Crafty bloggers use lots of images. We write tutorials with photos or post pictures of our finished projects. Every single post I publish has at least one image in it – usually more than one.
When I first started blogging I didn’t realize how important my images were. Yes, I wanted to share a picture of what I was writing about, but I didn’t spend a lot of time on the images. Now I do. Let me explain why and share my tips along the way.
Quality and Quantity
Tip 1: Size
Readers notice your pictures. Sometimes it is the first thing they notice. So make them big enough to grab their attention. I usually put a picture first in my post before the text and my images are usually 400 pixels wide. That size fits well in my layout. So experiment with your layout and see how different sizes look.
On the other hand, images that are too big can take a long time to load. Photos from my DSLR camera are huge files, so when I edit them I export them in a much smaller file size to use on my blog. It doesn’t compromise the quality of the picture but it does make them load quicker when someone visits my page. I use Picasa to edit and export photos and I export them at 640 pixels.
Tip 2: How many per post?
There are various opinions about how many pictures are too many in a post. I think it depends on what type of post you are writing. Tutorials can need a picture to explain each step.
I think about the purpose of my pictures. I use pictures to
- break up chunks of text,
- to illustrate my text and
- to show the details of my projects.
If the picture doesn’t have a purpose that you can identify, perhaps you don’t need it.
Tip 3: Quality
I’m no expert photographer. But I try to get the best photos I can and spend time learning about how to do that. There are lots of blogs and sites online that have tutorials for taking different types of photos. Read. Learn. Practice.
I’ve also learnt to use photo editing software like Picasa (which is free) to fix my photos to some degree. I can crop, adjust the colours and add borders and text.
Tip 5: Copyright Images
Many images out there online are copyright. You can’t just copy them and pop them into your blog. Well, you can, but you risk getting in trouble from the owner of the image. So be careful about images you download.
The best way to avoid copyright issues is to use your own photos.
If you do decide to use an image from another blogger or website, I would suggest you only use one, you link back very clearly, and if it is from another blog, let the blogger know you have linked to them. Many bloggers are happy to have their posts shared with one image but look for instructions on every blog as every blogger is different.
Tip 4: Watermark or text
Many bloggers and photographers add text to their photos. It is a way of marking the pictures as theirs even if someone uses them elsewhere. In an online world where it is common to share pictures on Facebook, Twitter, Google+ and Pinterest, it is smart to have your name or website on them. Then if there is no link back to your blog, then it is there, on the picture. If you make that text slightly transparent it is called a “watermark”. There are a few ways to add text or watermarks. I wrote a tutorial on how I add text using Picasa, a free program.
Images and Search Engines
When I first started blogging, I didn’t realise that images can be searched by search engines. If I want to find a picture of a doily, I can search Google Images, for “doily” and it will show me images that link back to the sites where they are posted. So the images I post on my blog can be searched by others.
Or can they?
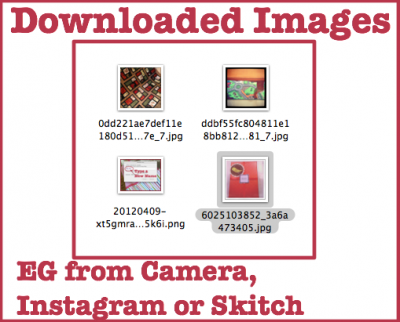
If all my images are called something like “8723576182793589465.png” or “img_4397.jpg” that tells the search engine nothing about what that image looks like. It doesn’t tell anyone what kind of craft I used or what colour it is.
So I learnt how I can make my images more likely to be found by others and enhance my blog as well.
Tip 5: Rename Images
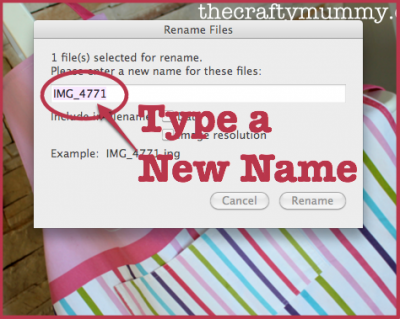
Change those strings of numbers into names that describe the image. Use the keywords that someone might use to search if you can. I rename my photos in Picasa before I export them. If I want to use Instagram photos or Skitch images in my blog posts, I download them to my computer then rename them in my Finder (on my Mac) or in File Manager (on Windows).
Tip 6: Add Alternate Text
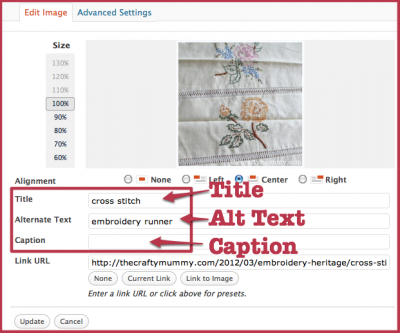
On WordPress blogs, you have the option to add “Alt Text” to your images after you’ve added them to your post. The Alt Text doesn’t appear on your post, but it appears in the code behind your post. Search engines can read the code and see the Alt Text. It provides an alternative to the name of your image.
So even if your images are already uploaded and you’ve forgotten to rename them, you can add a description in the Alt Text box. If you have renamed them, you can add further details in the Alt Text.
Tip 7: Select a Featured Image
Another item you might see in your WordPress post editor is the option to set a Featured Image. This is one image that is then associated with that post. Some blog themes or plugins pull the featured image to appear in Archives or Excerpts, like the partial posts at the bottom of my Homepage. It can also be pulled to Facebook, Google+ or Pinterest when your post is shared there.
Tip 8: Share Your Images
Just as your share your posts on social media, share your images. A great image can really grab attention and bring visitors to your post. You can share images easily on Twitter, Facebook, Google + and Pinterest.
You can also make it easy for your readers to share them by having sharing buttons on your blog and your posts. I use floating Digg Digg buttons which I love because I can choose which buttons appear in the group. There are lots of sharing buttons available so choose whichever ones you like the look of, but have something that makes it easy for others to click. If its easy, they will click!
Tip 9: Create Images to Share
You have probably heard of Pinterest, one of the hottest social media sharing options right now. It is ALL about images. You can pin images to your pinboards which your followers can then see. Get all the details from this post by Blogging with Amy.
I read a great post recently about Pinterest (read it here from The Nester) suggesting that you could create images particularly in the hope that they will be shared on Pinterest. This involves adding words to yor images so that they include the title of your post or information that reminds the pinner what the post was about. Very clever!
Tip 10: Look at what others are doing
Which leads to my next point: look at what others are doing with their images. There are some fabulous clever bloggers out there! Every day I see images that I wish I had taken!
So be inspired.
Look at how people take their images and how they edit them. Look at what images are being shared and think about how you could apply what you see to your own images.
WordPress Image Plugins
I use a couple of plugins on WordPress that relate to images so I thought I’d share:
WordPress Shadows Plugin – I use this to add shadows to my images
WordPress Simple Image Link Plugin – This is an easy way to add images to your sidebar. I often use it to add images from my Madeit store.
Snazzy Archives – creates gorgeous archives with images for each post. (Note: I don’t have this one turned on at the moment)
WP Facebook Open Graph Protocol – Have you ever shared a post on Facebook only to have an image from your sidebar appear instead of the post image you expected? This plugin will fix that.
Link Within – adds a row of pictures under each of your post that link to your related posts
Digg Digg – for sharing buttons
I also highly recommend Picasa for free photo editing. I have written quite a few tutorials on Picasa too.
Edit: This is a helpful link about using Smushit! on WordPress and particularly Genesis blogs.
Phew! Over to you: how do you use images on your blog? What would be your Top Tip?


Hi Crafty Mummy – I found this really helpful, thanks. Any suggestions for my site would be greatly appreciated ; )
Thanks -e
I’d be happy to visit your site if you’d left a link, Mrs S
Ooops!
//mrssabbatical.blogspot.com.au
Have a fab weekend
Thanks for the tips – the one goal I have for my blog this year is to improve my photography skills.
I do make sure that I have a “standard” size image for my blog – I think that’s the one thing I’ve learned. Now, if only I could take better pictures!!
This was so useful! Thankyou! I’m bookmarking this page for future reference. I had no idea how the alt text thing worked!
Fabulous tips! Thanks so much for sharing this.
Thanks for the list of useful plugins! Especially liked Digg Digg one. I have been searching for a good plugin to help sharing from my site, this should help me out 🙂
You’re welcome! I like Digg Digg. And the same people make something called BufferApp which lets you schedule your sharing to Facebook and Twitter from your toolbar – love that one too! You can find it here
Thanks! Really appreciate it 🙂
A very interesting post, thank you.
Great article Tonya!
Thanks Janelle!
Great post! I would have never thought of sharing images in addition to sharing posts! Thanks for the tips 🙂
Great post! Lots of tips anyone can apply. Maybe I’ll check out some new plugins, but will have to swap some out if I find some as I don’t want my load times to lag. Thanks for tips.
Thanks for all the info. I pinned this post. I’m on WordPress.com so plugins won’t work for me. I’m already using alt text but I’m going to start using your other tips.
Annamaria