I’ve written before about how to crop photos in Picasa. I generally crop my photos square for my blog posts, but did you know you can crop them to any size you want to? This is super useful when you want a picture exactly the right size for your Facebook Timeline Cover or your Madeit store header.
You can set those Custom Aspect Ratios (or sizes) in your Picasa software and it will save them for later on. So next time you want to change your Timeline cover, the size is there for you. I often crop a photo of my latest project to go into my Facebook page to highlight that project.
Here’s a list of the extra custom sizes you might use:
- Facebook Timeline Cover: 850 x 315
- Facebook Photos or Tab Buttons: 204 x 291
- WordPress Blog Header: 960 x 240
- Blogger Blog Header: 960 x 250
- Madeit Store Header: 950 x 200
- Sidebar Buttons: 125 x 125 OR 250 x 125
- Google Plus Cover Picture: 940 x 180
- Google Plus Profile Picture: 250 x 250
You can set up Custom Aspect Ratios in whatever sizes you need. So say your blog sidebar is 250 pixels wide, you might create a couple of different rectangles that are 250 wide for buttons or ads that you want to put there.
How To Create Custom Sizes:
- Open your photo in Picasa (If you don’t have it yet, download it for free here.)
- Click the Crop option to open the cropping screen
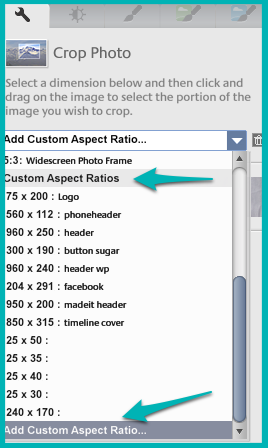
- Roll down the Menu to choose the crop size
- Right at the bottom of the list choose “Add Custom Aspect Ratio”
- Type in the dimension you want e.g. 960 x 250
- Give your new size a name if you want to use it for a particular purpose, or leave the name blank.
- Click OK.
- Now you should see that size in the list to choose each time you crop photos.
What other custom sizes do you use?


I agree Tonya, this is a great tool. I use it all the time, most recently on a collage for one of my posts…..T
Thanks for your suggestions for cropping.
Would you know how to form a border using a duplicate photo from a central photo? It would be in the middel and above it would be a series of smaller photos forming a top border.
Any help gratefully received.
Regards,
Sally.
Hi Sally, Sounds like you want to make a collage. You can do this in Picasa too. Select all the pictures you want in your collage, then choose “Picture Collage” under the “Create” Menu at the top.
There are a bunch of different layouts for collages but to get the design you describe, I would use the Picture Pile option. With this one you can drag each image to put it where you want it and resize each one as well.
Otherwise you can use the Frame Mosaic option to lay a bunch of pictures around a central picture.
I wrote a tutorial for collages here: http://thecraftymummy.com/2012/02/how-to-make-a-collage-with-picasa/
Thank you so much for describing this feature love it. I discovered the pencil/drawing effect. It really is a matter of playing around, right?
I think so, Carina. I wish I had more time to play with the different features!
Tonya,
I’ve found your website and wondered if you could help my wife and I out. We have started using Picasa 3 in Windows Vista/Internet Explorer- a nessity as our old computer crashed and took with it the Photo Editor we were using and used to. That was a version of Ulead Explorer. We are getting to grips with Picasa with regard to cropping and editing but cannot print in the way we have before. Every time we get a photo up to print it just puts the photo in the middle of a sheet, eg A4. We cannot seem to find any way of ‘moving’ the picture to say ‘top left’. We are sure we will use a lot of photo paper this way- and waste a lot. Can you shed any light on this issue please.
We live in the UK and I am a cricketer so I hope the first Test is a good one. If we beat the Aussies I hope you will still be good enough to reply!!
Regards,
Dave