The Crafty Mummy

Crafts. Sewing. Quilting. Crochet. Tutorials.

  • Start Here
  • Welcome
    • Subscribe
    • About Me
      • Copyright
      • Disclosure
      • Privacy Policies
    • Advertise
    • Sharing
      • Recommendations
      • Shopping & Coupons
      • Books
  • Explore
    • Crafts
      • Beading
      • Kids
      • Paint
      • Storage
      • Christmas Crafts
    • Sewing
    • Quilting
    • Stitching
    • Crochet
      • Yarn
    • Life
      • Food
      • Organisation
    • Blogging
      • How To
      • Social Media
      • WordPress Plugins
      • Photography
  • Tutorials
    • Tips
  • Shop on Etsy
  • Shop on Redbubble

Seat Belt Cover Tutorial

by Tonya Grant |Filed Under: Sewing, Tutorials Tagged With: Tops of 2015 Get a Weekly Update of all Articles

Learn how to make a padded seat belt cover from a few scraps, padding and some velcro - the kids will never complain about the seat belts in the car again!

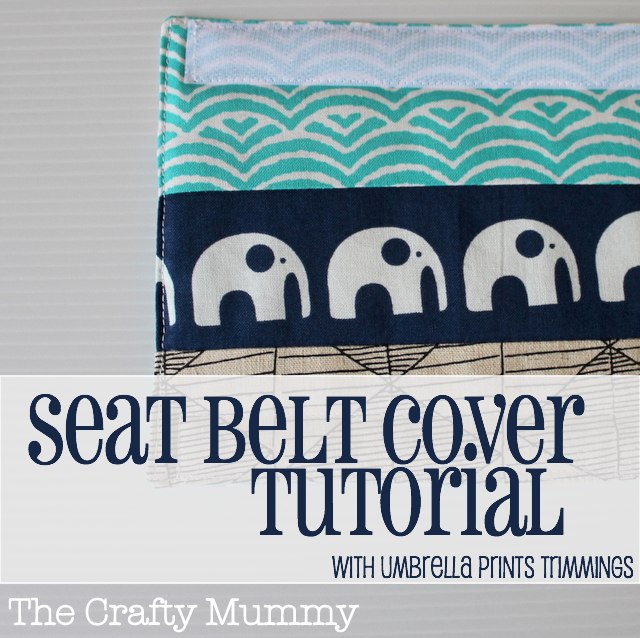
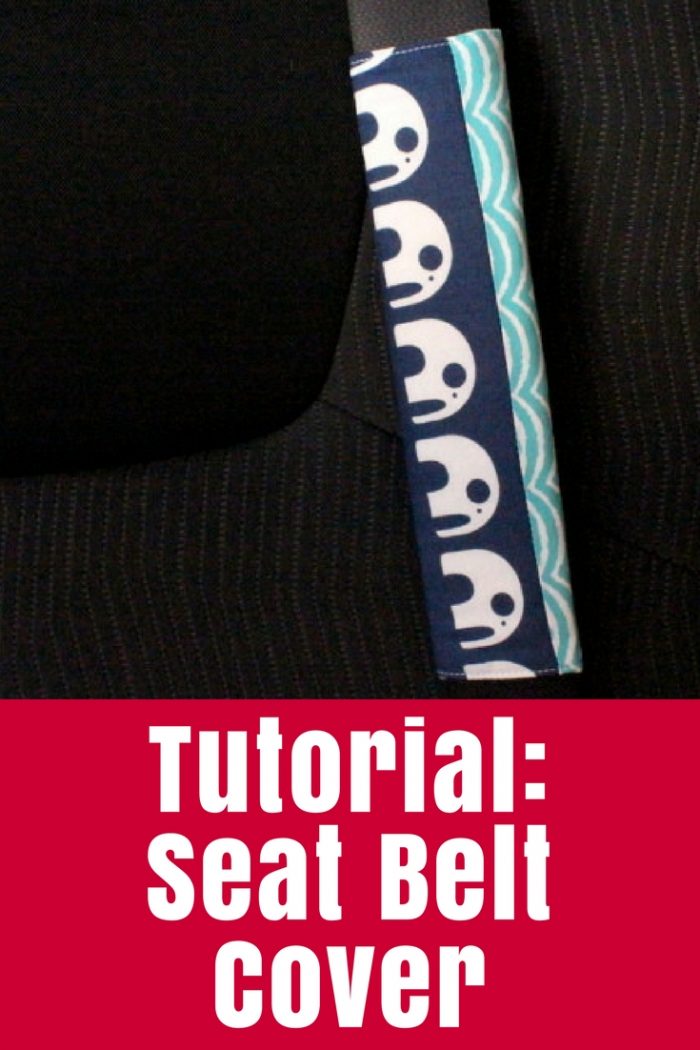
After sharing my Padded Seat Belt Cover post last week, I got a lot of messages asking how to make these. Today I’m going to share how I made mine, plus show you a second one I made out of gorgeous Umbrella Prints fabric for the Trimmings Competition. Umbrella Prints make printed organic fabric and artworks from their studio in South Australia, and each year run a competition showcasing trimmings from their fabric collection.

umbrella prints trimmings comp 2013

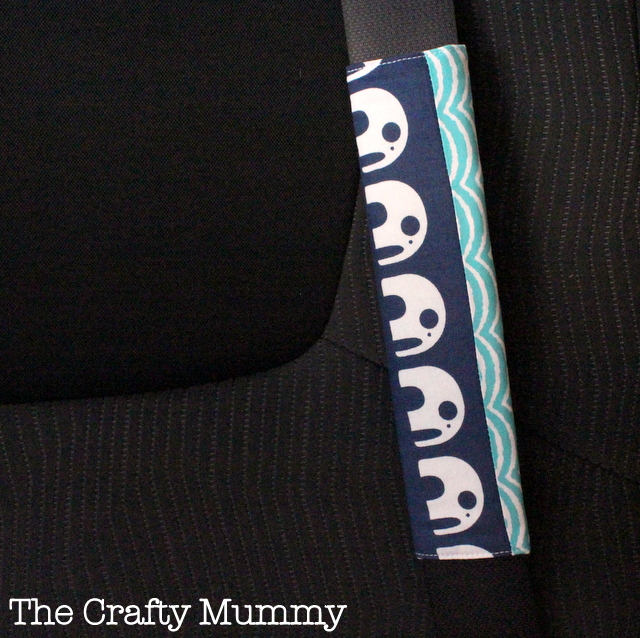
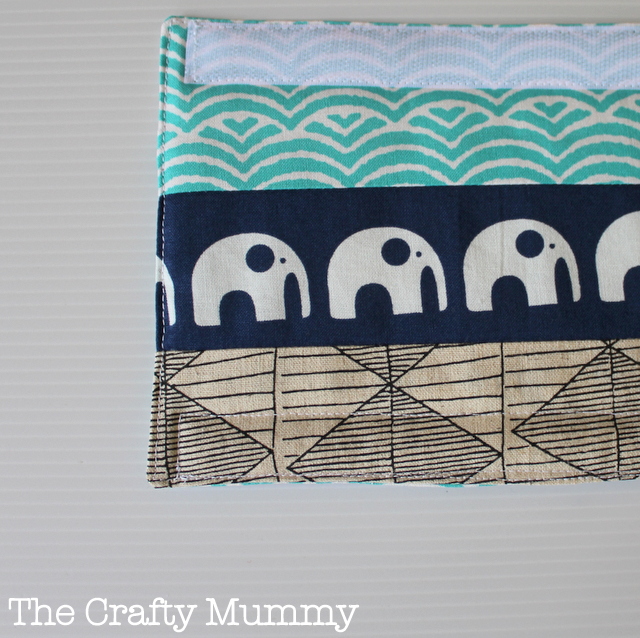
This is the pack of trimmings that I bought. I think my favourite piece is the navy elephants but Little Miss loves the aqua pieces so this was a great pack to use on a second seat belt cover for her.

patchwork seat belt cover

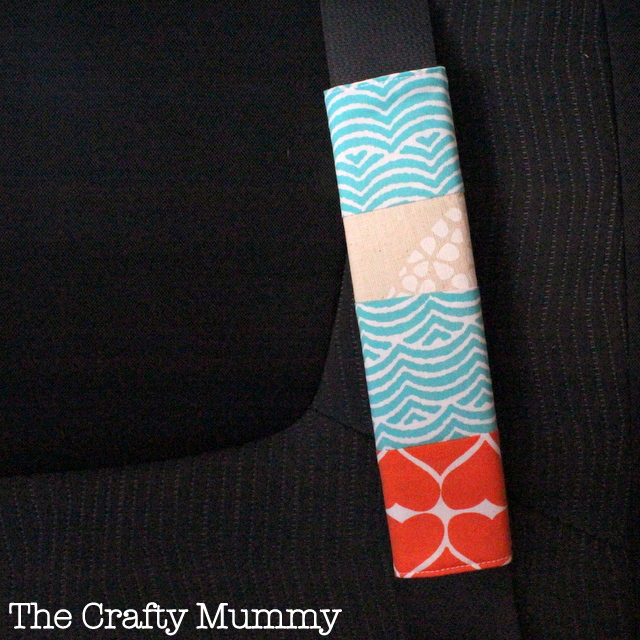
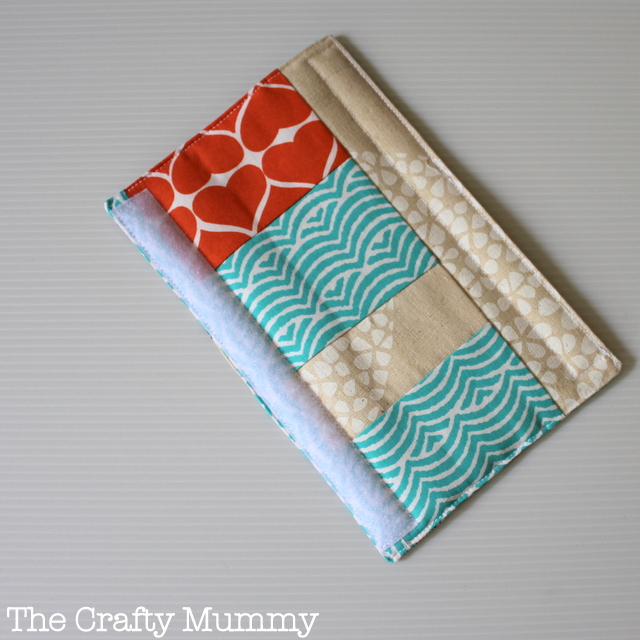
This seat belt cover is reversible so while I like it with the elephants marching down the belt, Little Miss likes the orange hearts and aqua scallops on display.

patchwork reversible seat belt cover

What You Need

  • Two pieces of fabric, 9″ x 6″
  • One piece of iron-on pellon (or similar padding) 8.5″ x 5.5″
  • Velcro (hook-and-loop fastener) – 8″ piece
  • Sewing machine and usual sewing supplies (thread, pins, scissors)

patchwork seat belt cover

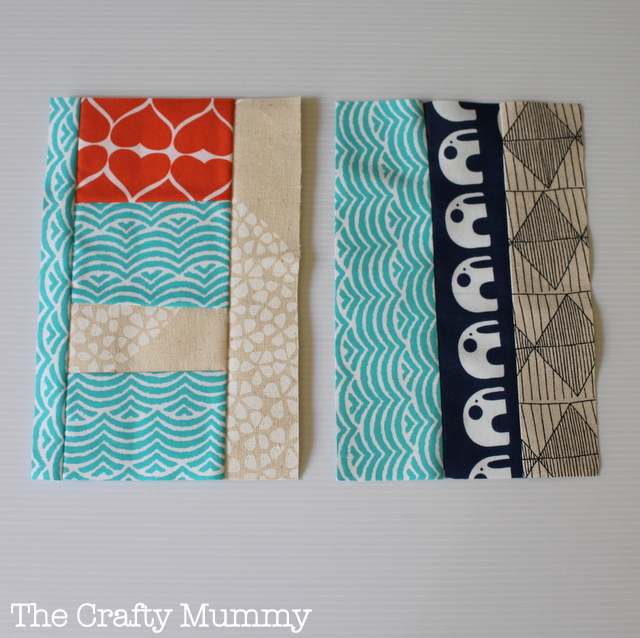
I created my two pieces of fabric from my Umbrella Prints trimmings, but you could easily just use two pieces of fabric. These are 9″ x 6″. My first seat belt cover started with 10″ x 6″ pieces so either size will work fine. If you want to make a cover for a child’s seat belt in a car seat, you could even make your pieces 6″ x 6″.

patchwork seat belt cover clipping corners

What To Do

  • Cut your fabric pieces
  • Iron on the pellon to the wrong side of one piece of fabric
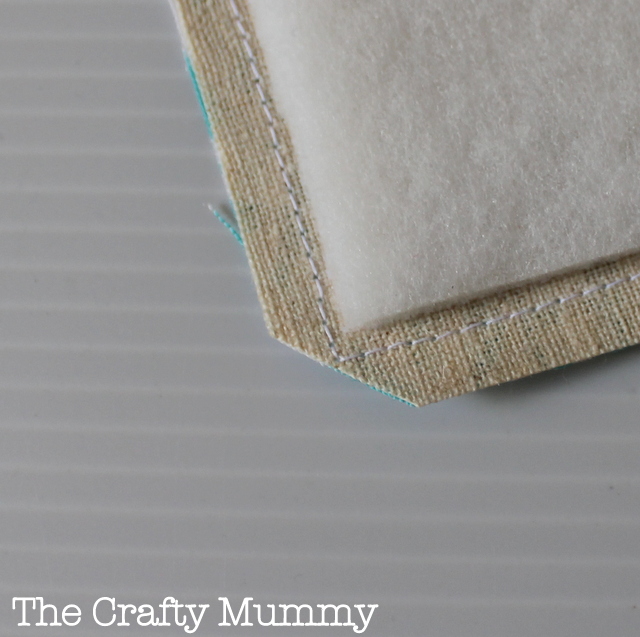
  • Pin the fabric pieces right sides together and sew around the outside about 1/4″ in, leaving a gap of about 3″ for turning through
  • Clip the corners (like the picture above)
  • Turn the cover through and press
  • Top stitch around the outside edge as close to the edge as you can to close the gap and create a neat finish
  • Separate your piece of Velcro into the hook piece and the loop piece
  • Pin one piece along the long edge on one side. Flip the whole cover over and pin the matching Velcro piece on the opposite edge on the other side. (When you wrap the cover around the seat belt the two pieces of Velcro should match up so wrap it to check you have them placed correctly)
  • Sew the two pieces of Velcro into place

seat belt cover tutorial

All done and ready to go on the seat belt. I wrapped our cover so that the Velcro fastening was flat against the seat belt and away from the neck.

seat belt cover tutorial

Tips

  • Velcro is thicker than fabric so I find that I need to sew a little slower than usual to sew it neatly.
  • You could quilt your cover after you’ve placed the velcro to add an extra texture.
  • My patchwork piecing on this was partly inspired by a new book I bought recently, Quilting Modern. Find it here:

quilting modern

More Easy Sewing Projects to Try

sewing machine mat with pocket tutorial

rainbow bean bag stack chair bag done
Learn how to make a padded seat belt cover from a few scraps, padding and some velcro - the kids will never complain about the seat belts in the car again!

Filed Under: Sewing, Tutorials Tagged With: Tops of 2015

« Mother’s Day Gifts: Vases & Bottles
Instagram: How to Delete Comments »
Disclosure: There are affiliate links in this post.  This just means that if you click through and choose to purchase something I may get a small commission - at no extra cost to you, of course.  This helps me keep the content here at The Crafty Mummy free for everyone.

I love to chat so please leave me a comment or ask a question.

Don't stress if your comment doesn't appear immediately - sometimes I have to moderate comments thanks to spam visitors, but the comments from real readers will always get published. Scroll down to add your thoughts or ask a question.

Comments

  1. Chantal Vandenberg says

    May 6, 2013 at 12:20 PM

    What a great idea! I love the mix of fabrics and the end result? BRILLIANT!!

    • CraftyMummy says

      May 7, 2013 at 10:00 AM

      Thanks, Chantal

  2. Laura G.Turcotte says

    May 7, 2013 at 10:41 AM

    This is FABULOUS!!! Love it—definitely making one, or two, or three…….Thank you for having such amazing tuts on your blog!

    • CraftyMummy says

      May 7, 2013 at 11:24 AM

      Thanks Laura! Tutorials are the most popular things I write so I’ve been trying hard to write more of them

  3. Patrica McCollum says

    May 7, 2013 at 12:26 PM

    Hi Tonya~~Just wanted to say~~~I would love to design a seat belt for a man and I know just how it would close!! He He!! My seat belt covers are those generic black ones~~~so ugly!. I can’t wait to try making some of these in pretty fabrics!!
    PS~~~~~I love your blog!

  4. Robyn says

    May 7, 2013 at 9:55 PM

    I was just thinking yesterday of replacing my ratty looking seat belt cover with a nice made-by-me one and there you are. Thanks for the post.

  5. Sue says

    May 8, 2013 at 6:17 AM

    Love it. I hate it when the belt rubs against my neck. I’ll have to try this one. Thanks.

  6. Naomi Ward says

    May 8, 2013 at 10:22 AM

    wow! These are awesome! I had to go and buy some a couple of years ago for the car because I found the seatbelt digging in too much and not only was it difficult to find decent lookin ones, they weren’t exactly cheap!

    I am totally going to try these! 🙂

    Thankyou 🙂

  7. Monique - Your Cheeky Monkey says

    June 6, 2013 at 11:34 AM

    Thank you for entering your post in the DP blog carnival 🙂

  8. Robomum says

    June 30, 2013 at 10:50 PM

    How cute are they! I’m not much of a crafter but these look like a nice little starting point. DPBC visitor X

  9. Janine Evans says

    April 21, 2016 at 10:11 AM

    Adorable! These would make great kids presents when they move from a baby seat.

  10. Beckee Carrier says

    June 13, 2016 at 9:27 AM

    This looks so easy! I’ll be making one tonight! for my. daughter, who is a Type 1 Diabetic. I plan on having it embroidered with her name and “Type I Diabetic.

  11. Melissa @ Think Bowtique says

    June 24, 2016 at 11:12 AM

    These are great, mine had something similar when they were little.
    Looks quick and easy to make to.

  12. Angela says

    March 13, 2018 at 7:17 AM

    They are so beautiful! So I do have a question.. ????
    I really would love to have some of these But I don’t have a machine and don’t know how to sew. Is there anyway you can make me some and I pay you for them?
    Thanks,Angela ????

    • Tonya Grant says

      March 13, 2018 at 11:24 AM

      Hi Angela,
      I’m not making these to sell at the moment but why not try this Etsy shop – she has lots in stock and takes custom orders too: https://www.awin1.com/cread.php?awinmid=10781&awinaffid=243329&clickref=&p=https%3A%2F%2Fwww.etsy.com%2Fau%2Fshop%2FBurpieBibsBoutique
      Have a great day,
      Tonya

  13. Tiziana Facciolla Cassar says

    August 25, 2019 at 11:09 PM

    Thanks so much for this tutorial; managed to make one for my eldest in no time at all and she is loving it <3

Hi! I’m the CraftyMummy

Tonya is the voice behind The Crafty Mummy. She dabbles in lots of different crafts – patchwork, quilting, cross-stitch, scrapbooking, knitting, crochet and sewing. This is the record of projects she has done, and the projects she dreams of getting to! Read More…

Search

  • Email
  • Facebook
  • Instagram
  • Pinterest
  • Twitter
  • YouTube
Shop my Affiliate Favourites

Fat Quarter Shop for Fabric and More

Grab the Sew Sampler Box Here

AccuQuilt for Cutting Machines and Dies

QuiltyBox for Monthly Treats in the Mail

CreativeBug for Craft Classes

Pretty Darn Cute for Blog Designs like mine

Creative Market for Fonts, Images, Themes and More

OzGameShop for All the Games

Adrift for Fashion you’ll Love

Kindle Unlimited Membership Plans

Kindle Book List

Click to shop my kindle book list
Shop my Amazon Influencer Shop
Join the CrochetU and learn to crochet
New to TheCraftyMummy.com? Click here to see more
Blog Tools I use for TheCraftyMummy.com

Grammarly

Aweber for email newsletter

CoSchedule to stay organised and share

Milotree for social media

Genesis for blog framework

FoodiePro is my theme

Hosting with WPEngine

Powered by

Recent Articles

Disclosure: There are affiliate links on this site. This means that I may get a commission if you choose to purchase after browsing via these links - at absolutely no extra cost to you, of course. I only recommend products which I use and love, or that I think will be quality products that will be useful to my readers. It is the affiliate links in this site that help me keep my tutorials free of charge. Thank you!

Looking for something? Search here:

Copyright 2015 The Crafty Mummy · Built using Genesis Framework & Foodie Pro Theme