The Crafty Mummy

Crafts. Sewing. Quilting. Crochet. Tutorials.

  • Start Here
  • Welcome
    • Subscribe
    • About Me
      • Copyright
      • Disclosure
      • Privacy Policies
    • Advertise
    • Sharing
      • Recommendations
      • Shopping & Coupons
      • Books
  • Explore
    • Crafts
      • Beading
      • Kids
      • Paint
      • Storage
      • Christmas Crafts
    • Sewing
    • Quilting
    • Stitching
    • Crochet
      • Yarn
    • Life
      • Food
      • Organisation
    • Blogging
      • How To
      • Social Media
      • WordPress Plugins
      • Photography
  • Tutorials
    • Tips
  • Shop on Etsy
  • Shop on Redbubble

Quilting Tip: Using Two Rulers Together

by Tonya Grant |Filed Under: Quilting, Tutorials Tagged With: Tips, Tops of 2015 Get a Weekly Update of all Articles

A trick for using two rulers together to cut fabric.

I love my rotary cutter and perspex quilt rulers. I’d be lost without them on my cutting table! I love patchwork and these are the tools I use to create straight cuts and perfect pieces for my projects. In fact I use them for most of my small sewing projects when I’m cutting straight lines.

But sometimes they are not quite wide enough.

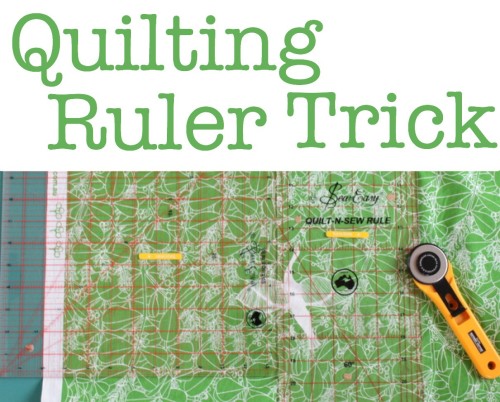
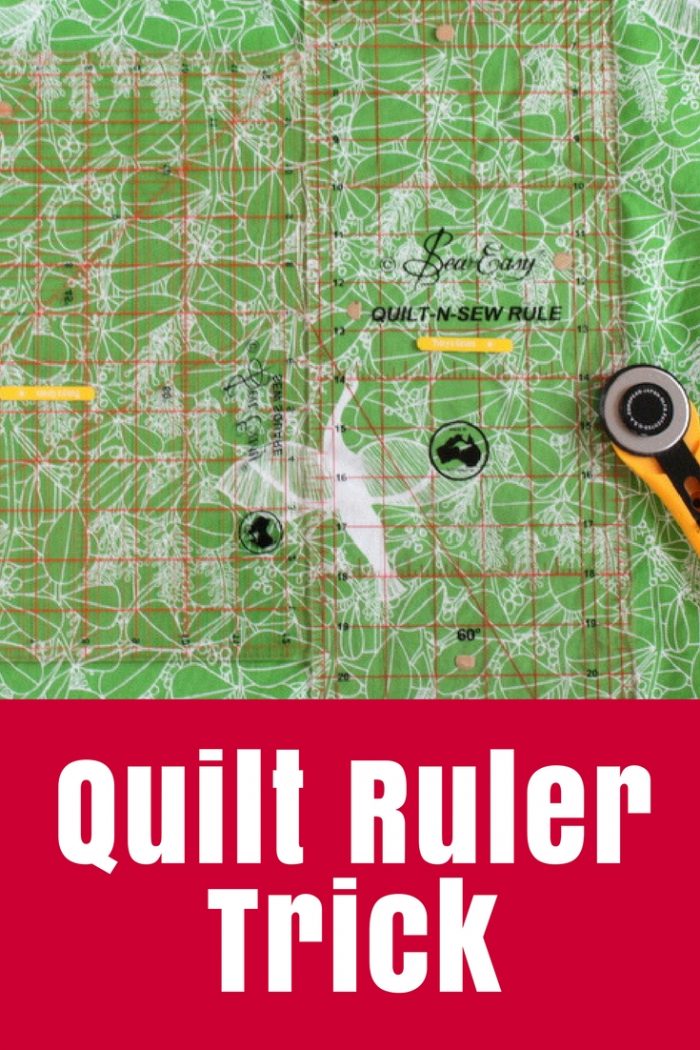
I have a 12.5″ square ruler and a long 6.5″ x 24″ ruler. This long ruler is perfect for cutting across the width of most fabric when it is folded in half. The square ruler is great for cutting smaller strips, rectangles and squares up to 12.5″.

How to Use Two Quilt Rulers Together

But what about cutting, say, a 17″ wide strip? Nether of my rulers are large enough but here’s the trick: you can use them together!

First a little math:

  • Long ruler = 6.5″ wide
  • Square ruler = 12.5″ wide
  • Together = 19″ wide

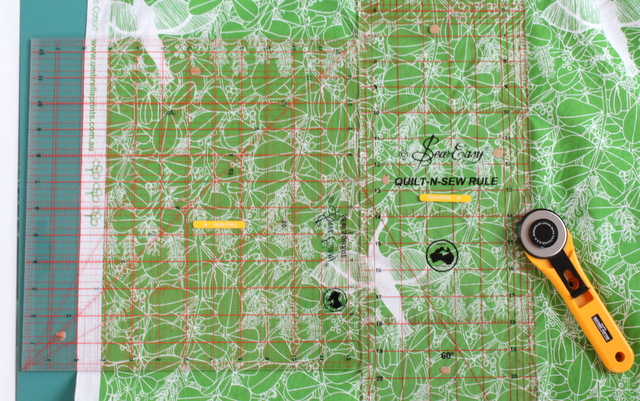
So to cut a strip 17″ wide, lay the two rulers together with the long one on the side where you want to cut – for me that’s the right-hand side. Make sure the two are resting against each other without any gap.

Then slide them to the left so that the edge of the fabric is in line with the 2″ line of the square ruler (like my picture).

Now instead of 19″ wide, you will only cut 17″ because 2″ of your ruler width is off the fabric.

Here’s the math again: 19 (the total width of the rulers) minus 17 (the width I want to cut) = 2 (the amount to slide off the fabric)

If you wanted to cut 14″, let 5″ slide off the edge of the fabric. (19 minus 15 = 5)

All ready to cut!

Tip: Always remember to use a cutting mat under your rulers to protect your tabletop.

quilt ruler trick

Different size rulers?

If you have different size rulers, just do your math in the same way:

  • Width of ruler one = ??
  • Width of ruler two = ??
  • Together (“total ruler width”) = ??
  • Total ruler width minus the width you want to cut = ?? (the amount you want to slide off the edge of your fabric)


A trick for using two rulers together to cut fabric.

Filed Under: Quilting, Tutorials Tagged With: Tips, Tops of 2015

« Tools I Use: Chrome
Top Posts of April 2014 »
Disclosure: There are affiliate links in this post.  This just means that if you click through and choose to purchase something I may get a small commission - at no extra cost to you, of course.  This helps me keep the content here at The Crafty Mummy free for everyone.

I love to chat so please leave me a comment or ask a question.

Don't stress if your comment doesn't appear immediately - sometimes I have to moderate comments thanks to spam visitors, but the comments from real readers will always get published. Scroll down to add your thoughts or ask a question.

Comments

  1. D Ivone says

    October 3, 2021 at 3:52 AM

    Hello, I tried signing up for your weekly updates and special freebie, however, your site is not accepting my email address. Can you advise?

    • Tonya Grant says

      October 3, 2021 at 4:58 PM

      Hi D, I have added your email manually to the list – I’m not sure why it rejects some addresses sometimes! Tonya

Hi! I’m the CraftyMummy

Tonya is the voice behind The Crafty Mummy. She dabbles in lots of different crafts – patchwork, quilting, cross-stitch, scrapbooking, knitting, crochet and sewing. This is the record of projects she has done, and the projects she dreams of getting to! Read More…

Search

  • Email
  • Facebook
  • Instagram
  • Pinterest
  • Twitter
  • YouTube
Shop my Affiliate Favourites

Fat Quarter Shop for Fabric and More

Grab the Sew Sampler Box Here

AccuQuilt for Cutting Machines and Dies

QuiltyBox for Monthly Treats in the Mail

CreativeBug for Craft Classes

Pretty Darn Cute for Blog Designs like mine

Creative Market for Fonts, Images, Themes and More

OzGameShop for All the Games

Adrift for Fashion you’ll Love

Kindle Unlimited Membership Plans

Kindle Book List

Click to shop my kindle book list
Shop my Amazon Influencer Shop
Join the CrochetU and learn to crochet
New to TheCraftyMummy.com? Click here to see more
Blog Tools I use for TheCraftyMummy.com

Grammarly

Aweber for email newsletter

CoSchedule to stay organised and share

Milotree for social media

Genesis for blog framework

FoodiePro is my theme

Hosting with WPEngine

Powered by

Recent Articles

Disclosure: There are affiliate links on this site. This means that I may get a commission if you choose to purchase after browsing via these links - at absolutely no extra cost to you, of course. I only recommend products which I use and love, or that I think will be quality products that will be useful to my readers. It is the affiliate links in this site that help me keep my tutorials free of charge. Thank you!

Looking for something? Search here:

Copyright 2015 The Crafty Mummy · Built using Genesis Framework & Foodie Pro Theme