Today I’m so pleased to welcome Renee from About The Garden. When Renee told me she had made lots of the pretties for her own wedding and wanted to share, I just couldn’t resist! Here is all about how she made her fabric flowers.
I decided from the start, that my wedding was going to be a handmade crafting experience from start to finish. I viewed it as an opportunity to stretch my crafting skills, buy some new craft equipment (shhhh…. don’t tell my husband) and spend some time with my daughter, who is becoming increasingly craft addicted…. YAY! So when it came to ‘bouquets’ and ‘corsages’, I decided to try making shabby chic fabric flowers to fit with my vintage theme, something I’d never done before.
Supplies
- Synthetic Satin (you want a fabric that will ‘melt’ well, so not a cotton or silk base)
- Chiffon
- Buttons
- Scissors
- Felt circles (cut your own or purchase from craft store)
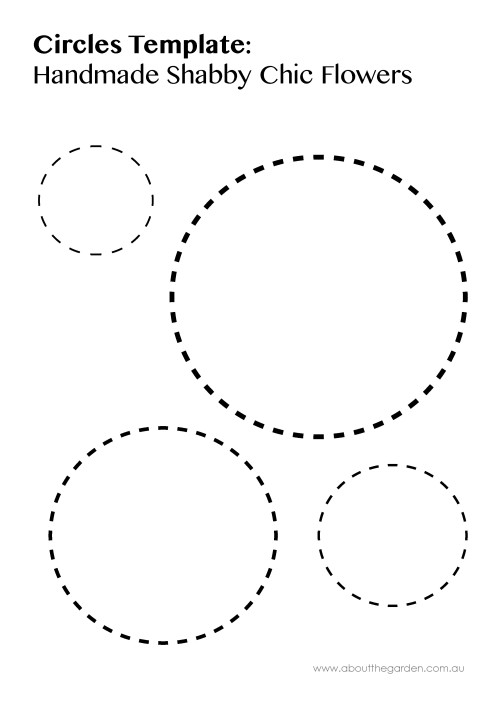
- Printed copy of ‘Circles Template: Handmade Shabby Chic Flowers’
- Hot Glue Gun
- Small bowl water
- Candle
- Tweezers
How to Make Shabby Chic Flowers
Step 1: Cutting
The first step was to cut the circles out (to make it easier for you, I made up the ‘Circles Template’ that you can print off). To make cutting the circles a quicker job, I stacked the fabric on itself and pin my rough ‘Circle Templates’ to the fabric. I was cutting up to ten layers of fabric at a time in four different sizes. I made smaller fabric layers for my daughter to cut through.
If you find your circles are not perfectly round, don’t stress. I didn’t find this a problem later on. If anything it added to the shabbiness of the finished flowers.
Step 2: Melting
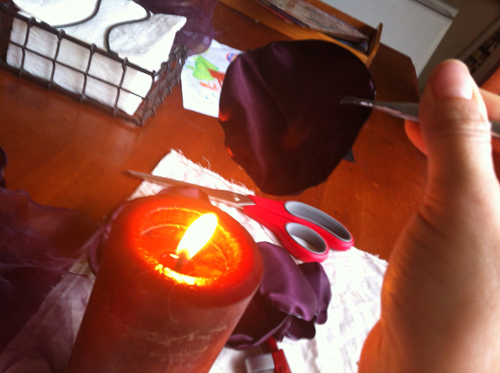
To stop the fabric fraying and also to create dimension to the fabric circles, I melted the edges. I did this by holding my circle fabric piece with a pair of tweezers, then slowly twisting the fabric edge over a candle flame.
It is a good idea to have your windows open and a bowl of water nearby for this part. I had a few little ‘fires’ when I left the fabric over the flame for too long, quickly extinguished with a ‘dunk’ in the water bowl.
Also be mindful when using synthetics that you can’t ‘brush it off’ if it melts onto your skin (ouch), so keep your fingers away from the hot edge and just be vigilant if little people are around. I didn’t allow my daughter to do this part, but she was very helpful in passing me an endless supply of fabric circles.
Step 3: Gluing
The glueing portion of my fabric flowers was divided into two parts:
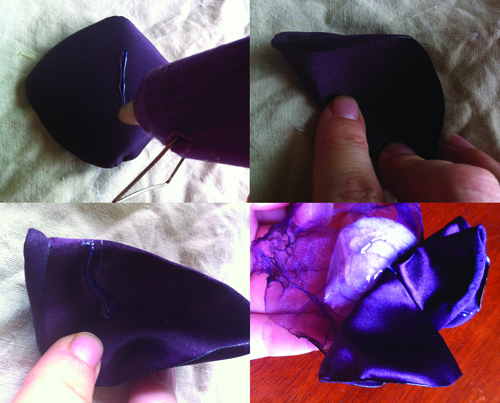
Part 1: To make the flowers ‘fuller’ in appearance, I turned many of the medium-sized fabric circles into triangle shapes. This was achieved by:
1. Applying glue down the middle of the fabric circle and folding in half to cool.
2. Applying glue down the middle again of the now triangle piece of fabric and repeating the folding process. Four triangles make a full flower centre.
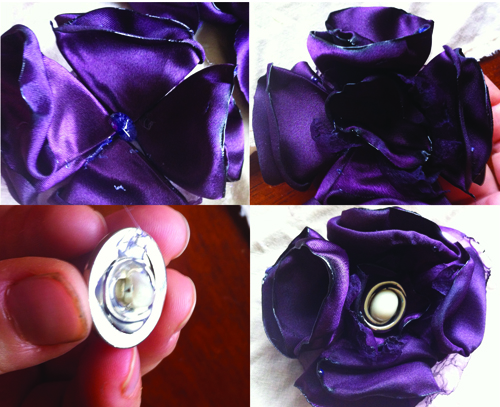
Part 2: Once the triangles were completed, I glued the flower together. I found the best effect was applying the individual pieces in the following pattern:
1. Glue large chiffon circle to felt circle base.
2. Glue the four triangle fabric pieces on top of the chiffon circle.
3. Glue a medium or small chiffon circle on top of the triangle pieces; use only a small amount of glue in the centre.
4. Glue the smallest circle of satin in the centre
5. Glue a button in the middle, I used recycled vintage buttons to go with my ‘repurpose, reuse’ vintage theme.
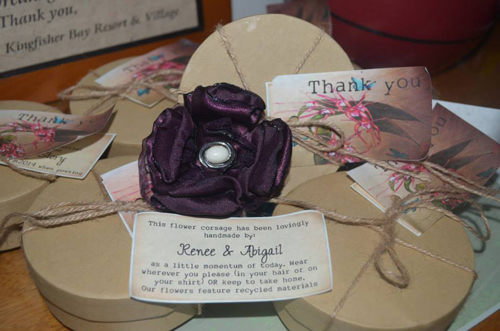
I used these flowers in my bouquet, centrepiece, my headpiece and also corsages. They were so adorable and really added something special to my vintage theme.
HAPPY CRAFTING
Hi, I’m Renee and I’m a self-confessed fun maker. Whilst I’m not the world’s best gardener (I’ve killed cactus), I believe that getting my kids gardening is one of the most important experiences I can give them as a parent. It’s my way to teach them about the environment, food production, healthy living, science and sustainable practices in a fun and physical way. I love that they are willing to taste our garden produce and that we incorporate many of our garden ‘treasures’ into our craft activities. So don’t let past gardening failures burden you, we’ve all killed plants and that’s OK. Just get out there and garden with your kids, because….. well….. it’s fun Find more of my garden fun here www.aboutthegarden.com.au or on Facebook.


I love this post because it’s so well written and illustrates step by step how to create something new, but if I were to try this, I’d have to rename them “nailed it flowers” before I even start!
These are so lovely!