The Crafty Mummy

Crafts. Sewing. Quilting. Crochet. Tutorials.

  • Start Here
  • Welcome
    • Subscribe
    • About Me
      • Copyright
      • Disclosure
      • Privacy Policies
    • Advertise
    • Sharing
      • Recommendations
      • Shopping & Coupons
      • Books
  • Explore
    • Crafts
      • Beading
      • Kids
      • Paint
      • Storage
      • Christmas Crafts
    • Sewing
    • Quilting
    • Stitching
    • Crochet
      • Yarn
    • Life
      • Food
      • Organisation
    • Blogging
      • How To
      • Social Media
      • WordPress Plugins
      • Photography
  • Tutorials
    • Tips
  • Shop on Etsy
  • Shop on Redbubble

Star Quilt Finished!

by Tonya Grant |Filed Under: Quilting Tagged With: Craftsy, Stars Get a Weekly Update of all Articles

My latest quilt finish: a star quilt wall hanging to go in our entrance hall with echo straight line quilting.

star quilt finished

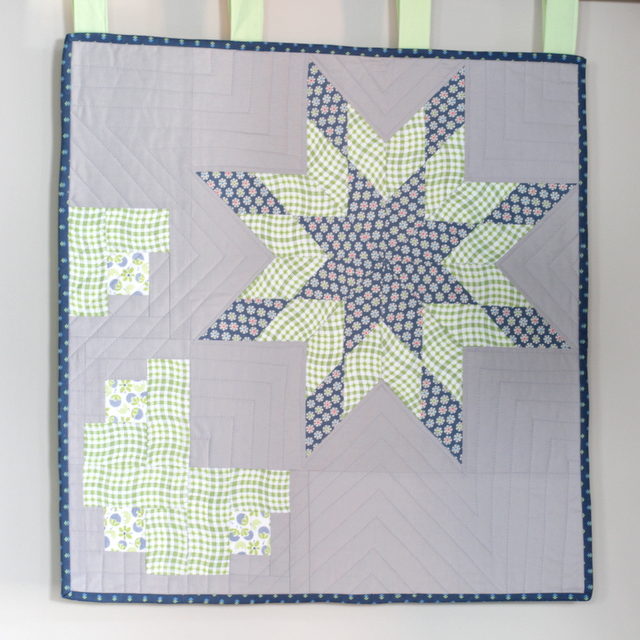
Ta da! My star quilt is all finished! The star of this quilt – forgive the pun! – is a block called LeMoyne Star so I think of it as my Star Quilt.

star quilt instagram

I was showing pictures on Instagram and Facebook last week of the quilting I was doing on this one, but here is the finished quilt.

You might recognise these blocks from the Craftsy Block of the Month 2013. This was a free class on Craftsy which made a bunch of different blocks and taught various techniques as you made them. I’m a self-taught quilter mostly so I picked up lots of tips and tricks by doing this course. It was also super convenient as Craftsy classes can be taken at your own pace and you can always watch the videos again if you need to. I made most of the blocks in the class, but I never got around to joining them into a quilt. Finally I decided that I would use my favourites in some small projects rather than fell I should join them all as the class had done.

star quilt quilting

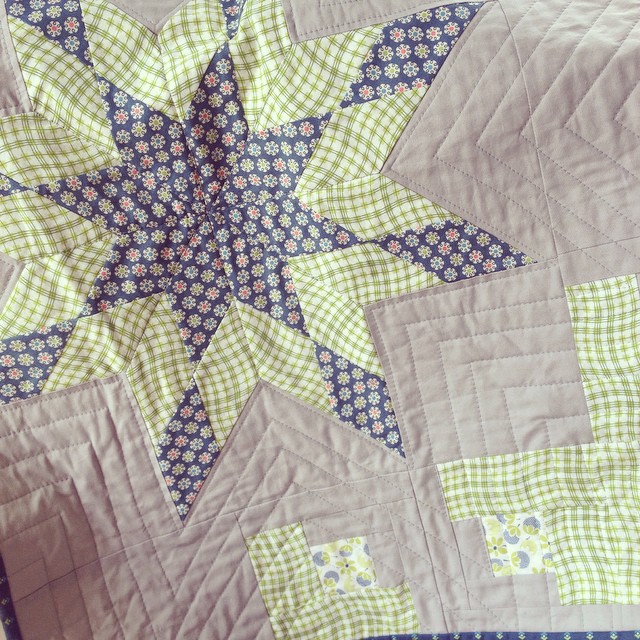
This quilt is hanging on the wall in our entrance  and is made up from two months worth of the class blocks. The large block is the LeMoyne Star which is my favourite from the entire course. I love stars anyway, and I had often thought of making one of these stars but always thought they looked so hard. In fact, it wasn’t as hard to piece as I had expected. I chose a mix of navy and green fabrics on the same grey background I used for all the blocks.

In the bottom corner and up the side you can see four smaller blocks called Offset Log Cabin. These included the green fabric I used in the star so they were a perfect set to match up for this small quilt. I added some extra grey panels to make the quilt square and another navy print for the binding.

star quilting lines

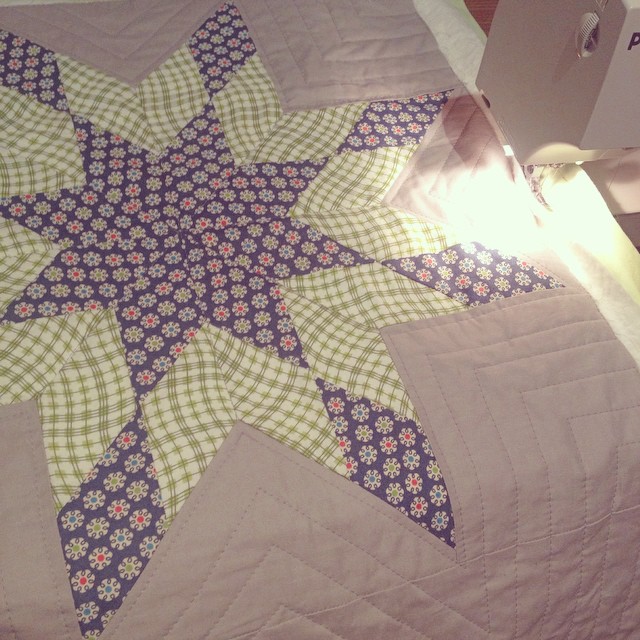
Once I had pieced my quilt and gotten it ready for quilting, I needed to decide on a quilting pattern. I decided to go with straight line quilting with my walking foot. I like how easy this is compared to free motion quilting and I’m really happy with the result. I went around the star then echoed the line, around and around until I reached the edges of the quilt. My lines are not perfect – some are closer or further apart than others – but I’m still happy with it. Those little imperfections just give it interest and from a distance they are not very noticeable. I used grey thread to match the background so the quilting creates texture rather than being another design feature. Within the star I stitched ‘in the ditch’ across the inner points just to secure the layers together.

I am actually taking another Craftsy class at the moment all about quilting with the walking foot and picking up more ideas for straight line and curved quilting so I will share more about that another day.

Remember those Wonderclips I mentioned in my Sewing Machine Mat post? The ones I got from Sew Box Subscriptions? Well, they were great for the binding of this quilt. I used them just as I have previously used pegs.

star quilt wonder clips

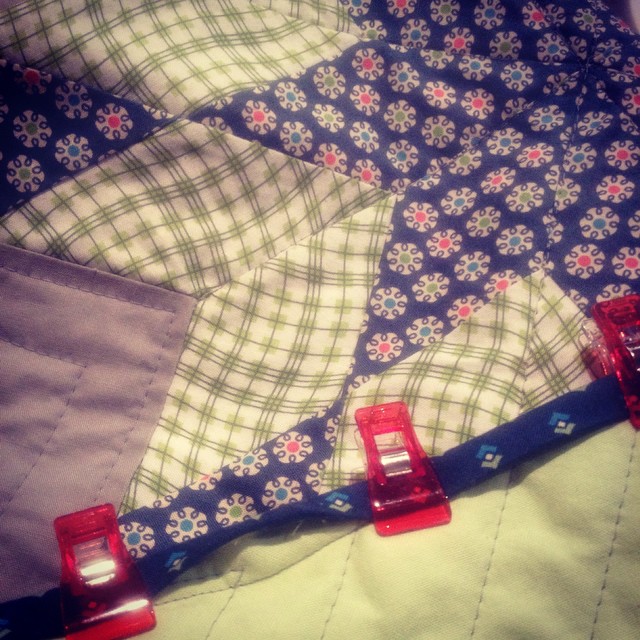
Find the Birch Wonderclips I used to hold my binding while I hand stitched the back on Amazon – Affiliate link:

Finally, after finishing off the binding, I added some simple fabric loops so that I could hang this quilt from my wooden shelf. It looks lovely near our front door!

You might also recognise this quilt from this post:

tutorial how to spray baste a quilt

Craftsy

Disclosure: There are affiliate links in this post – which means you pay no extra but I get a little payment if you click through these links then purchase something. Thanks for helping me keep this site running!
Summary
Star Quilt Finished
Article Title
Star Quilt Finished
Description
My latest quilt finish: a star quilt wall hanging to go in our entrance hall with echo straight line quilting.
Author
Tonya Grant
Published on
TheCraftyMummy.com

Filed Under: Quilting Tagged With: Craftsy, Stars

« Tutorial: Sewing Machine Mat with Pockets
Washi Tape Mail Holders »
Disclosure: There are affiliate links in this post.  This just means that if you click through and choose to purchase something I may get a small commission - at no extra cost to you, of course.  This helps me keep the content here at The Crafty Mummy free for everyone.

I love to chat so please leave me a comment or ask a question.

Don't stress if your comment doesn't appear immediately - sometimes I have to moderate comments thanks to spam visitors, but the comments from real readers will always get published. Scroll down to add your thoughts or ask a question.

Hi! I’m the CraftyMummy

Tonya is the voice behind The Crafty Mummy. She dabbles in lots of different crafts – patchwork, quilting, cross-stitch, scrapbooking, knitting, crochet and sewing. This is the record of projects she has done, and the projects she dreams of getting to! Read More…

Search

  • Email
  • Facebook
  • Instagram
  • Pinterest
  • Twitter
  • YouTube
Shop my Affiliate Favourites

Fat Quarter Shop for Fabric and More

Grab the Sew Sampler Box Here

AccuQuilt for Cutting Machines and Dies

QuiltyBox for Monthly Treats in the Mail

CreativeBug for Craft Classes

Pretty Darn Cute for Blog Designs like mine

Creative Market for Fonts, Images, Themes and More

OzGameShop for All the Games

Adrift for Fashion you’ll Love

Kindle Unlimited Membership Plans

Kindle Book List

Click to shop my kindle book list
Shop my Amazon Influencer Shop
Join the CrochetU and learn to crochet
New to TheCraftyMummy.com? Click here to see more
Blog Tools I use for TheCraftyMummy.com

Grammarly

Aweber for email newsletter

CoSchedule to stay organised and share

Milotree for social media

Genesis for blog framework

FoodiePro is my theme

Hosting with WPEngine

Powered by

Recent Articles

Disclosure: There are affiliate links on this site. This means that I may get a commission if you choose to purchase after browsing via these links - at absolutely no extra cost to you, of course. I only recommend products which I use and love, or that I think will be quality products that will be useful to my readers. It is the affiliate links in this site that help me keep my tutorials free of charge. Thank you!

Looking for something? Search here:

Copyright 2015 The Crafty Mummy · Built using Genesis Framework & Foodie Pro Theme