The Crafty Mummy

Crafts. Sewing. Quilting. Crochet. Tutorials.

  • Start Here
  • Welcome
    • Subscribe
    • About Me
      • Copyright
      • Disclosure
      • Privacy Policies
    • Advertise
    • Sharing
      • Recommendations
      • Shopping & Coupons
      • Books
  • Explore
    • Crafts
      • Beading
      • Kids
      • Paint
      • Storage
      • Christmas Crafts
    • Sewing
    • Quilting
    • Stitching
    • Crochet
      • Yarn
    • Life
      • Food
      • Organisation
    • Blogging
      • How To
      • Social Media
      • WordPress Plugins
      • Photography
  • Tutorials
    • Tips
  • Shop on Etsy
  • Shop on Redbubble

How to Add Borders in Picasa 3

by Tonya Grant |Filed Under: How To, Photography Tagged With: Picasa, Reader Questions, Tops of 2015 Get a Weekly Update of all Articles

How to Add Borders in Picasa 3

Reader Question

Thanks to Patsy for the following question:

What I originally queried was about using Borders in Picasa 3, so I hope you can help me.

I have a portrait cropped to 5x7in, saved it, then tried to add caption space, moving slider about ¾ of the way across so I can put name on white background.

When I do this it changes to a 6x4in format. I thought that I had success with this some time ago, but just can’t remember what I did.

Crafty Answer

I originally wrote about adding borders to pictures in Picasa a couple of years ago and Picasa has had a couple of updates since then. The version I use now is Picasa 3.

Picasa 3 - cropped image-1

To answer Patsy’s question, I tried to do as she was trying to do: add a border with a caption space to a picture that was cropped to 5×7.

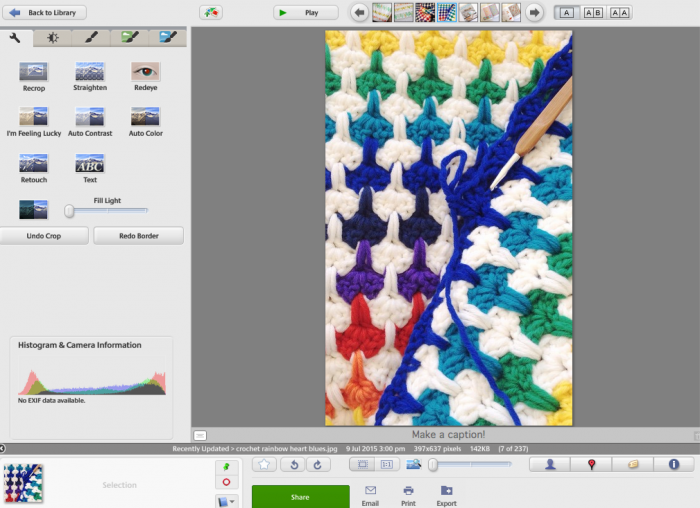
Here is my cropped picture to start with. Mine is cropped to 5×8 as I didn’t want to create a special 5×7 option, but the steps to add a border will be the same no matter what size your cropped image is.

Crop your photo first.

Picasa 3 add border

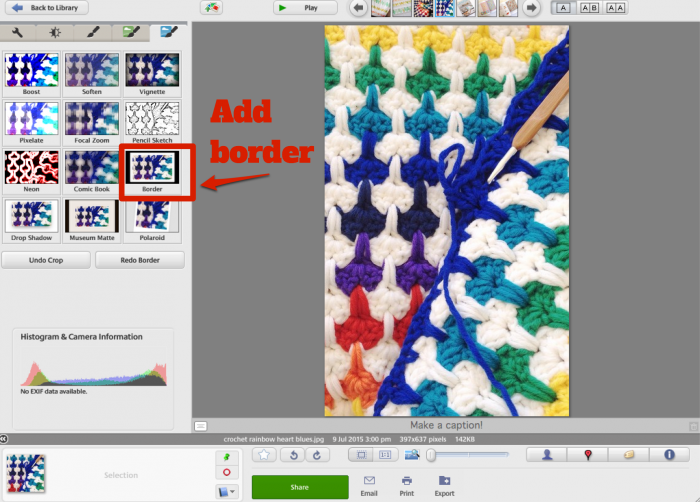
Next go to the last menu on the right where you will find the Border option. When you click this, you will get a double border around your image in black and white like the image below.

You can adjust the width of the two borders by sliding the Outer Thickness and Inner Thickness sliders. You can change the colours just above that.

To get rid of one of the borders simply slide one of the sliders all the way to the left and that border will disappear.

If you want rounded corners on your image, use the Corner Radius slider.

Picasa 3 add caption-1

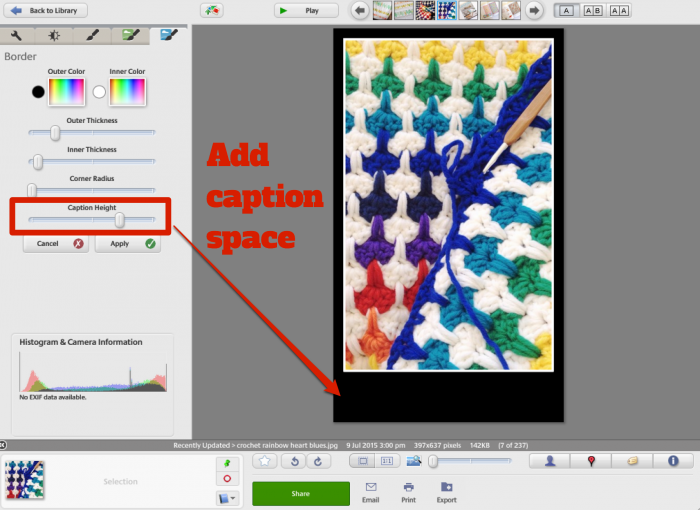
To add the caption space to the bottom of the image, slide the Caption Height slider to the right. The size of the image as a whole will be adjusted so that the size with the borders is still the size that you cropped your image originally. This is default in the program and I couldn’t find any way to change it. It will make your image a little smaller depending on the size of your borders and caption height.

Click Apply to save the borders when you have them the way you want them.

Text Tip: If you want to add text in your caption space, go back to the first menu on the left and click the Text button.

I hope this helps, Patsy. I’m not sure why your version would have been changing the image size but hopefully using this step-by-step will solve it for you.

If you have a crafty question that you think I could help with, feel free to send me an email or leave it on this post:

Ask a Crafty Question

Filed Under: How To, Photography Tagged With: Picasa, Reader Questions, Tops of 2015

« 10 Ways to Find More Time to Craft
How to Use Acrylic Templates »
Disclosure: There are affiliate links in this post.  This just means that if you click through and choose to purchase something I may get a small commission - at no extra cost to you, of course.  This helps me keep the content here at The Crafty Mummy free for everyone.

I love to chat so please leave me a comment or ask a question.

Don't stress if your comment doesn't appear immediately - sometimes I have to moderate comments thanks to spam visitors, but the comments from real readers will always get published. Scroll down to add your thoughts or ask a question.

Comments

  1. Faith says

    July 28, 2015 at 6:08 AM

    Thanks for this! I love Picasa and this will really come in handy.

  2. Debbie says

    May 13, 2018 at 1:36 AM

    Hello, thank you for your help!! I to love picasa but am having a problem when I go to print a picture with the border or borders around the picture. When I print it shows correct in the editing mode but when I go to print the picture part of the border is missing. Sometimes it works beautifully and other times it just won’t work and I’m doing the same thing I think. Any help from you would be awesome. I love your page and you are truly the craft mummy! Thank you very much!! Debbie, a follower

Hi! I’m the CraftyMummy

Tonya is the voice behind The Crafty Mummy. She dabbles in lots of different crafts – patchwork, quilting, cross-stitch, scrapbooking, knitting, crochet and sewing. This is the record of projects she has done, and the projects she dreams of getting to! Read More…

Search

  • Email
  • Facebook
  • Instagram
  • Pinterest
  • Twitter
  • YouTube
Shop my Affiliate Favourites

Fat Quarter Shop for Fabric and More

Grab the Sew Sampler Box Here

AccuQuilt for Cutting Machines and Dies

QuiltyBox for Monthly Treats in the Mail

CreativeBug for Craft Classes

Pretty Darn Cute for Blog Designs like mine

Creative Market for Fonts, Images, Themes and More

OzGameShop for All the Games

Adrift for Fashion you’ll Love

Kindle Unlimited Membership Plans

Kindle Book List

Click to shop my kindle book list
Shop my Amazon Influencer Shop
Join the CrochetU and learn to crochet
New to TheCraftyMummy.com? Click here to see more
Blog Tools I use for TheCraftyMummy.com

Grammarly

Aweber for email newsletter

CoSchedule to stay organised and share

Milotree for social media

Genesis for blog framework

FoodiePro is my theme

Hosting with WPEngine

Powered by

Recent Articles

Disclosure: There are affiliate links on this site. This means that I may get a commission if you choose to purchase after browsing via these links - at absolutely no extra cost to you, of course. I only recommend products which I use and love, or that I think will be quality products that will be useful to my readers. It is the affiliate links in this site that help me keep my tutorials free of charge. Thank you!

Looking for something? Search here:

Copyright 2015 The Crafty Mummy · Built using Genesis Framework & Foodie Pro Theme