The Crafty Mummy

Crafts. Sewing. Quilting. Crochet. Tutorials.

  • Start Here
  • Welcome
    • Subscribe
    • About Me
      • Copyright
      • Disclosure
      • Privacy Policies
    • Advertise
    • Sharing
      • Recommendations
      • Shopping & Coupons
      • Books
  • Explore
    • Crafts
      • Beading
      • Kids
      • Paint
      • Storage
      • Christmas Crafts
    • Sewing
    • Quilting
    • Stitching
    • Crochet
      • Yarn
    • Life
      • Food
      • Organisation
    • Blogging
      • How To
      • Social Media
      • WordPress Plugins
      • Photography
  • Tutorials
    • Tips
  • Shop on Etsy
  • Shop on Redbubble

How to Mend a Seam

by Tonya Grant |Filed Under: Sewing, Tutorials Get a Weekly Update of all Articles

mend split seam

I was making the bed the other day when I realised that my doona cover had a split in the seam. This cover is made of a bunch of different fabrics joined in panels and one of the joins was gaping just a little. (You can see the whole bed in this post if you’re curious.) When I looked closely I think I may have mended this seam by hand once before but the stitches have pulled out. So it was time to mend it properly with the sewing machine.

mend split seam inside

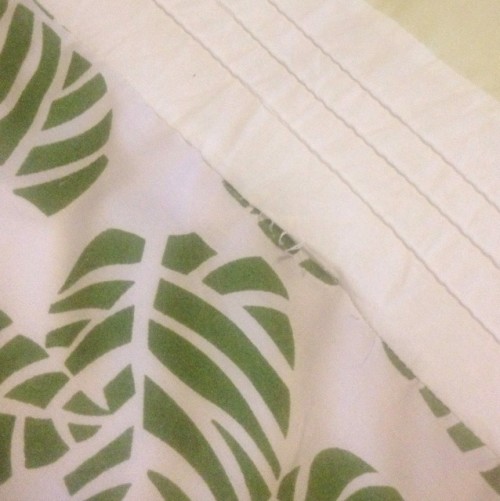
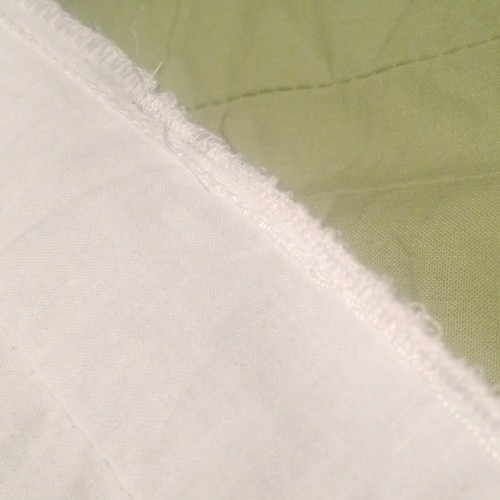
Here’s what the inside of the seam looked like. The fabric had unravelled a little at the edge and pulled out of the seam. This method of fixing a seam will work for any item including clothes. Start by turning the item inside out so you can see where the seam is split.

how to mend a split seam

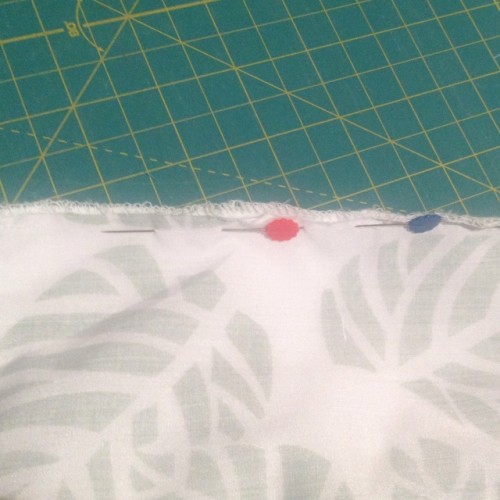
The first step is to line up the seam in place again and pin it. Fold the fabric back so that the two pieces of edge to be re-joined are lying flat against each other. You should be able to see the original stitching line where it is still joining the fabric on either side of the hole.

stitch seam on top of old stitching line

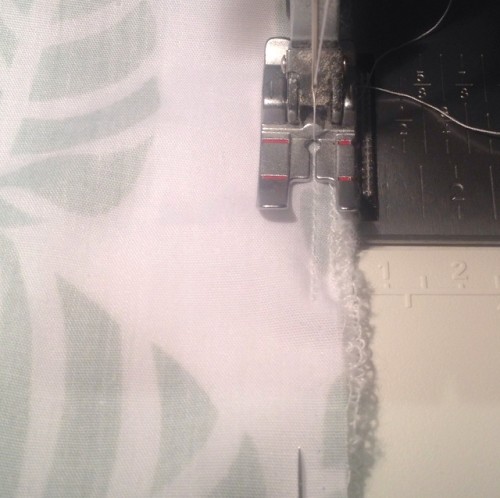
Once you have it pinned flat you’re ready to take it to your sewing machine. Lay the seam under the sewing foot but start a couple of centimetres back from the hole. The goal is to sewing straight over the existing stitch line then over the split section and join up with the stitching on the other side. In this case it is a nice straight piece of sewing so it is easy to see where the line goes. On most items the stitching line will run just a little bit in from the edge of the fabric. If the fabric has frayed too much you might need to create a new stitching line where the fabric is still solid.

mended seam zig zag edges

Once I had joined the seam I decided to try to reduce the fraying as well. The original stitching had been done on an overlocker or serger, but I decided to run a zigzag stitch along the edge. With the stitch length quite short, the zigzag ends up like a satin stitch and easily seals the edge again. Turn through. Press. All done!

You could also mend a seam like this by hand stitching if you don’t have a sewing machine handy. Just use the same principle for lining up the seam and then stitch with needle and thread.

tutorial mend a seam


Filed Under: Sewing, Tutorials

« Recycled Pyjamas for Kids
Simple Coasters Tutorial »
Disclosure: There are affiliate links in this post.  This just means that if you click through and choose to purchase something I may get a small commission - at no extra cost to you, of course.  This helps me keep the content here at The Crafty Mummy free for everyone.

I love to chat so please leave me a comment or ask a question.

Don't stress if your comment doesn't appear immediately - sometimes I have to moderate comments thanks to spam visitors, but the comments from real readers will always get published. Scroll down to add your thoughts or ask a question.

Hi! I’m the CraftyMummy

Tonya is the voice behind The Crafty Mummy. She dabbles in lots of different crafts – patchwork, quilting, cross-stitch, scrapbooking, knitting, crochet and sewing. This is the record of projects she has done, and the projects she dreams of getting to! Read More…

Search

  • Email
  • Facebook
  • Instagram
  • Pinterest
  • Twitter
  • YouTube
Shop my Affiliate Favourites

Fat Quarter Shop for Fabric and More

Grab the Sew Sampler Box Here

AccuQuilt for Cutting Machines and Dies

QuiltyBox for Monthly Treats in the Mail

CreativeBug for Craft Classes

Pretty Darn Cute for Blog Designs like mine

Creative Market for Fonts, Images, Themes and More

OzGameShop for All the Games

Adrift for Fashion you’ll Love

Kindle Unlimited Membership Plans

Kindle Book List

Click to shop my kindle book list
Shop my Amazon Influencer Shop
Join the CrochetU and learn to crochet
New to TheCraftyMummy.com? Click here to see more
Blog Tools I use for TheCraftyMummy.com

Grammarly

Aweber for email newsletter

CoSchedule to stay organised and share

Milotree for social media

Genesis for blog framework

FoodiePro is my theme

Hosting with WPEngine

Powered by

Recent Articles

Disclosure: There are affiliate links on this site. This means that I may get a commission if you choose to purchase after browsing via these links - at absolutely no extra cost to you, of course. I only recommend products which I use and love, or that I think will be quality products that will be useful to my readers. It is the affiliate links in this site that help me keep my tutorials free of charge. Thank you!

Looking for something? Search here:

Copyright 2015 The Crafty Mummy · Built using Genesis Framework & Foodie Pro Theme