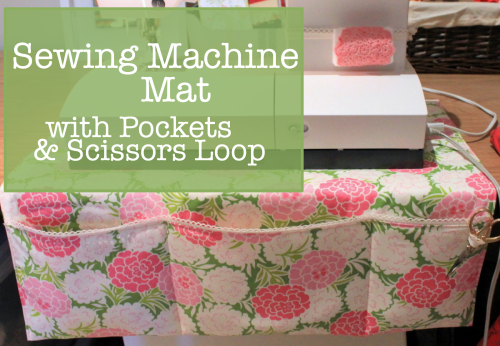
A few years ago now I decided to make a mat to go under my sewing machine to protect my table top and store various bits and pieces that I used all the time when I was sewing. At the time I made it up as I went along using some leftover jelly roll strips. A few people have asked over time for a tutorial and I have meant to write one, but this week I actually made a new and improved mat. This mat has an easier method, better finish and an extra scissors loop to keep my scissors right where I need them.
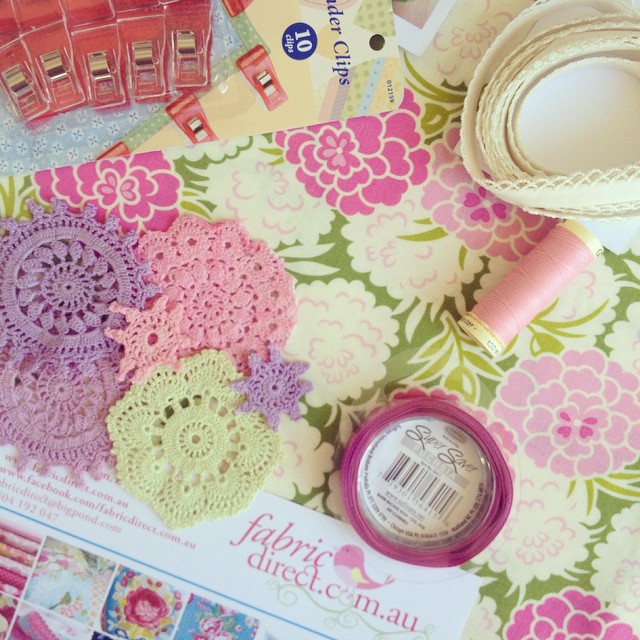
It also gave the chance to use some of the gorgeous items that arrived recently from Sew Box Subscriptions. I was lucky enough to receive one of the first boxes sent out in September from this new website and I was impressed. The presentation was gorgeous – a neat white box tied with pretty blue ribbon, and the contents were lovely. I have shared a few pictures on Instagram and Facebook where you can see the floral fabric, matching thread, dyed crochet doilies, unusual ribbon, Wonder Clips and some special vouchers. These boxes are available every month and you can sign up now at the Sew Box Subscriptions website.
But on to the tutorial!
Sew a Sewing Machine Mat with Pockets
What You Need
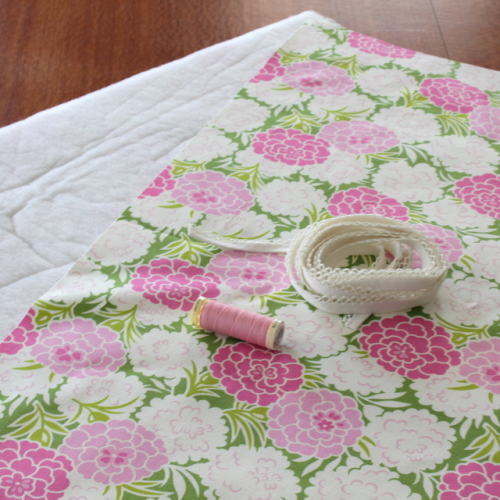
- 2 Rectangles of Fabric – 22″ x 26″ (If you want to adjust the size: 22″ is a little wider than the base of my sewing machine, 26″ is the depth of the mat plus the depth of the pocket x 2)
- 1 Rectangle of Iron-on Pellon – 21″ x 25″ (This is just slightly smaller than your fabric rectangles)
- Decorative Ribbon – 23″ long for pocket trim + 1.5″ for scissors loop (see note)
- Usual sewing supplies – thread, scissors, etc.
Note: The decorative ribbon I have used had a crochet loopy edge which made it perfect to use as a decoration of the edge of the pockets. You could get a similar look with lace or ric rac. (You can find this at Little Cherubs Craft)
What To Do
1. Iron the pellon onto the back of one of the fabric rectangles.
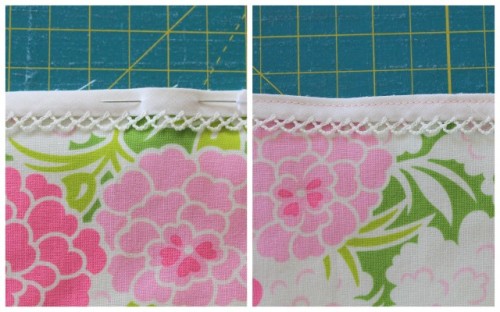
2. Lay the ribbon on the right side of the short edge of one of the rectangles. I used the one with pellon attached but either one will work. Lay it with the decorative edge away from the fabric edge and careful pin into place.
3. At the sewing machine, attach the ribbon to the fabric sewing just in from the edge – about 1/8″ or 2mm. This stitching won’t be seen on the finished edge – and that’s what we want – but it will hold the ribbon in place when we join the rectangles.

4. Lay one rectangle piece down right side up. Then lay the other rectangle on top right side down. Match the edges and pin in place. (Tip: I like the have the pellon on top so I can see it as I’m sewing and so it won’t get caught in the feed dogs of the sewing machine.)
5. Take to the sewing machine and stitch around the edge to join the two rectangles about 1/4″ or 5mm from the edge, leaving a gap of 6-8″ on one side for turning. (Tip: Don’t leave the gap on the edge with the ribbon trim – pick one of the other three sides. Oh, and having the gap in the middle of a side is easier than near a corner.)

6. Clip the corners (to remove bulk) and turn it through. Use a knitting needle or similar to push the corners out to nice points.
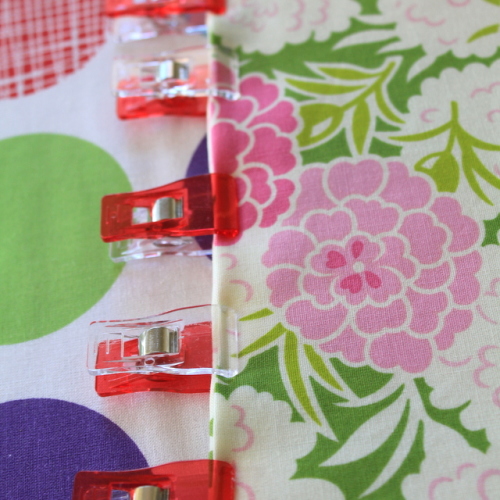
7. Carefully press the edges – be especially careful pressing the edge with the decorative ribbon – and tuck the edges of the gap into place. I clipped these with Wonder Clips that came in the Sew Box – much easier than pins!
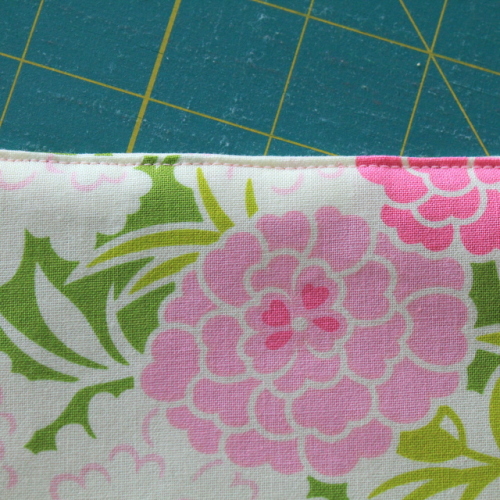
8. Sew around the whole rectangle 1/8″ from the edge – this “top stitching” will create a nice finish and close the gap as well. At the corners, stop with your needle down, lift the presser foot and pivot the fabric to go down the next side.
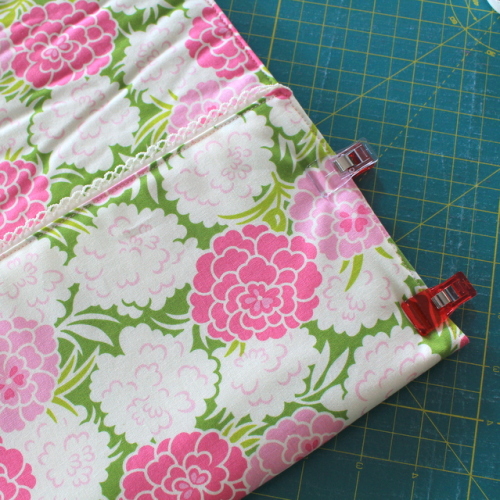
9. Fold up one short end to become the pocket. Mine is 6″ deep but you could adjust yours if you wish. Again I clipped mine with the Wonder Clips – I can see these are going to get lots of use!
10. Stitch up the two sides of the pocket – I tried to sew close to the top stitching but you could put your seam further in from the edge if you like.
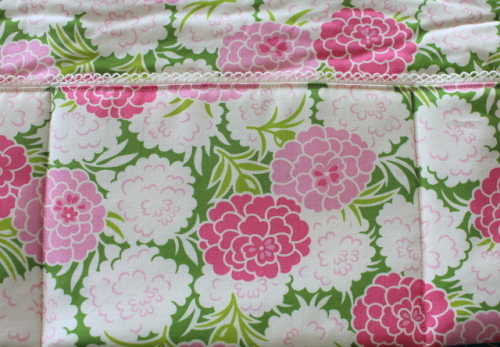
11. Divide the long pocket into sections. I chose three sections with the middle one wider than the other two, but think about what you will be putting in them and plan for the sizes you need. Just sew from the bottom of the pocket to the top to create the smaller pockets.
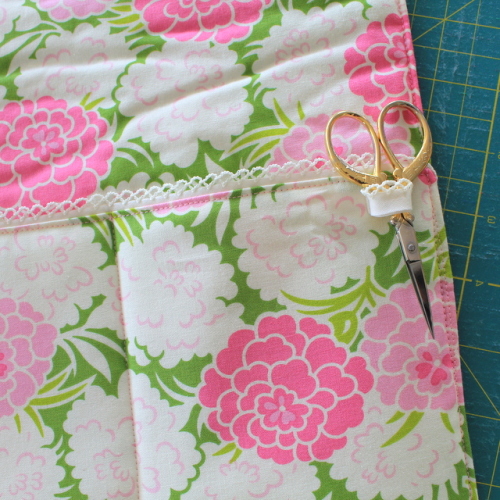
12. Add a little loop of ribbon to slip a pair of scissors into. This is just a small piece of ribbon in a circle and hand stitched onto the pocket. You could even add a couple more of these for other tools.
One more thing you can’t see in the pictures:
I quilted a couple of lines across the main section of the mat to keep the layers together. While the mat is on the table they are not going to shift, but if I ever have to wash it, I want the pieces to stay together, so some simple lines through all the layers will help that. I did this step last. If you want quilting on the pocket, you would need to quilt it before you folded it up into the pocket position.
Update: Sew Box Subscriptions are sadly no longer available.
But instead I’d suggest you check out these similar subscription boxes:

See my matching Sewing Machine Pincushion here.


Great tutorial thank you, and lovely to see the Sew Box contents in use. Thanks for sharing
You’re welcome, Caroline – rumour has it that the next box will be brights so I can’t wait to see that one too!
What a great idea – I recently purchased a converted sewing stand – it has a iron bottom and a beautiful walnut top- I’m so making this
Sounds like a beautiful sewing stand!
Love your sewing machine mat very pretty fabric. Definately be making one. I also like the subscription box. Will be organising that n a week or so
Glad to hear you love it, Irena! It really was a lovely kinda mail to receive!
Ran across your tutorial and it reminded me of a project I have wanted to do for ages. For me, your pockets in front won’t work because I sew with an old all metal Bernina–sweet machine with a lever by your knee that can raise the needle to turn fabric while sewing your heart out. So I sew next to my kitchen table on a wooden (sturdy) fold up table the perfect size, and my pocket or pockets would have to be like saddle bags, on the sides. Since I am right handed, the tools would be on the right hand side, and less needed supplies in the pockets on the left. I also use a home made chatelaine with great little sewing tools that hangs around my neck. I mourn that chatelaines are mere collectibles now, though I use my antique laying tool, and love my reproduction needle threaders and tape measures & needle cases. What is useful should also be beautiful, an idea from William Morris and his shaping of the Arts & Crafts movement. But I like your well-thought-out design, and it inspires me to get busy and finish my own. I have a bag of clothing that needs hemming and sleeve shortening. Thank you for the idea! Just have to love the internet.
Thanks for sharing, Tess – you’ve really thought this through!. Your antique tools sound divine!
Wow. I wonder if Sew Box really intends to come across sounding quite so negative? This is the first I have heard of them and they turn me off. Too bad!
Hi Sue,
I don’t think Sew Box wants to sound negative at all but they did want to honestly answer my questions and I think that’s fair enough. I have found them to be quite lovely in my dealings with them online over a number of months and I certainly enjoyed their product.
Thanks for taking the time to comment and share your impression – I’ll certainly let them know,
Tonya
This is incredibly cute! I don’t have need of one myself but it would be a great gift for any fellow sewers. Bookmarked!
I stumbled across this on Pinterest and then read about the Sew Box Subscriptions! I immediately wanted one but then realized its only in Australia. Bummer- we’re in the states. Maybe I can convince them to bring it across the ocean to us.
Made the sewing mat and love it. It only took me a couple hours start to finish and it’ll be super helpful to have all my stuff in one spot.
Thanks for posting!
I made my sewing machine mat with shelf liner backing. I like the idea of putting the pockets at the sides. I am looking for a pattern for a childs activities bag. It’s construction is much like the sewing machine mat.
I am needing one of these so your tutorial is just in time. My sewing table shares a sewing machine and a serger so I may make it even wider to accommodate both.
I have two questions. Is the Pellon you used a fusible fleece? And can the scissor loop be added before stitching the seams? So you don’t have to hand sew it later.
Thanks so much!
Hi Brenda, I didn’t but you could definitely use fusible fleece, and yes you could add the scissors loop into a seam. Have fun making yours!
Thank you for your reply! What type interfacing did you use? Was it a heavyweight Pellon?
I am looking forward to making one of these.
Mine wasn’t super heavy weight, Brenda. I just wanted to provide a little padding to protect my table.
Awesome instructions. Made a mat for my serger that now holds the tweezers, etc. Thank you for sharing.
Whee is the fabric from for the sewing mat please
Hi Louise,
This project was made back in 2014 so I don’t remember the name of the fabric anymore.
Sorry,
Tonya
This is beautiful! Thank you for sharing.
GREETINGS FROM NORTH QUEENSLAND, AUSTRALIA.
Have been racking my brains as to what to give my dearest sister for her birthday. Came across this tutorial by accident. Problem solved this will make a beautiful gift for her as she loves sewing .
thank you again