 You’ve found your social media icons and you want them in your blog sidebar, but you have no idea how to get them there. This is the tutorial for you!
There is probably more than one way to do this, but I know this way has worked for me. This process will work for Blogger or WordPress, although in WordPress you have the option of using a plugin instead. You’ll need access to your blogger dashboard and a text document of some kind to write the code in, e.g. a Word document.
Step 1:
Download your icons to your computer. There are lots of free sets out there.
Step 2:
Create a new blog post and upload your icons into it as if you were adding pictures to a post. Save it but don’t publish it. This is a way of storing your icons online where you can find them. You could also upload them to Photobucket or a similar site.
Step 3:
Copy the URL of each button and paste it into a text document so you can write your code with it. Writing the code in a text document first, then copying it and pasting it into blogger just makes it a little easier.
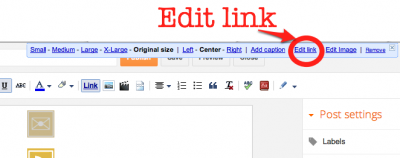
To find that URL, click on the image in your Blogger post. You should get this pop up:
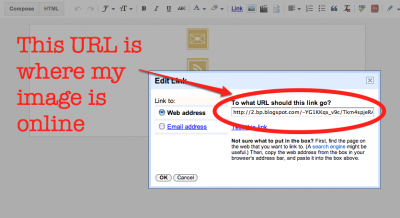
Click on “Edit link” and you should see this:
Copy the link in the box next to Web Address. It will probably start with “http:” and end with the file name. Paste that into your text document so you have it for later. Do the same thing for each of your images.
Step 4:
Now you need to create the HTML code. This is the snippet you need for each of your buttons:
<a border=”0″ href=”URL to go to” target=”_blank”><img src=”where the image is” /></a>
See the parts in red? They are what you are going to change.
- URL to go to – is the link to the place you want people to go to when they click on your button. It might be your Facebook page, your Twitter profile, your store or your Flickr photostream. You can send them to any URL on the net.
- where the image is – this is the URL for your image online. We put your images in a Blogger post and copied the URL of each one in Step 3.
Here’s an example from the blog I write with my friend, B, called Friends Who Cook.
URL for my RSS feed: http://feeds.feedburner.com/FriendsWhoCook
URL for RSS image: http://3.bp.blogspot.com/-aswCOYTQgwc/Tkm4tyb6DVI/AAAAAAAACxc/p-I72JOnIc8/s1600/rss.png
So here’s the code with my URLs replacing the red bits:
<a border=”0″ href=”http://feeds.feedburner.com/FriendsWhoCook” target=”_blank”><img src=”http://3.bp.blogspot.com/-aswCOYTQgwc/Tkm4tyb6DVI/AAAAAAAACxc/p-I72JOnIc8/s1600/rss.png” /></a>
Do this for each of your buttons. You will end up with a block of code like this for each button.
Step 5:
Now its time to put your buttons in your blog sidebar. Go to your Blogger dashboard again and go to the “Layout” for your blog. In the sidebar area, click on “Add a Gadget”, then choose a “HTML/Javascript” one. Copy all the code you created from your text document and paste it into the gadget box, then “save”. You’re done!
EDIT: Check that your text program doesn’t change the URL’s into hyperlinks (you know, change them into links that you can click on and go to the page). If it does, then when you paste the code into Blogger it won’t like it. You might need to tell the document to save as “text only”, or right click on the links and “un-link” them. (Different text programs have different terms so have a look at the Help if you need to.)
DOUBLE CHECK: Sometimes when you cut and paste HTML code, there can be a problem with the quotation marks. So once you have pasted the code into the gadget box, go through and delete and re-type each set of quotation marks – you know, these things: “. Seems odd but trust me, it makes a difference!
Some extras:
- If you want the buttons centred in the column, add <center> at the start of the code and </center> at the end.
- You can create groups of buttons if you want to. For example, put the <center></center> codes around two of your buttons, and then again around the next two. You’ll end up with the two sets underneath each other.
- If you want a little space between the buttons, add some spaces at the end of the code like this:
- You can add text into that space, too. I’d recommend a space before and after the text so it doesn’t touch the buttons.


It’s funny you just posted this today.
About 3 hours ago I went to like 6 different websites, trying to figure out how to do this! I figured it out, but this woud have been nice to have (:
Chrissy
Wish I posted it earlier for you, Chrissy! When I couldn’t find a tutorial for it out there, I thought I’d create one so hopefully it will help someone else who looks for it.
This is wonderfully written! I’m sure it will be of lots of help.
Thanks Sonia It’s been pretty popular so far
Thanks for sharing! Easy tutorial – I’ll have to give these a try!!! 🙂
You’re welcome, Reannah. I’m glad it makes sense to you. Let me know if you need any help
I have been trying to figure out how to do this FOREVER! Thanks so much for the step by step directions. I can’t wait until I have some time to sit down and try it.
You’re welcome, Sammie. Part of the reason I wrote this post was because I couldn’t find clear instructions out there to do it.
I’m so excited I found this tutorial over @ key lime! I’ve been wanting to do this for a long time but this is the first tutorial I’ve seen!
Thanks for sharing!!
Kristy
Just popped over to your blog and it looks like you’ve already done it – well done!
what does it cost for you to make a few icons for me? I am having a hard time finding what I want!!!
Thanks!!!
Hi Bonnie, If you want simple square icons like mine, I could make up to 10 of them for AU$5. You can choose the colours or I can match them to your blog background. If you want something bigger or a little different, I’d need to know what you’d like to give you a quote.
Dear Ma’am,
Trust all is well with you. I am Mohit Kumar, Editor @ The Geek Solutions
I was wondering if you would be interested in guest blogging on our blog.
Please go through the URL and let us know.
Regards,
Mohit Kumar
Thanks for asking, but I wouldn’t have time at this stage.
Best of luck with your blog,
Tonya
Thank you! so easy to follow. really helpful
You’re welcome, Rigel! Glad it helped you.
I LOVE the look of your site! Just got lost in there for a happy 15 minutes!