The Crafty Mummy

Crafts. Sewing. Quilting. Crochet. Tutorials.

  • Start Here
  • Welcome
    • Subscribe
    • About Me
      • Copyright
      • Disclosure
      • Privacy Policies
    • Advertise
    • Sharing
      • Recommendations
      • Shopping & Coupons
      • Books
  • Explore
    • Crafts
      • Beading
      • Kids
      • Paint
      • Storage
      • Christmas Crafts
    • Sewing
    • Quilting
    • Stitching
    • Crochet
      • Yarn
    • Life
      • Food
      • Organisation
    • Blogging
      • How To
      • Social Media
      • WordPress Plugins
      • Photography
  • Tutorials
    • Tips
  • Shop on Etsy
  • Shop on Redbubble

Rainbow Coins Mini Quilt Tutorial

by Tonya Grant |Filed Under: Quilting, Tutorials Tagged With: Mini Quilts, Rainbow Get a Weekly Update of all Articles

Rainbow Mini Coins Quilt Tutorial

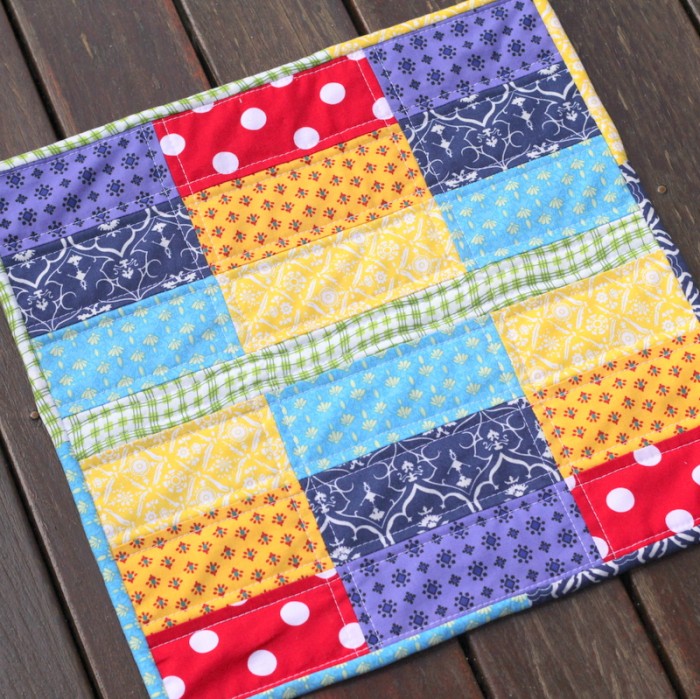
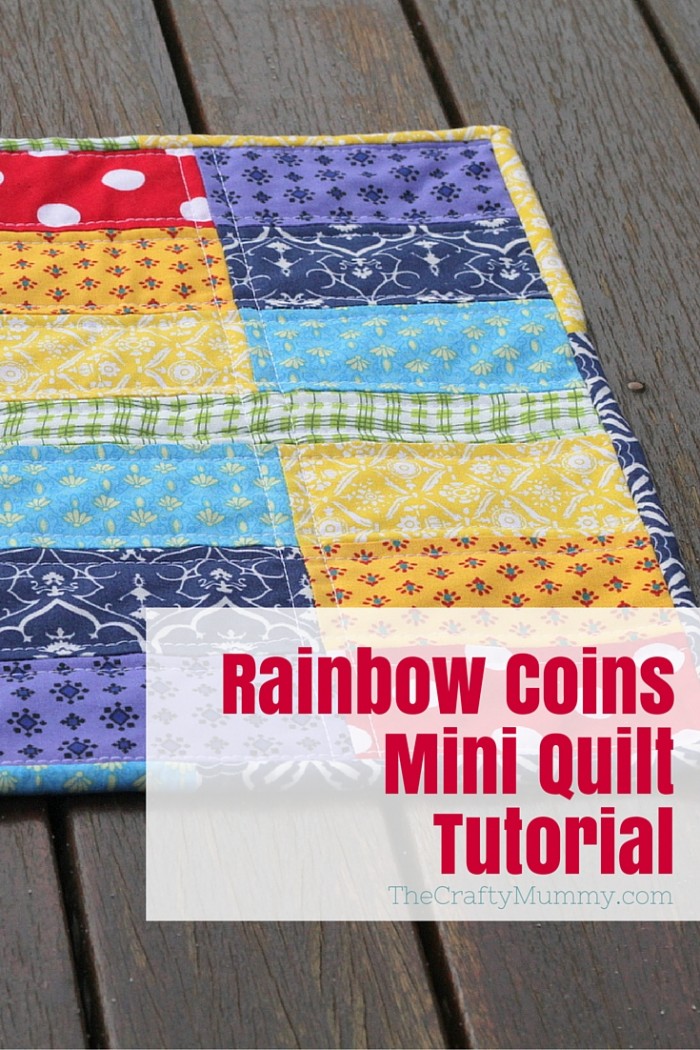
Another rainbow mini quilt – yay!

It is no secret that I love rainbows and mini quilts are so quick to make that this is the perfect match for me. When I stitched all my rainbow blocks cross stitch last year, I had this secret plan to make each of them into mini quilts as well and I’m gradually adding to the collection. This is the fourth mini quilt in the set and it is based on Block 3 of the cross stitch designs.

You can see the other rainbow mini quilts and more on this page.

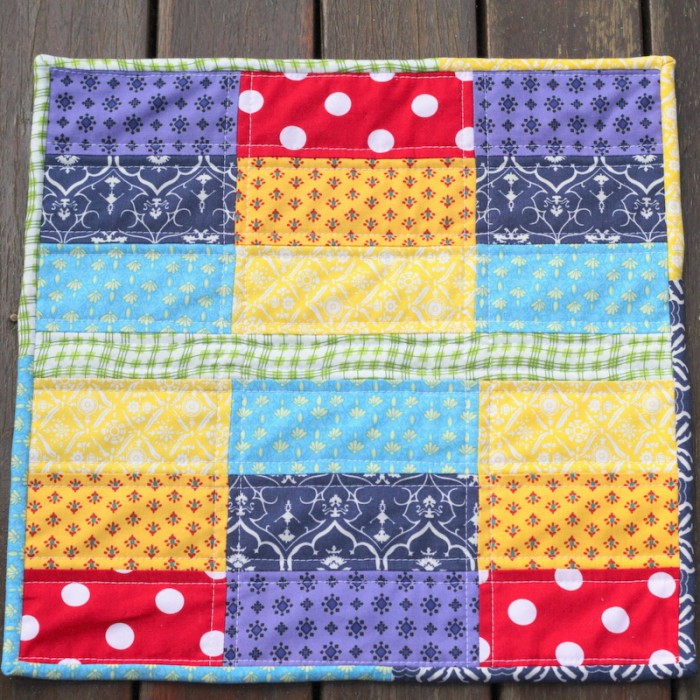
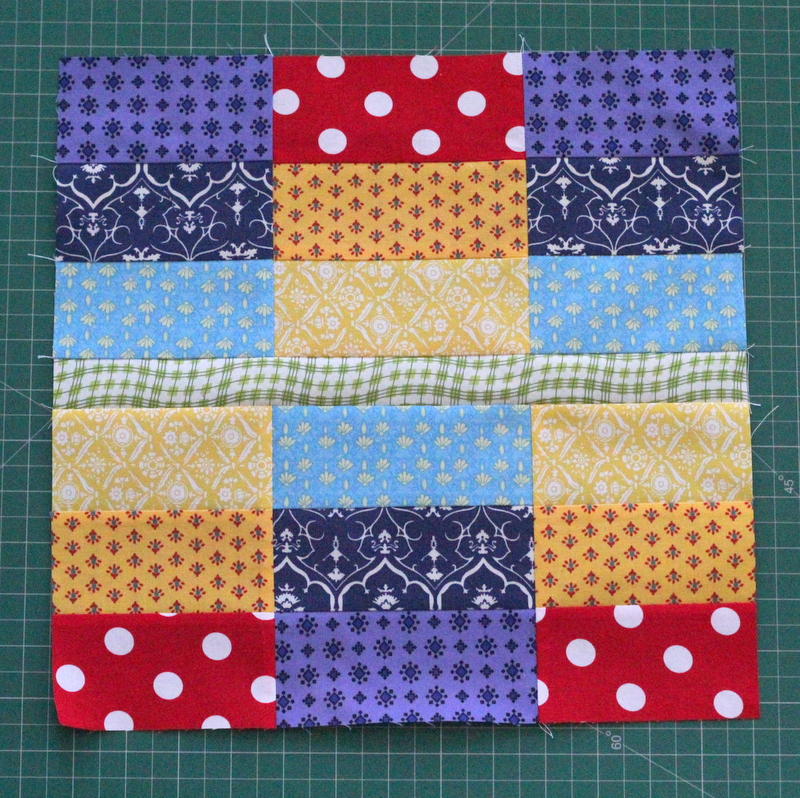
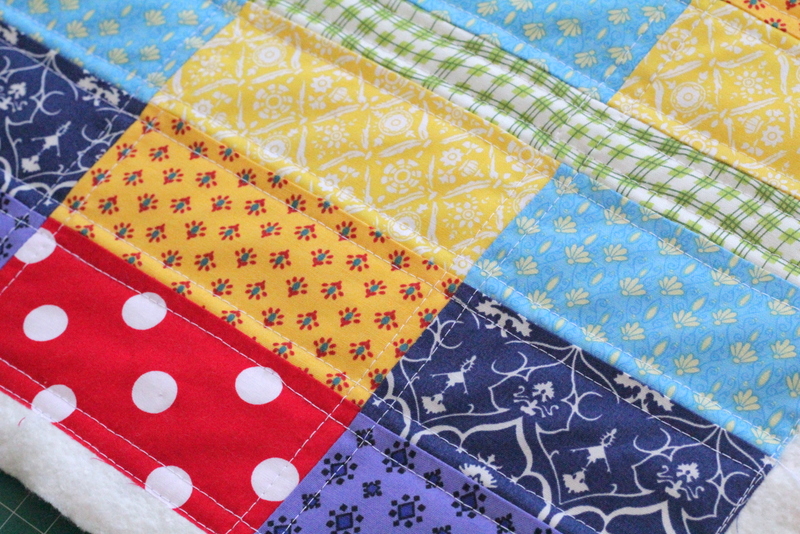
I’ve named this quilt the Rainbow Coins Mini Quilt because it reminds of a traditional quilt design sometimes called Chinese coins which stacks rectangles of fabric on top of each other in columns. My design has a green stripe across the middle of the set because the practical side of me didn’t want to chop it in rectangles only to stitch them together again! But the quilting really emphasises the rectangles I think.

I hope you enjoy making this one as much as I did. I’d love to see your finished mini quilts so tag me on Instagram or Facebook, or even Google+ if you’re over there.

Rainbow Coin Mini Quilt

What You Need

Rainbow Fabric:

Green – 1 piece: 13.5″ x 1.5″
Purple, Blue, Light Blue, Yellow, Orange & Red – 1 piece in each colour: 9″ x 2.5″; 1 piece in each colour: 5.5″ x 2.5″

Backing fabric – 15″ x 15″

2″ x at least 65″ strip for binding – mine was made by piecing scraps of my rainbow fabric, this includes extra length for joining

Pellon or quilt batting – 15″ x 15″

Thread and usual sewing supplies

Finished size: 13″ square

rainbow coin mini quilt pieces

What To Do

Note: all seams are quarter inch seams

Step 1

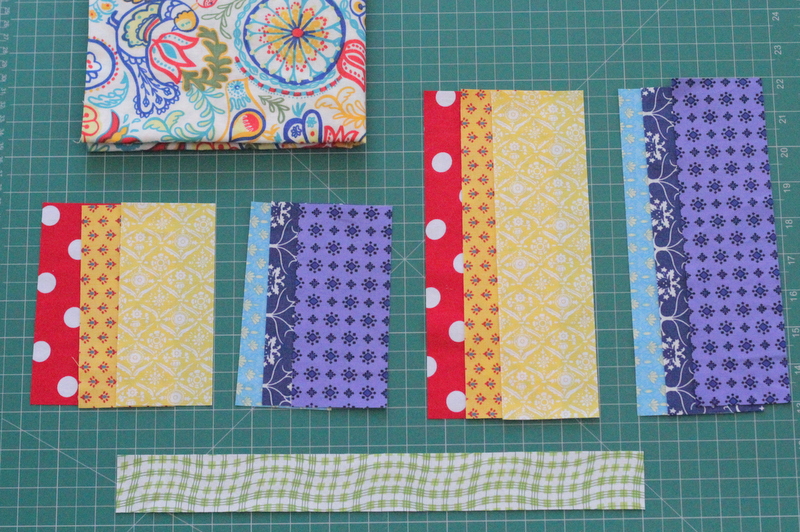
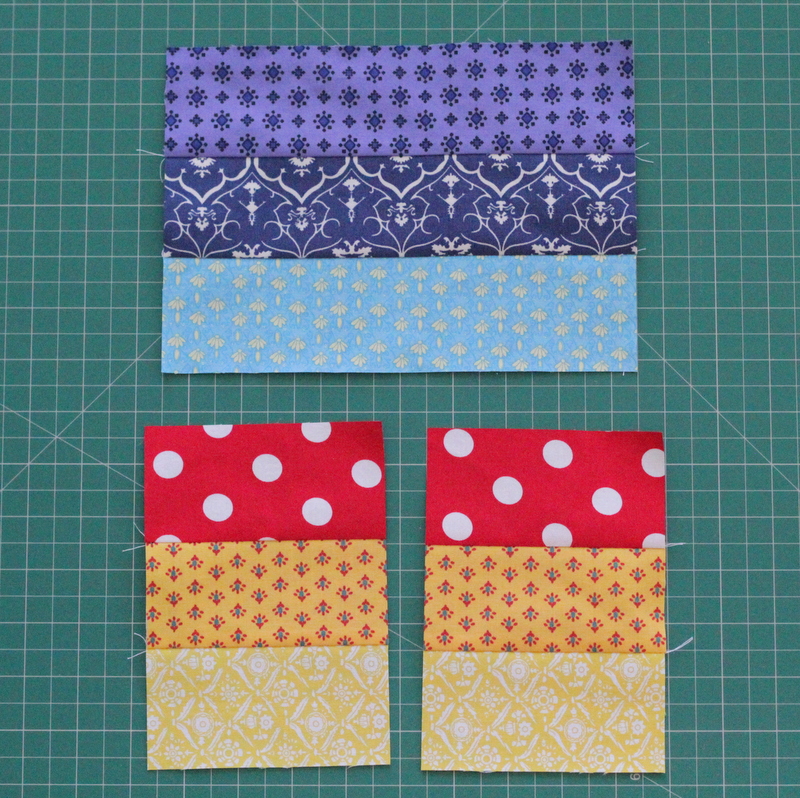
Cut all your pieces. Divide the pieces into groups: red, orange and yellow together; purple, blue and light blue together.

rainbow coin mini step 2

Step 2

Join the red, orange and yellow pieces together in that order for both the 9″ pieces and the 5.5″ pieces, pressing the seams to the side as you go.

Then join the purple, blue and light blue pieces together in that order.

rainbow mini coin quilt step 3

Step 3

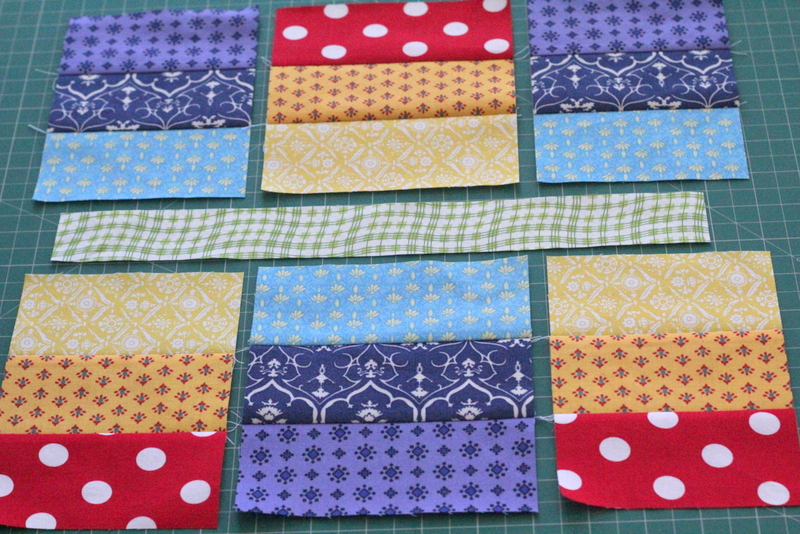
Cut the 9″ sets in half to create to sets that are 4.5″ wide.

rainbow coin mini quilt step 4

Step 4

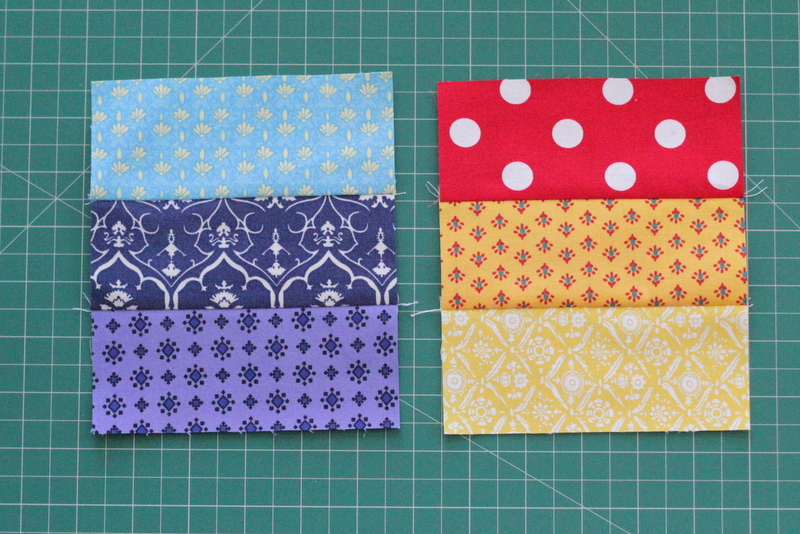
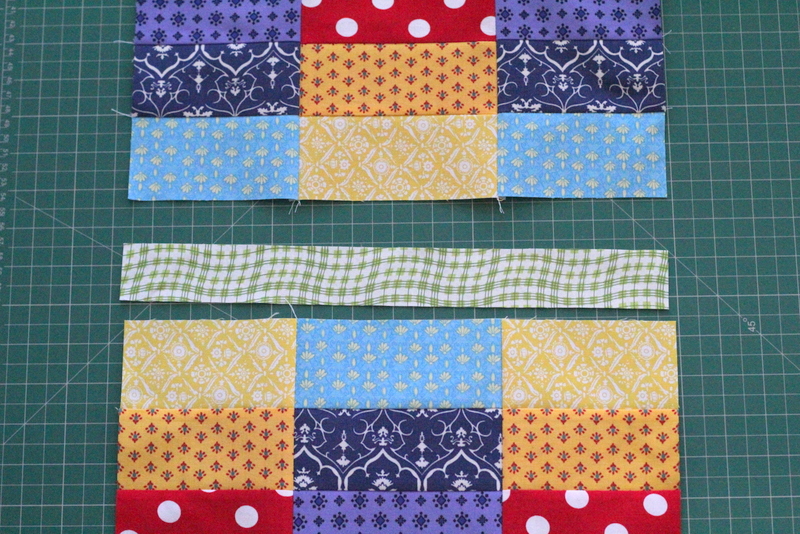
Lay out the pieces as they will join for the quilt top. Join the sets of three together as shown in the pictures. Press the seams.

rainbow coin mini quilt step 5

Step 5

Join the top section to the green strip, then join the lower section. Press and you’re finished the quilt top.

rainbow coin mini quilt top

Step 6

Layer the backing piece, right side down, then the batting or pellon, then the quilt top, right side up. Baste with spray or pins to hold.

Quilt as desired.

I quilted lines about a quarter inch from each seam to emphasise the rectangles.

rainbow coin mini quilting

Step 7

Attach binding – I have a tutorial for my method here: Quilt Binding.

rainbow mini binding clips

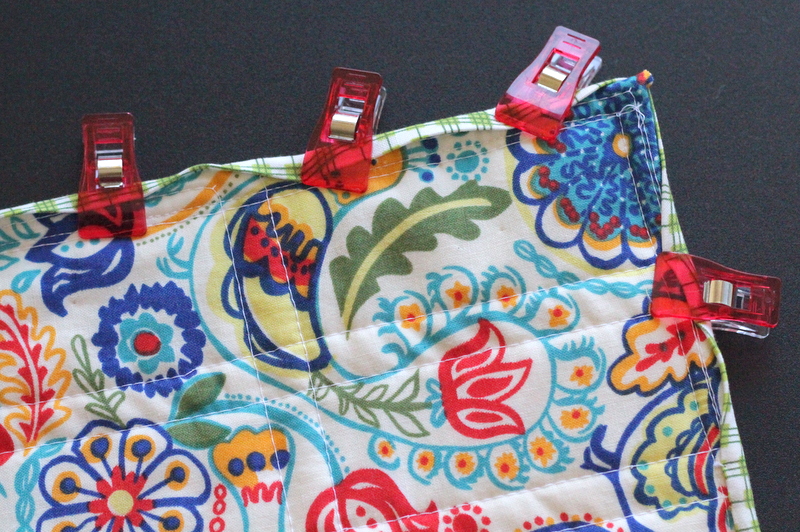
Tip: These Clover clips are great for holding the binding in place while you are hand stitching the back.

Look out in the next few days for a little bit of excitement with QuiltyBox and The Crafty Mummy… more soon! But get $12 off your first QuiltyBox with this special discount code: MUMMYSEPT12

QuiltyBox code

Rainbow Coins Mini Quilt Tutorial

See the rest of the Rainbow Mini Quilt tutorials:

Rainbow Mini Quilts Collection

Filed Under: Quilting, Tutorials Tagged With: Mini Quilts, Rainbow

« How to Build a Pallet Garden
Blog Planner Board »
Disclosure: There are affiliate links in this post.  This just means that if you click through and choose to purchase something I may get a small commission - at no extra cost to you, of course.  This helps me keep the content here at The Crafty Mummy free for everyone.

I love to chat so please leave me a comment or ask a question.

Don't stress if your comment doesn't appear immediately - sometimes I have to moderate comments thanks to spam visitors, but the comments from real readers will always get published. Scroll down to add your thoughts or ask a question.

Comments

  1. BritDeshiMummy says

    September 6, 2015 at 8:39 PM

    This quilt is super cute! I love all the patterns and different fabric used! I am saving my little baba’s bibs and shirts hoping to create a memory blanket!

  2. Dottie says

    September 21, 2015 at 9:19 AM

    Hi Tonya – I got my first quilty box this week (unfortunately I had just joined before your special discount) and I was thrilled to see two specific things I had been thinking of purchasing as I wanted to start doing some hexagons and applique. What a treat to see the needle threader and the finger presser. The mini pattern idea is just a little bonus!

    • Tonya Grant says

      September 21, 2015 at 9:50 AM

      Awesome, Dottie! So pleased you like all the items in the box – I use my finger presser all the time!

Hi! I’m the CraftyMummy

Tonya is the voice behind The Crafty Mummy. She dabbles in lots of different crafts – patchwork, quilting, cross-stitch, scrapbooking, knitting, crochet and sewing. This is the record of projects she has done, and the projects she dreams of getting to! Read More…

Search

  • Email
  • Facebook
  • Instagram
  • Pinterest
  • Twitter
  • YouTube
Shop my Affiliate Favourites

Fat Quarter Shop for Fabric and More

Grab the Sew Sampler Box Here

AccuQuilt for Cutting Machines and Dies

QuiltyBox for Monthly Treats in the Mail

CreativeBug for Craft Classes

Pretty Darn Cute for Blog Designs like mine

Creative Market for Fonts, Images, Themes and More

OzGameShop for All the Games

Adrift for Fashion you’ll Love

Kindle Unlimited Membership Plans

Kindle Book List

Click to shop my kindle book list
Shop my Amazon Influencer Shop
Join the CrochetU and learn to crochet
New to TheCraftyMummy.com? Click here to see more
Blog Tools I use for TheCraftyMummy.com

Grammarly

Aweber for email newsletter

CoSchedule to stay organised and share

Milotree for social media

Genesis for blog framework

FoodiePro is my theme

Hosting with WPEngine

Powered by

Recent Articles

Disclosure: There are affiliate links on this site. This means that I may get a commission if you choose to purchase after browsing via these links - at absolutely no extra cost to you, of course. I only recommend products which I use and love, or that I think will be quality products that will be useful to my readers. It is the affiliate links in this site that help me keep my tutorials free of charge. Thank you!

Looking for something? Search here:

Copyright 2015 The Crafty Mummy · Built using Genesis Framework & Foodie Pro Theme