For a number of years now Picasa has been my photo editing software of choice. It started out as my choice because it was free (let’s face it – new bloggers have no spare cash or fancy software!) but it has continued to be my choice because it does what I need it to and it is easy to use. I’ve looked at other options – paid and free – but each time I come back to the one I am familiar with.
Picasa is a Google product and recently they moved away from supporting it to developing Google Photos instead. As a result, if you have the free download already, these tutorials will help you use it as I do. If you don’t have it yet, the official Google page says you can’t get it anymore. There still seem to be some links around to other sources though so I will leave it to you to look for it online.
Recently I was talking to a friend about how I edit my photos and suggested they look at the tutorials I wrote a couple of years back about Picasa. On a whim, I went to look at the tutorials the next day and was dismayed to find that many of the images had disappeared in the shuffle from Blogger to WordPress and that some of the info was now out of date. So here’s my updated mega tutorial including all the steps I take from loading my photos to my computer to exporting them ready for my blog posts.
If you have questions, don’t hesitate to ask in the comments and I’ll do my best to add the answers in this “ultimate guide”.
Loading Photos into Picasa
I load my photos directly from my camera to my laptop computer via the USB port. You can also use this method if you have photos on a memory stick, camera card or disc.
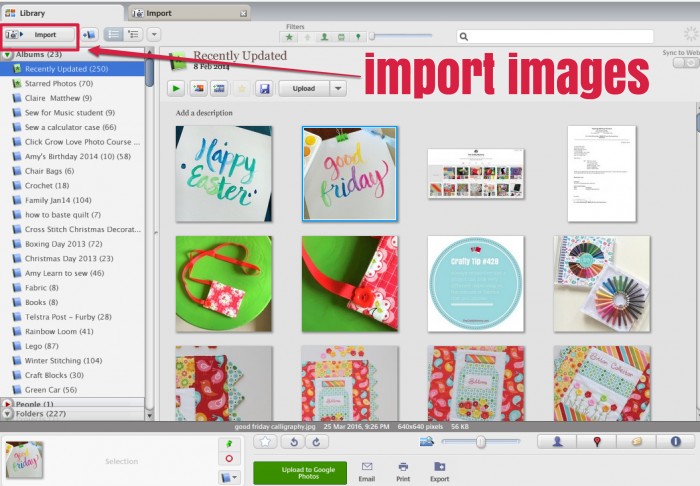
- Open Picasa.
- Plug in your camera and turn it on. (Or insert your card, stick or disc)
- Go to the “Import” tab in Picasa and select your camera from the roll down menu at the top
- All your photos should load and appear on the screen.
- Select the pictures you want to load – use shift and control to help you pick multiples.
- Use the roll downs at the bottom to choose the folder to import them to. Mine go into my “Pictures” folder, then Picasa creates a folder with the date for me. If the pictures are from multiple dates, it will automatically create multiple date folders for them, according to the dates they were taken. If you prefer, you can call the folder “today’s date” or you can give it a special name. Sometimes I will call the folder by the name of the project so I can find them easily later.
- Then click the “Import selected” button (bottom right) to import them. If you want to import all of them there is an option for that there too.
Now your photos will be in the Recently Updated folder at the top of the list as well as in the folder with the date or title you gave it.
Cropping Photos
The next step is to crop your photos to the size and shape that is best for your purpose. I like square images on my website but I will often create rectangular images for Facebook or Pinterest. I love that you can set up custom shapes and sizes in Picasa for the sizes you need regularly.
- Decide which photo you want to work with and double click it. It will open in the edit screen.
- We want to crop my photo so I click on “Crop”, on the left-hand side under the Spanner tab.
- Now we need to decide on what size and shape we want the photo cropped. The roll down menu gives lots of options. “Manual” will let me drag the cursor to any rectangular shape, while the other sizes will keep the cropped section in those proportions. You can set up custom proportions to re-use each time, too.
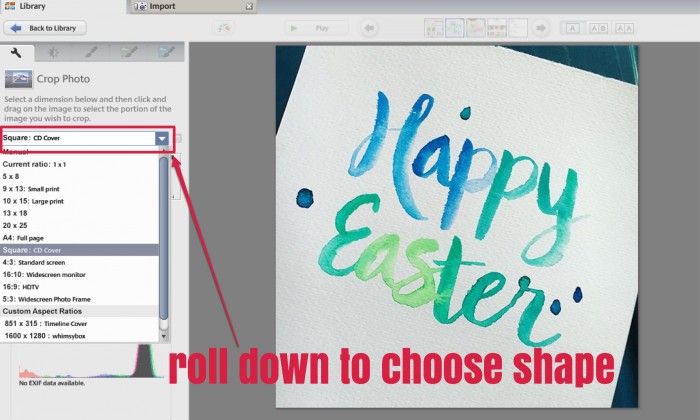
- I like square photos on my blog so I often use the “CD cover” option.
- Once I click on CD cover, it will suggest 3 areas to crop in that shape for me. If I click one it will highlight that area for me to see. Then I can click and drag that highlighted area to adjust it until I am happy.
- Click and drag a corner to make the box bigger or smaller. Click the middle of the area to move the cropping area without changing its size.
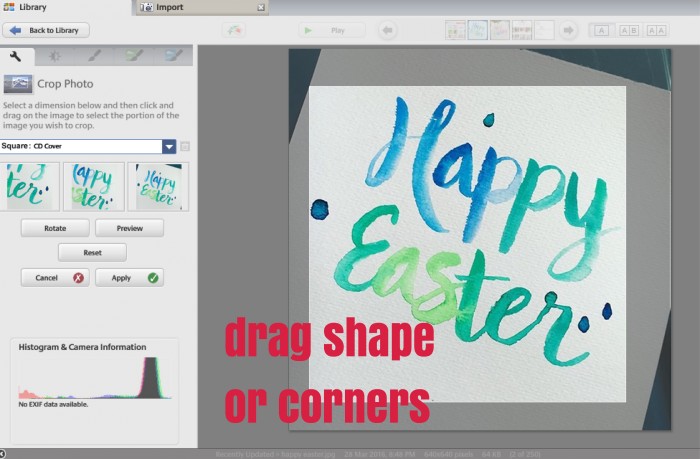
- When I think I have the cropping box where I want it, I can click “Preview” to check that I’m happy with the cropped image.
- Then I click “Apply” to crop it.
- Don’t panic if you’re not quite happy. You can undo your crop or re-crop if you want to.
- Picasa will save this now automatically so if you leave it there (as I’m going to do right now!) and come back tomorrow, the cropped version of the photo will be sitting there in the Library just where you left it.
Adjusting Colours
My next step is usually to adjust to the colours in my photo. Sometimes I haven’t had enough light or the colours have been washed out by the flash. A little tweaking can make a big difference.
- If you haven’t got your photo open, double-click on the photo you want to edit to take you to the editing screen.
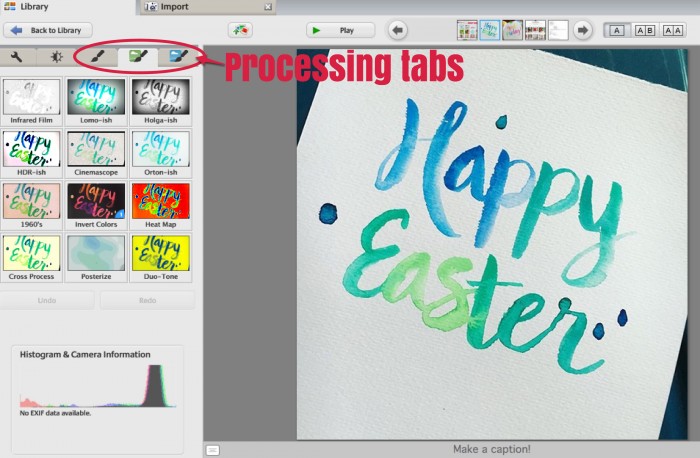
- There are two sets of tabs to look at – the “Tuning” tab and the 3 “Processing” tabs.
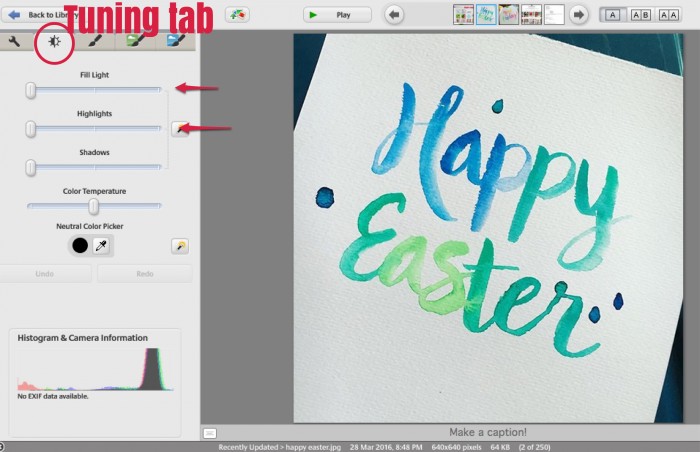
- I start in the Tuning tab. Now someone smarter than me could tell you what actually happens when you slide the sliders, but I have just played and looked at the results. Generally I find that they make my shots a bit brighter and lighter. I usually slide the first two sliders, but occasionally I play with the third one, the Shadows. It tends to make things darker, which usually isn’t what I’m after.
- The “Color Temperature” slider will make all the colours cooler (more blue) or warmer (more red).
- Picasa saves these changes as you do them so you don’t have to click any button to keep them. But you do have the option of clicking “Undo Tuning” to remove the changes you have made, or simply slide the sliders back to the far left.
- The other tabs you might want to visit at this stage are the Processing tabs. The Processing tabs have a bunch of interesting filters and effects that you can apply to your photos, similar to those in phone apps like Instagram. They allow you to create some great effects like Film Grain or Graduated Tint. I won’t go through them, but if you open a photo and have a play, you can see what each one does. Remember you can always choose not to apply the changes, or undo them if you don’t like them.
- The other thing I often need to do at this stage is retouch my photo. I often take shots of smaller items laid on a timber coffee table. Unfortunately this table has a couple of scratches on it which don’t look so good in my photo background. So I go back to the “Basic Fixes” tab and choose “Retouch”. This tool relies on you having another part of the photo that can replace the spot that you want to fix, and it works best on small areas, so if you want to fix a large area, you might try something else. (I’d love to know how to replace a larger portion of my background with Picasa. If anyone knows how, please share!)
- Back to retouching: Say, for example, I have a couple of small white spots to fix. I can zoom in to see them clearer with the slider at the bottom of the photo. Then I can change the brush size with the slider at the left.
- You want your brush size to be large enough to cover the spot you’re fixing, then click on that spot. Move your little circle to another area of the photo and you will see the target area change to look like the area your brush is sitting over. Find a match to the spot you are fixing that looks good, and then click in that spot. Your target area will change.
- I found it took me a bit of practice to get this tool right, but remember the “Undo Patch” and the “Cancel” buttons are there if you need them.
- When you’re happy with your touch-ups, click “Apply” to save them.
Adding a Border
I’ve written a post previously about adding Borders to a photo so check it out here.
Create a Collage
- If you want to collage more than one image together, it is easy too. Go back to your Library screen and click on one of the images you want. Then hold your CTRL or Command button and click each of the others. They should all appear in the bottom left hand corner of the screen where I have written “pictures selected”.
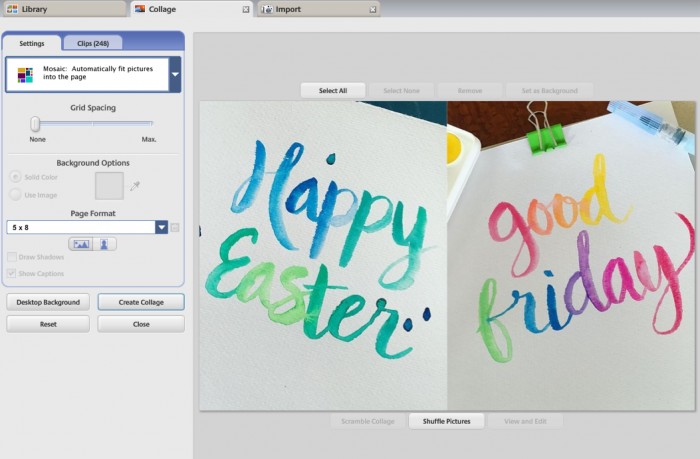
- Next click the Create menu at the top of the screen and choose “Picture Collage”.
- There is a roll down menu at the left with a bunch of different types of collages. I use the one called “Mosaic” most often.
- One you’ve selected the mosaic option, then look at the other roll down menu below that. It will let you choose the shape of picture you want to work with, also called the “page format”. You can choose the shape just as you would when you crop an image.
- Next step is to slide the Grid Spacing slider to the right. The further you slide it, the wider your border will be.
- I have a white border most of the time, but you can choose any colour with the background options. If you click on the white box with the dropper beside it, you will get a little pop-up menu of colours to choose from, or you can slide the cursor over your picture and choose a colour from the picture. You can even choose to have the image itself echoed in the border if you click use image.
- When you are happy click “Create Collage” to save. It may take a minute or two.
Tip 1: The Orientation (landscape or portrait) of a rectangle shape can be changed with the two buttons just below the drop down menu.
Tip 2: If you don’t like where Picasa has put each photo, hit the Shuffle button to change them around. You might try it a couple of times to see all the possible combos, especially if you are working with more photos.
Experiment with the Collages other than Mosaics. I also like the photo pile one. I’ve seen it used with text added later to create captions with the photos or tutorial instructions.
Adding Text
There can be lots of reasons to add text to your photos. You can add titles, web page URLs or tutorial steps. These days I often do my text additions in Canva because it has lots of fancy options, but here’s how to do it in Picasa.
- Open your photo in the editing screen by double clicking on it.
- In the “Basic Fixes” tab click on the “Text” button
- Click on your photo and type to add your text. You can “enter” for a new line and delete just like a text editor. It is easier to adjust your options once you can see your text.
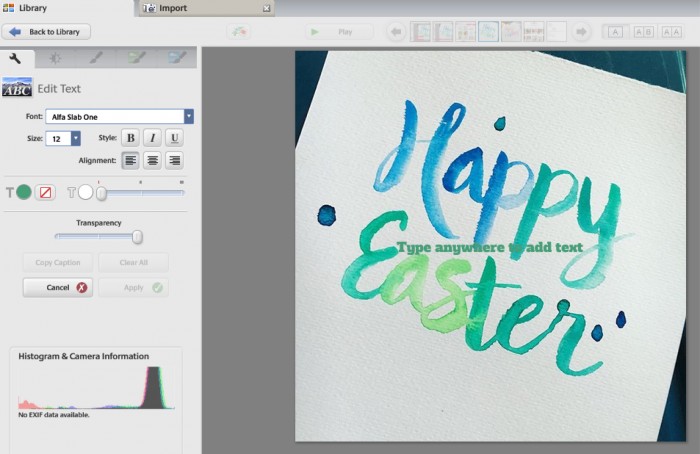
- To move your text click and drag the grey rectangle around the text.
- To change the direction of your text to another angle, click and drag the small red dot. Also use that red dot to pull your text larger or smaller.
- At the top of the section you can choose your font and the size of it. You can also choose bold, italics and underline as well as the alignment of the text.
- Below that you can choose the colour for your text. To the left is the fill colour for your text and to the right is the colour of the outline of the letters. The slider on the right changes the width of the letter outlines. If you click on the small circle you’ll get a dropper for a cursor. Use that to choose a colour from your photo for the text. Or choose a colour from the drop-down menu. Black and white are always to the top left of that menu.
- Below the colour options is the Transparency slider. Use this to make your text more transparent – more like a watermark. I have seen photos with a big title across the whole picture but made transparent with this tool so the photo is still clear.
- You can add multiple bits of text, each with its own size, font, colour, etc. Just click in a new area of the photo to start typing something new. You can even overlap your text this way to create interesting titles or labels.
- Once you are happy, click “Apply”.
- Here’s my finished photo with my text up the side. I usually try to put my text in white on a dark background.
Renaming Photos
Once I’ve done all my editing and I’m happy with my photo I give it a new name to help me identify it as well as to make it easier for search engines to find it. Then I export it to a folder where I can find it when I’m writing my blog posts, rather than having to search through all my unedited photos.
- Double click on your photo of choice so that it opens in the editing screen again.
- Right at the top of your screen there is a “File” tab. Under that choose the “Rename” option.
- In the pop-up window, you can type in your new file name. You can also choose the tick boxes to include the Date and the Image resolution.
- Then click the “Rename” button to save it.
Exporting Photos
- Next, to export the photo: Go back to your “File” folder, and choose “Export Picture to Folder”
- Another pop-up window will appear with a few options: First browse to find the folder you want to put it in. Now this is the tricky bit. Choose the folder ABOVE the one you want it to go in. (It’s a quirk of Picasa that I took a while to learn!) Then type the actual folder name in the “Name of exported folder” box.
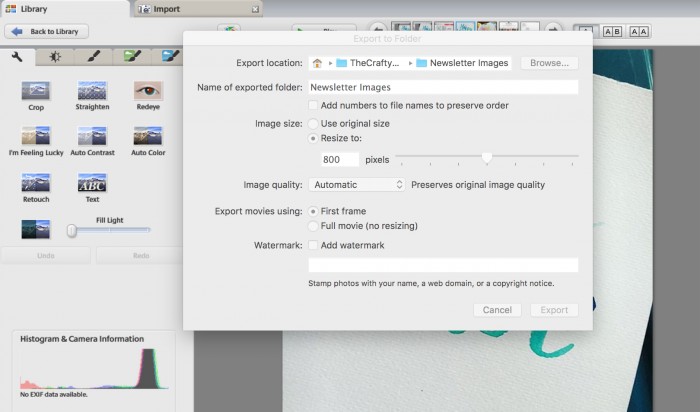
- So if I want my photo in “TheCraftyMummy/April2016” so I chose the “TheCraftyMummy” folder. Picasa wants to put it in a folder called “Collages” but just delete that from the text box and type “April2016”. That folder already exists on my computer so the icon will turn into a folder once I have typed it.
- Next I resize my photos. I usually use 800 pixels. If I’m making a blog button I will choose 200 or 150, but you can go smaller or larger. You can slide the slider or type the number into the text box.
- At that point I hit the “Export” button, but you can also adjust the Image Quality or add a watermark. The watermark is writing on your photo which I do with the “Adding Text” step, but experiment and see which you prefer. I found I liked being able to control where my text goes.
- Once you’ve chosen all your options, click the “Export” button.
- You can export the same photo multiple times. This is useful if you want to use that picture in a different sizes, or to have it stored in two different folders.
Phew! That was a lot of info!
As I said earlier, don’t hesitate to ask if you still have questions about my process or Picasa and I’ll do my best to answer them.


That was very helpful for Picasa instructions. If you need the photo that you have already cropped to fit into a 4 x 6 or 8 x 10 and you haven’t followed one of the first 3 options on the crop can you do that at the aspect ratio spot? If so what would ratio’s be for a 4 x 6?
Hi Connie,
I believe you would get 4×6 size if you set the dimensions to 1200 x 1800 pixels. If that size is not in Picasa as an option, you can create a custom size at the bottom of the drop down list.
Is it possible to crop a person out of one photo and add it to another family group photo using Picasa? Thanks
I don’t think so, Phyllis