The Crafty Mummy

Crafts. Sewing. Quilting. Crochet. Tutorials.

  • Start Here
  • Welcome
    • Subscribe
    • About Me
      • Copyright
      • Disclosure
      • Privacy Policies
    • Advertise
    • Sharing
      • Recommendations
      • Shopping & Coupons
      • Books
  • Explore
    • Crafts
      • Beading
      • Kids
      • Paint
      • Storage
      • Christmas Crafts
    • Sewing
    • Quilting
    • Stitching
    • Crochet
      • Yarn
    • Life
      • Food
      • Organisation
    • Blogging
      • How To
      • Social Media
      • WordPress Plugins
      • Photography
  • Tutorials
    • Tips
  • Shop on Etsy
  • Shop on Redbubble

Bride Veil Tutorial

by Tonya Grant |Filed Under: Sewing, Tutorials Tagged With: Costumes, Kids, Sewing, Tutorials Get a Weekly Update of all Articles

how to make a bride veil

This Friday is the Royal Wedding of William and Kate. Little Miss has a friend, Little Miss E, who has her birthday that day. So naturally she is inviting a couple of friends for High Tea. I volunteered to create a couple of special party favours and I thought I’d share the process with you. Perhaps your Little Miss needs a Bride Veil to celebrate a Royal Wedding.

How to make a Bride Veil

What you’ll need:

  • White tulle or netting – 50cm x 135cm approx.
  • Plastic headband or Alice band
  • Thread, sewing machine, scissors, etc.

use tulle and headband to make a bride veil

What To Do

Step 1:

Cut your tulle to size.  I bought tulle that was 270cm wide then cut it in half to give me 135cm. My finished bride veil is folded and ends up about 85cm long which is fine for a 7-year-old. You could make it longer or shorter depending on what you prefer.

Step 2:

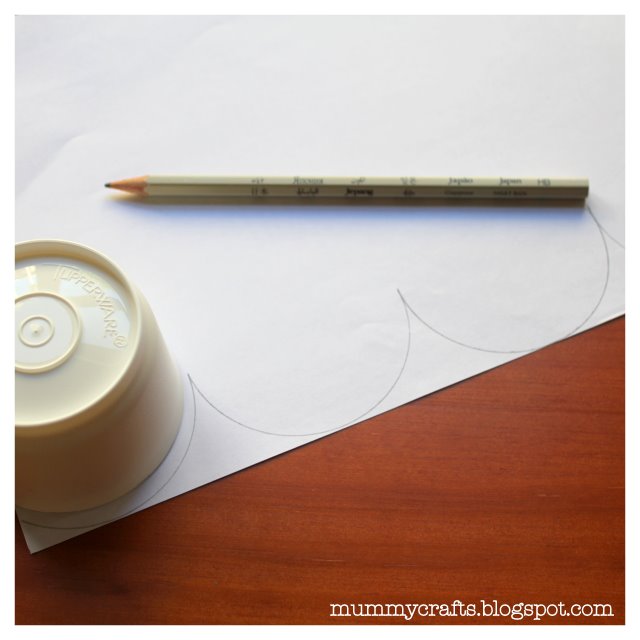
I wanted scalloped edges so I created a template. You need a sheet of paper and a round container for a circle shape. Start at one edge of your paper and draw around half your circle. Then move your circle along a little and draw the next scallop. When you have the edge drawn, cut out your scalloped edge.

Step 3:

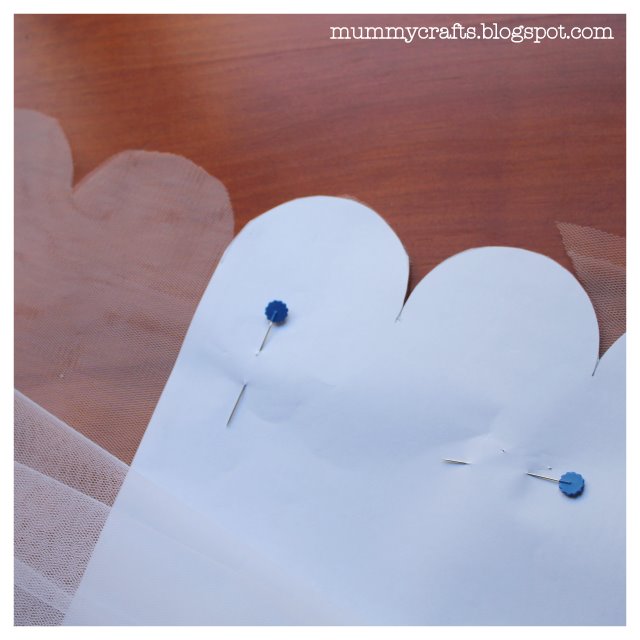
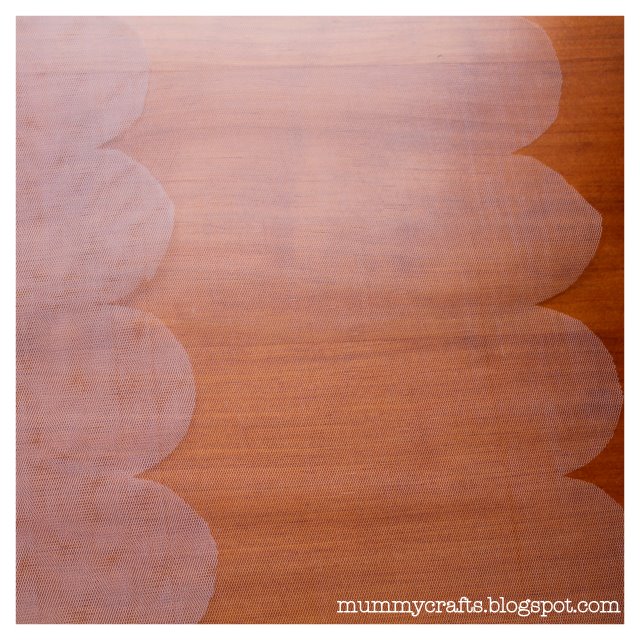
Fold your fabric so the two short edges are together. (You could scallop the long sides too but I didn’t.) Pin your scallop template onto your fabric to hold it in place while you cut the scallops. When you get to the end of the page,  shift it and match it to one scallop to finish the edge.

Step 4:

You could leave your two layers together but I moved the top layer up so that the lower layer was about 20cm longer. Pin near the folded end to stop it shifting as you sew.
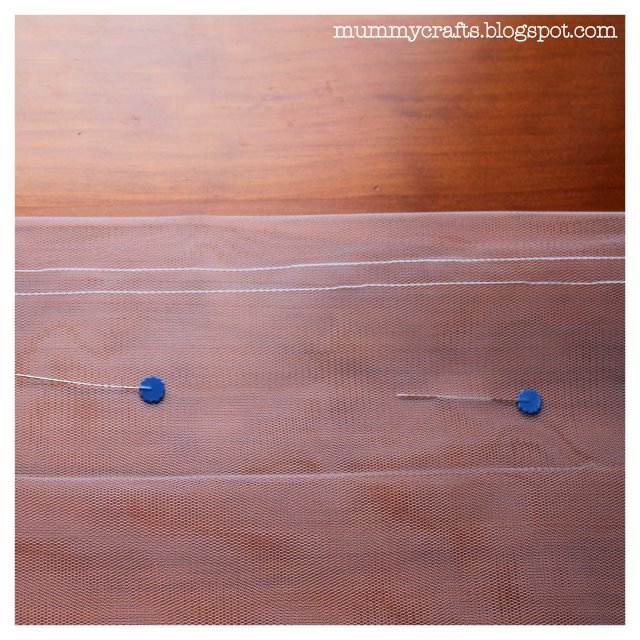
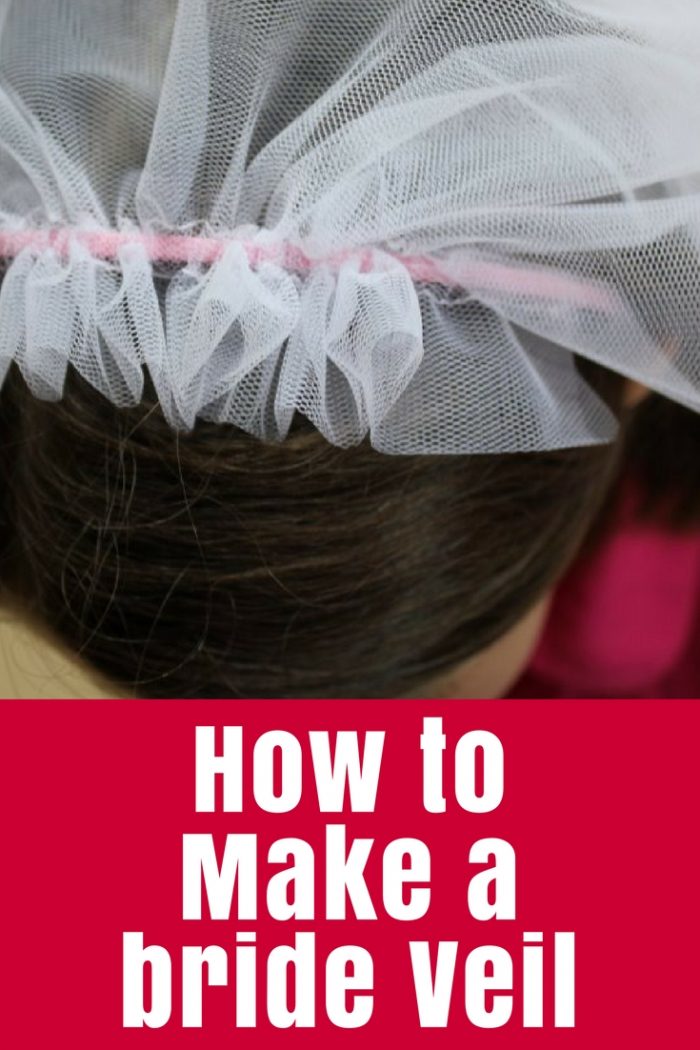
Step 5:

Sew two rows of stitching. The first one is about 2.5cm (1″) from the fold. Then sew a second row wide enough to slide the headband into the gap. My headbands were quite narrow so my two rows are about 5mm (1/4″) apart.
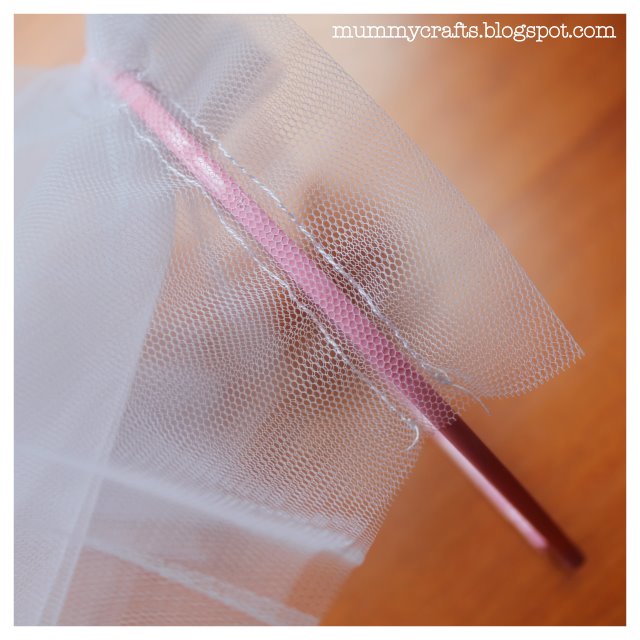
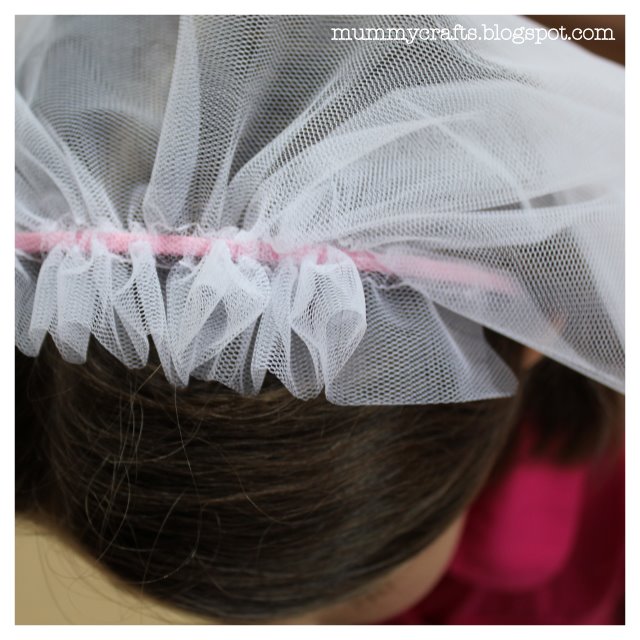
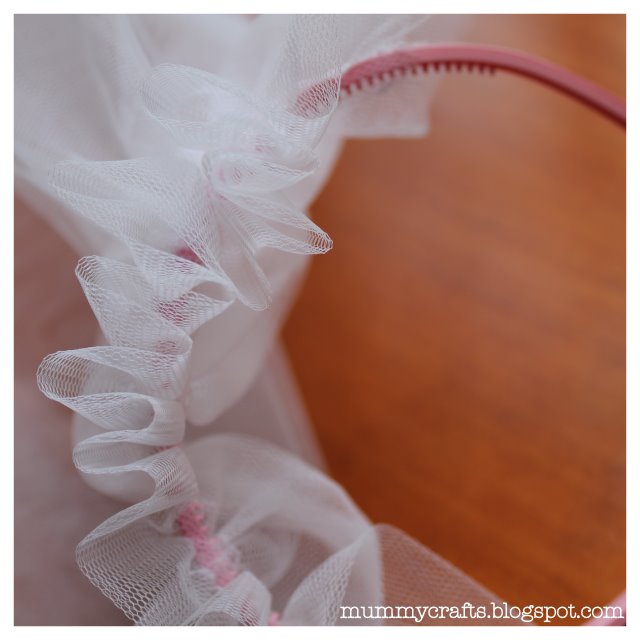
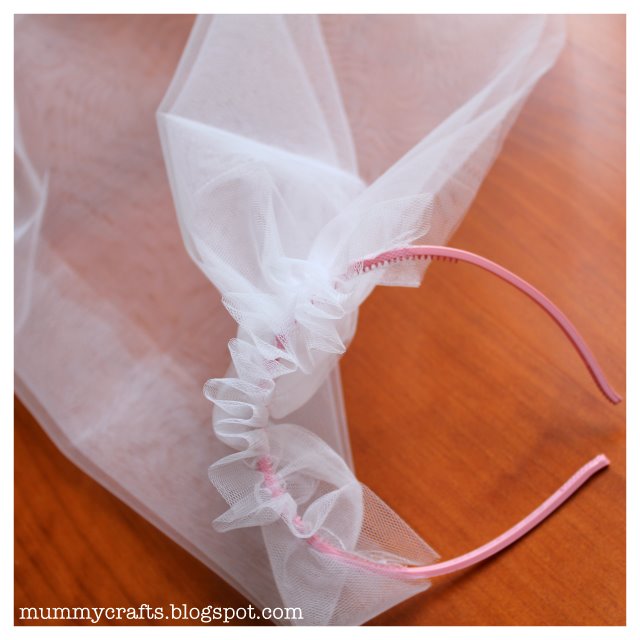
Step 6:

Slide the headband into the casing created by the rows of stitching. As it gathers up, the folded inch will form a ruffle. This headband has tiny teeth that hold the fabric in place. If you want to, you could add a spot of hot glue to hold the fabric in place.

Now that your Little Miss has a royal bride veil, perhaps Mummy needs one too.

Use this simple bride veil tutorial to sew a dress-up for a little girl, or be inspired to create one for a real wedding!

Filed Under: Sewing, Tutorials Tagged With: Costumes, Kids, Sewing, Tutorials

« Babushka Card Holder Giveaway…
Laptop Computer by Little Miss »
Disclosure: There are affiliate links in this post.  This just means that if you click through and choose to purchase something I may get a small commission - at no extra cost to you, of course.  This helps me keep the content here at The Crafty Mummy free for everyone.

I love to chat so please leave me a comment or ask a question.

Don't stress if your comment doesn't appear immediately - sometimes I have to moderate comments thanks to spam visitors, but the comments from real readers will always get published. Scroll down to add your thoughts or ask a question.

Comments

  1. Anonymous says

    April 27, 2011 at 7:54 AM

    hi i just wanted to say wow and thank you im hoping to be geting marride next year and its a diy wedding and it any thing i wanted a easy made vail and i think this idea will be prefect

  2. CraftyMummy says

    April 27, 2011 at 8:00 AM

    So happy to help! You could easily make it with more layers and wider to get that lovely full look. You could also sew little pearls or flowers into the ruffle at the front to create something gorgeous! I'd love to see what you come up with when its done. Please come back and share with us.

  3. Jacqueline says

    April 27, 2011 at 8:13 AM

    How fun is this! My little ones would love playing with this and it is so easy. Thanks! I just posted about the Royal Wedding too!

  4. Di says

    April 27, 2011 at 10:39 AM

    love it. hope little miss enjoys the party.

    we are having a party to celebrate- curry to eat (a great british institution), and instruction to bring your tiara…..

  5. Lizzet says

    April 28, 2011 at 2:01 AM

    Fantastic!!! So cool and so easy!!!
    We are going to have a bbq and I am going to make a few for the little girls that are coming, they will love them! 😀

  6. Marie {Make and Takes} says

    April 28, 2011 at 2:52 AM

    We all must have weddings on the brain as I just did my own wedding veil version too!! Here's to the Royal wedding!! 🙂

  7. Amy says

    April 28, 2011 at 3:23 AM

    This is really lovely. My sister has asked me to make her bridal veil. I'm adding this one to my idea book!

  8. Rebecca @ My Girlish Whims says

    April 28, 2011 at 7:17 AM

    great idea!!! i want to try to make my own veil for my wedding, thanks for the tips & inspiration!!

  9. Melissa says

    April 29, 2011 at 5:20 AM

    That is really fun! Super easy too. I would have though it would have been a lot harder. Thanks for sharing over at Tuesday Tell All.

    Melissa

    MyCraftieLife.Blogspot.com

  10. Sew Many Ways... says

    May 2, 2011 at 10:37 AM

    Thanks so much for linking this project…too cute. Very easy with your great photos. Wasn't the wedding just spectacular?
    Thanks again,
    Karen

  11. Megan @ Cut the Craft! says

    May 2, 2011 at 1:08 PM

    So cute! I have 3 friends getting married this year, so this is definitely being made! 🙂

    Megan

  12. shopannies says

    May 2, 2011 at 1:46 PM

    my grandmother made my veil in a like manner very special

  13. Jenn Erickson says

    May 3, 2011 at 9:59 AM

    What a wonderful, wonderful way to celebrate the Royal wedding! Gosh, I wish we were neighbors!

    Such a creative idea and fantastic tutorial!

    Thank you so much for being a part of "A Little Birdie Told Me…" Tuesday at Rook No. 17

    Jenn

  14. Lynne says

    May 6, 2011 at 4:15 PM

    I was away on holidays at the coast but still watched every minute of it!

  15. MBC scrapbooking says

    May 31, 2011 at 10:18 PM

    Thank you for linking this up! What a cute project- my daughter would love being a princess bride:)
    C:)

  16. Jessica Marie Muoio says

    June 25, 2011 at 7:17 AM

    Wow this is great!!! I find that veils are so expensive these days & since my fiancee and I are trying to have a very diy wedding this is a great idea. Thanks a bunch.

Hi! I’m the CraftyMummy

Tonya is the voice behind The Crafty Mummy. She dabbles in lots of different crafts – patchwork, quilting, cross-stitch, scrapbooking, knitting, crochet and sewing. This is the record of projects she has done, and the projects she dreams of getting to! Read More…

Search

  • Email
  • Facebook
  • Instagram
  • Pinterest
  • Twitter
  • YouTube
Shop my Affiliate Favourites

Fat Quarter Shop for Fabric and More

Grab the Sew Sampler Box Here

AccuQuilt for Cutting Machines and Dies

QuiltyBox for Monthly Treats in the Mail

CreativeBug for Craft Classes

Pretty Darn Cute for Blog Designs like mine

Creative Market for Fonts, Images, Themes and More

OzGameShop for All the Games

Adrift for Fashion you’ll Love

Kindle Unlimited Membership Plans

Kindle Book List

Click to shop my kindle book list
Shop my Amazon Influencer Shop
Join the CrochetU and learn to crochet
New to TheCraftyMummy.com? Click here to see more
Blog Tools I use for TheCraftyMummy.com

Grammarly

Aweber for email newsletter

CoSchedule to stay organised and share

Milotree for social media

Genesis for blog framework

FoodiePro is my theme

Hosting with WPEngine

Powered by

Recent Articles

Disclosure: There are affiliate links on this site. This means that I may get a commission if you choose to purchase after browsing via these links - at absolutely no extra cost to you, of course. I only recommend products which I use and love, or that I think will be quality products that will be useful to my readers. It is the affiliate links in this site that help me keep my tutorials free of charge. Thank you!

Looking for something? Search here:

Copyright 2015 The Crafty Mummy · Built using Genesis Framework & Foodie Pro Theme