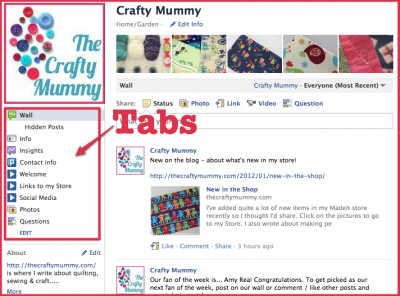
On the left hand side of your Facebook page, you can add Tabs. These are extra pages where you can share information and links with your readers. Some of the tabs are created by Facebook and can’t be changed or removed, but others are customisable. I thought today I’d share some information on how to work with tabs. I’ve taught myself so hopefully I can share what I’ve worked out.
Editing your existing tabs
- Click on Edit Page (top right of your Facebook Page) to start editing.
- Under Manage Permissions you can set the default landing tab. This is the Tab that new visitors will automatically go to. If you haven’t changed it, it will be your wall.
- Under Apps, you can see all the other added tabs you have already and change the settings on them. You can also find the links for each of the tabs. (This is useful if you want to link to a particular tab from a blog post.) You can click on the X at the right of each app to remove it from the list. To change the name from “Custom Tab 1” to “Welcome”, click on the settings under the Tab.
- Note: The Wall and Info tabs are permanent. The Insights tab is only visible to the page administrator.
- You can also remove tabs from your page by hovering just to the left of the name of the tab, then clicking the X that appears there.
Changing the order of your tabs
- Just below the list of tabs on your FB Page there is a button that says Edit. Click that to change the order of your tabs list.
- The Wall, Info and Insights tabs cannot be moved but you can move any of the other tabs by clicking and holding down the mouse on the name of the tab, then dragging it to where you want it in the list.
- Click “Done” when you’re happy with the order.
Creating New Tabs
I have used two different free applications to create new Tabs.
- Pagemodo and
- Short Stack
Both are easy to use and update. I found Short Stack to have a lot more options. I can create as many extra tabs as I like for as many extra FB Pages as I have. I can go back and add to those tabs easily. I can start with a template or create a tab from scratch. I can even create sections within the pages that can only be seen by people who have already “liked” my FB Page. I made my Welcome tab with Short Stack and my Contact tab with Pagemodo.
Of course, as with every freebie, there are limitations. There are things that you can’t do unless you pay for a Plan, but until you have 2000 followers on your FB Page, you can use the basic ShortStack free plan.
How to Create a New Tab Using ShortStack
- Once you have set up your account, you can click a button to “Create Blank Tab” or “Create Tab from Template”. I’d suggest you start with a Template if you can see one that has the things you want. You will be able to add and remove things once you’ve chosen it.
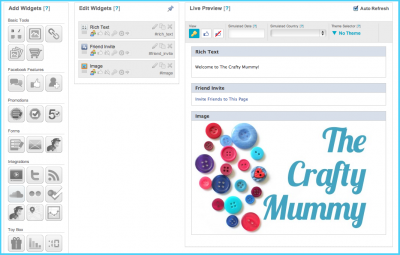
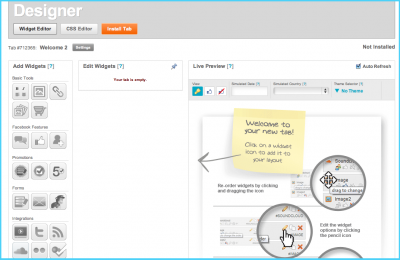
 You will automatically go to the Designer screen. On the left you’ll find all the gadgets you can add to your tab. On the right is a preview of what your page looks like as you build it. In the middle is the gadgets you have chosen.
- Click on a gadget on the left to choose it. It will appear in the middle column, and often pop open for you to edit it. For example, a Rich Text widget will open with a screen for you to type you text and change the size, colour, etc. Save when you’re done and you will see the update appear in the right Preview section.
- In the screen shot above you can see that I’ve added a Rich Text gadget, the Friend Invite gadget that allow your visitors to invite their friends to your page as well, and an Image gadget. The picture with the buttons was one that I created using Picasa.
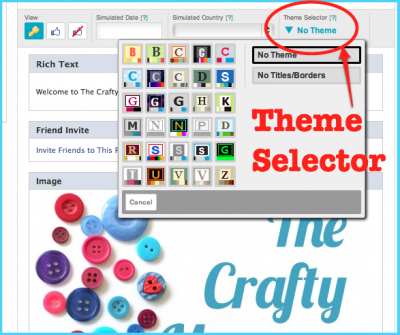
 Once you have a couple of gadgets on your page, you can use the Theme Selector to adjust how they look. You can also choose to remove the titles and boxes around the gadgets.
- Other gadgets you can include:
-
- RSS feed
- Video
- Gallery of pictures with links
- Links
- Comments
- Like Button
- Promotions and Voting
- Mailchimp newsletter sign up
- Contact form
- Custom form for entries, surveys, reservations, etc.
- Integrated social media – Twitter, Foursquare, Flickr, Mailchimp
- Google Maps and Analytics
- Virtual gifts
- Polls
- Countdown
-
- There are some coding options for techy folks like iFrames, flash, plain text for adding HTML, and code for adding Java.
- There is the option to set some gadgets as only visible to Fans of your page and others visible to Non-fans. For example, if you come to my Welcome tab, you can see my tutorial buttons only if you are a Fan. Non-fans see a suggestion to “Like” my page in order to see them. I’ve seen pages give Fans a coupon code this way too.
- Finally once you have your Tab all ready to share on your page, click the Install tab button at the top left and choose Quick Publish and the page you want to associate it with.
Note: Back at your Facebook Page, you can make your new Tab the first thing that new visitors see by making it the Default Landing Page. (Use the steps earlier in this post to “Edit Your Existing Tabs”.)
EDIT: The new Timeline for FB pages no longer lets you set a default landing page. But you can “pin” a post to the top of your Timeline that directs people to your Welcome page.
UPDATE: See my notes on Timeline Page Tabs here.
Need more help?
Leave me a comment and I’ll do my best. ShortStack also provides Help on their site so look there as well.
Made your new Tab?
I’d love to visit and see it! Leave me a comment, or visit my Facebook page and leave a message on my wall with your page.


Thank you so much fro writing this up – I am still head buzzing and need to digest it – will play around in the week when the kids are at school and I can think clearly (need to be alone to do that)
Absolutely, Deb. The best way to learn something is to have a go I think!
THis is brilliant I was going to tagged Deb (homelifesimplified) on facebook so that she good find your page….seems she beat me to it 🙂 Fantastic post and excellent help 🙂 Thank you so very much 🙂
Oh no! More techie things I need to get done! I have just added these things to my list… That would be the list of things to ask you to help me with next time we have a blogging night!
see that’s what i need – a blogger in my life to do tech things together!! I have no friends that blog.
You have to find one, Deb! We have the hardest time not talking geeky bloggy stuff at Playgroup! It’s great motivation and inspiration
I’m glad you have a list – otherwise we might get distracted by chatting about other stuff…
I had no idea you could change the tabs! Thanks for sharing the tips!
Thanks for sharing this information. I’ve been thinking of adding a welcome page so your post is very timely.
Thanks so much!!
Cool Beans! 🙂
Thank you so much for sharing!
Thank you for this! I was wondering how to create some custom tabs and was really getting frustrated trying to figure it out. – Feisty Mom