The Crafty Mummy

Crafts. Sewing. Quilting. Crochet. Tutorials.

  • Start Here
  • Welcome
    • Subscribe
    • About Me
      • Copyright
      • Disclosure
      • Privacy Policies
    • Advertise
    • Sharing
      • Recommendations
      • Shopping & Coupons
      • Books
  • Explore
    • Crafts
      • Beading
      • Kids
      • Paint
      • Storage
      • Christmas Crafts
    • Sewing
    • Quilting
    • Stitching
    • Crochet
      • Yarn
    • Life
      • Food
      • Organisation
    • Blogging
      • How To
      • Social Media
      • WordPress Plugins
      • Photography
  • Tutorials
    • Tips
  • Shop on Etsy
  • Shop on Redbubble

How to Add a Border in Picasa

by Tonya Grant |Filed Under: How To, Photography, Redirected Tagged With: Picasa Get a Weekly Update of all Articles

how to add a border in Picasa

Quite a while ago now, I wrote a series of posts about how I edit photos using Picasa. Recently Picasa had an upgrade that added a bunch of great extra features and changed some of the original ones.

So this is an update:

How to add a Border to your Photographs in Picasa
how to add border picasa

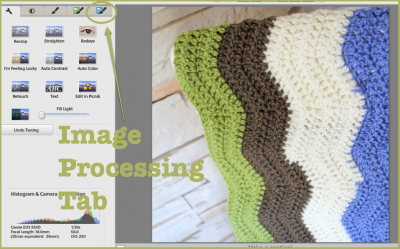
I used to add a border by creating a collage. (You can still do that using this tutorial.) But now you can add a border in the Image Processing Tab (with the blue button). So open your photo, then click the blue tab.
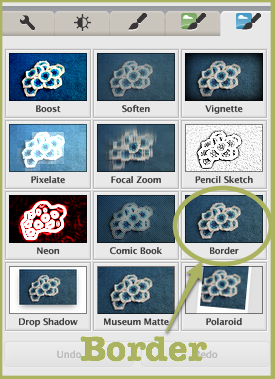
image processing tab picasa

In that tab, choose the “Border” option.
how to add border picasa

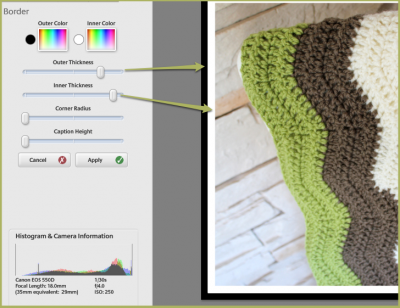
The new border button gives you great options. You have both an inner and outer border, and you can adjust the width of both. If you want only one border, just make both of them the same colour. To change the colour, click on the “rainbow” box near the top of the page. You can move the “dripper” over the colours in your photo to pick one of them or choose from the palette that pops up.

You can also adjust the space for the caption, and round the corners of the inner border and photo.

Once you’re happy with your adjustments, make sure you click “Apply” to save them. You have the option to “Undo” them later if you change your mind.

There are a few more new features in Picasa, but I’ll save them for another day. Have fun exploring!

Do you use Picasa? Which new features do you like?
 

Filed Under: How To, Photography, Redirected Tagged With: Picasa

« Joining Crochet
Newsletter News »
Disclosure: There are affiliate links in this post.  This just means that if you click through and choose to purchase something I may get a small commission - at no extra cost to you, of course.  This helps me keep the content here at The Crafty Mummy free for everyone.

I love to chat so please leave me a comment or ask a question.

Don't stress if your comment doesn't appear immediately - sometimes I have to moderate comments thanks to spam visitors, but the comments from real readers will always get published. Scroll down to add your thoughts or ask a question.

Comments

  1. Little Gumnut says

    April 3, 2012 at 12:36 PM

    Awesome tip. I haven’t really used borders in picasa yet, been going onto picnik or online picasa’s creative kit.

  2. Deb H. says

    April 3, 2012 at 2:00 PM

    Thanks for this, just upgraded Picasa so I can now add borders, etc without having to go online.

  3. Nikki @ Styling You says

    April 10, 2012 at 11:15 PM

    I so need to embrace Picassa!

    • CraftyMummy says

      April 14, 2012 at 10:14 AM

      I’m just starting to play with some of the new features, Nikki. But it looks like fun!

      PS sorry to here about your Pop this week

  4. Michael says

    April 22, 2012 at 12:28 PM

    Thank you! I looked all over and didn’t see where to create borders. I use Picasa for makings buttons, Tshirt and poster designs. I need to add borders to shrink the image but keep the same image color. This works great.

  5. jasmemphis says

    May 9, 2013 at 4:36 AM

    I like being able to add borders.

  6. katy says

    July 1, 2013 at 8:19 AM

    Hi, do you know how to create a border just around the text on a picture?

    • CraftyMummy says

      July 1, 2013 at 9:58 AM

      Hi Katy,
      If I were adding a box around the text on a picture, I would use Skitch. I can’t see any way to do it in Picasa.

  7. Carina says

    July 1, 2013 at 10:23 PM

    I love adding borders, the rounded corners make my photos look a little warmer :). I would love to learn how to use the batch feature, i.e. add my watermark text and border to a bunch of photos in one go – would save me a heap of time. Any tips appreciated, best wishes, Carina

  8. Julie says

    April 11, 2015 at 4:41 PM

    Hi,
    Great tips.:)

    If I create borders will I be able to have the text printed as well?

    I tried printing a couple at Boots yesterday but the grey & text was greyed out.

    I’m also having a hard time working out the colours, for example grey or white – I prefer white.

    I’d really appreciate some tips on this.:)

  9. Kerry says

    May 4, 2015 at 12:03 AM

    Are you aware of any way to batch edit photos with adding a border? I haven’t quite figured it out yet.

    • Tonya Grant says

      May 4, 2015 at 7:11 AM

      I haven’t found a way to batch edit photos in Picasa either, Kerry.

Hi! I’m the CraftyMummy

Tonya is the voice behind The Crafty Mummy. She dabbles in lots of different crafts – patchwork, quilting, cross-stitch, scrapbooking, knitting, crochet and sewing. This is the record of projects she has done, and the projects she dreams of getting to! Read More…

Search

  • Email
  • Facebook
  • Instagram
  • Pinterest
  • Twitter
  • YouTube
Shop my Affiliate Favourites

Fat Quarter Shop for Fabric and More

Grab the Sew Sampler Box Here

AccuQuilt for Cutting Machines and Dies

QuiltyBox for Monthly Treats in the Mail

CreativeBug for Craft Classes

Pretty Darn Cute for Blog Designs like mine

Creative Market for Fonts, Images, Themes and More

OzGameShop for All the Games

Adrift for Fashion you’ll Love

Kindle Unlimited Membership Plans

Kindle Book List

Click to shop my kindle book list
Shop my Amazon Influencer Shop
Join the CrochetU and learn to crochet
New to TheCraftyMummy.com? Click here to see more
Blog Tools I use for TheCraftyMummy.com

Grammarly

Aweber for email newsletter

CoSchedule to stay organised and share

Milotree for social media

Genesis for blog framework

FoodiePro is my theme

Hosting with WPEngine

Powered by

Recent Articles

Disclosure: There are affiliate links on this site. This means that I may get a commission if you choose to purchase after browsing via these links - at absolutely no extra cost to you, of course. I only recommend products which I use and love, or that I think will be quality products that will be useful to my readers. It is the affiliate links in this site that help me keep my tutorials free of charge. Thank you!

Looking for something? Search here:

Copyright 2015 The Crafty Mummy · Built using Genesis Framework & Foodie Pro Theme