The Crafty Mummy

Crafts. Sewing. Quilting. Crochet. Tutorials.

  • Start Here
  • Welcome
    • Subscribe
    • About Me
      • Copyright
      • Disclosure
      • Privacy Policies
    • Advertise
    • Sharing
      • Recommendations
      • Shopping & Coupons
      • Books
  • Explore
    • Crafts
      • Beading
      • Kids
      • Paint
      • Storage
      • Christmas Crafts
    • Sewing
    • Quilting
    • Stitching
    • Crochet
      • Yarn
    • Life
      • Food
      • Organisation
    • Blogging
      • How To
      • Social Media
      • WordPress Plugins
      • Photography
  • Tutorials
    • Tips
  • Shop on Etsy
  • Shop on Redbubble

Felt Envelope Tutorial

by Tonya Grant |Filed Under: Sewing, Tutorials Tagged With: Felt Get a Weekly Update of all Articles

tutorial felt envelope sewing

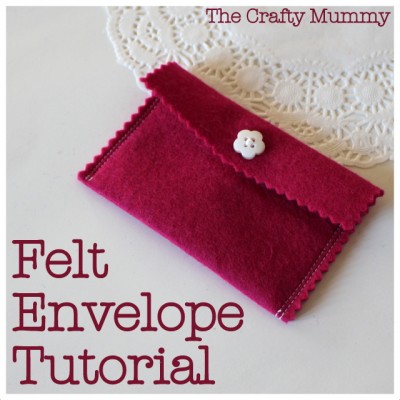
When Plushka’s Makery asked if she could send me some felt to play with, my first project idea was envelopes. I’ve been wanting to develop the habit of writing little notes to my kids – notes to encourage them and praise them for really being pretty fabulous! These would be envelopes that could be used over and over again, and become part of a special tradition. Alternatively you could use them for a special letter or a gift card, or even just to hold your own cards in your handbag.

What You Will Need

  • Felt – 4.5″ x 6.5″ (11.5 x 16.5cm)
  • A button
  • Sewing machine and usual sewing supplies (thread, scissors, pins, pinking shears)

What To Do

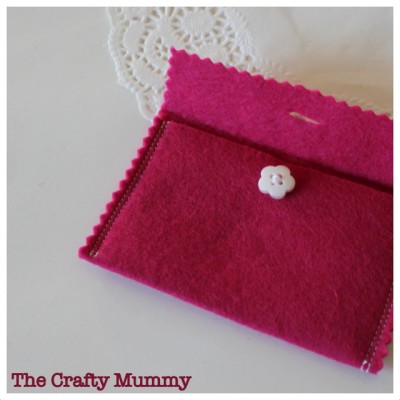
  • Fold one end of the felt up 2.5″ (6.5cm) and press and pin.
  • Sew up each side to create a pocket. I sewed two rows of stitching to tie it in with the other projects I’ve made recently.
  • Fold the top flap down about 1″ (2.5cm) and press.
  • Optional: With the flap folded, trim the edges with pinking shears. Unfold the top flap and trim the top edge with pinking shears as well.
  • Sew the button on.
  • Fold the flap down and cut a little slit for the button to go through.
  • Finished size: 2.75″ x 4.25″ (7 x 11cm)

Notes:

  • The felt won’t fray so the pinking shears are only for looks.
  • You could easily make a larger envelope to hold a notebook, phone, birthday card or larger letters.
  • You may find with a larger envelope you need two or more buttons.
  • For a hidden closure, use a press stud or velcro instead of a button.
  • My thread is contrasting, but if you prefer not to see the stitches, match your thread to your felt.
sewing tutorial felt envelope

Look out later in the week for a blanket with felt decoration. In case you missed it I have already written tutorials for a felt iPhone case and a felt tissue holder.

Thank you to Plushka’s Makery for the gift of felt to make this project.

Filed Under: Sewing, Tutorials Tagged With: Felt

« Felt iPhone Case Tutorial
Blogging Tip: Why does my Font look Funny? »
Disclosure: There are affiliate links in this post.  This just means that if you click through and choose to purchase something I may get a small commission - at no extra cost to you, of course.  This helps me keep the content here at The Crafty Mummy free for everyone.

I love to chat so please leave me a comment or ask a question.

Don't stress if your comment doesn't appear immediately - sometimes I have to moderate comments thanks to spam visitors, but the comments from real readers will always get published. Scroll down to add your thoughts or ask a question.

Hi! I’m the CraftyMummy

Tonya is the voice behind The Crafty Mummy. She dabbles in lots of different crafts – patchwork, quilting, cross-stitch, scrapbooking, knitting, crochet and sewing. This is the record of projects she has done, and the projects she dreams of getting to! Read More…

Search

  • Email
  • Facebook
  • Instagram
  • Pinterest
  • Twitter
  • YouTube
Shop my Affiliate Favourites

Fat Quarter Shop for Fabric and More

Grab the Sew Sampler Box Here

AccuQuilt for Cutting Machines and Dies

QuiltyBox for Monthly Treats in the Mail

CreativeBug for Craft Classes

Pretty Darn Cute for Blog Designs like mine

Creative Market for Fonts, Images, Themes and More

OzGameShop for All the Games

Adrift for Fashion you’ll Love

Kindle Unlimited Membership Plans

Kindle Book List

Click to shop my kindle book list
Shop my Amazon Influencer Shop
Join the CrochetU and learn to crochet
New to TheCraftyMummy.com? Click here to see more
Blog Tools I use for TheCraftyMummy.com

Grammarly

Aweber for email newsletter

CoSchedule to stay organised and share

Milotree for social media

Genesis for blog framework

FoodiePro is my theme

Hosting with WPEngine

Powered by

Recent Articles

Disclosure: There are affiliate links on this site. This means that I may get a commission if you choose to purchase after browsing via these links - at absolutely no extra cost to you, of course. I only recommend products which I use and love, or that I think will be quality products that will be useful to my readers. It is the affiliate links in this site that help me keep my tutorials free of charge. Thank you!

Looking for something? Search here:

Copyright 2015 The Crafty Mummy · Built using Genesis Framework & Foodie Pro Theme