The Crafty Mummy

Crafts. Sewing. Quilting. Crochet. Tutorials.

  • Start Here
  • Welcome
    • Subscribe
    • About Me
      • Copyright
      • Disclosure
      • Privacy Policies
    • Advertise
    • Sharing
      • Recommendations
      • Shopping & Coupons
      • Books
  • Explore
    • Crafts
      • Beading
      • Kids
      • Paint
      • Storage
      • Christmas Crafts
    • Sewing
    • Quilting
    • Stitching
    • Crochet
      • Yarn
    • Life
      • Food
      • Organisation
    • Blogging
      • How To
      • Social Media
      • WordPress Plugins
      • Photography
  • Tutorials
    • Tips
  • Shop on Etsy
  • Shop on Redbubble

Quilting Tip: Binding

by Tonya Grant |Filed Under: Quilting Tagged With: Binding, Pegs Get a Weekly Update of all Articles

pegs for quilt binding

I can’t remember where I picked up this clever idea, but the humble clothes peg can be very useful when you are stitching your quilt binding.

I machine stitch my quilt binding onto the front of my quilt. Then I flip it over and hand stitch it to the back to create a neat finish.

As I’m hand stitching, I use three pegs. Why three? Habit! Two would work just as well, or you could use lots and peg around the entire quilt if you prefer. I just use three.

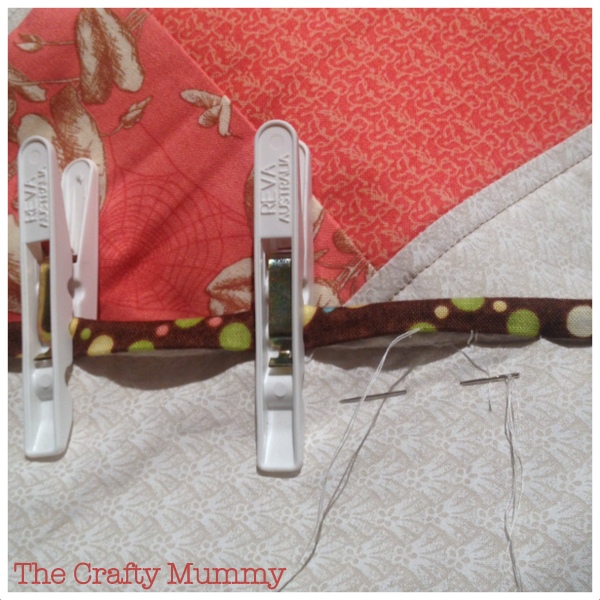
I fold over my binding then peg it into place with my first peg. Then I keep folding the binding further along in the direction I am going to stitch and add the next peg about 7cm away from the first. I do the same with the third peg.

Then I start stitching.

When I come to my peg, I fold over the next section of binding beyond my last peg and move my peg to hold that section.

The pegs hold the fabric ready to sew which makes the stitching easier.

I have seen the same method done with large hair clips, normal pins or special Dritz Quilt Binding Clips.

pegs holding quilt binding

How do you hold your quilt binding?

Filed Under: Quilting Tagged With: Binding, Pegs

« Travelling Crafty
How to Add a Linky Party Button to your Post »
Disclosure: There are affiliate links in this post.  This just means that if you click through and choose to purchase something I may get a small commission - at no extra cost to you, of course.  This helps me keep the content here at The Crafty Mummy free for everyone.

I love to chat so please leave me a comment or ask a question.

Don't stress if your comment doesn't appear immediately - sometimes I have to moderate comments thanks to spam visitors, but the comments from real readers will always get published. Scroll down to add your thoughts or ask a question.

Comments

  1. Jess says

    July 31, 2012 at 12:20 PM

    Oh I love this idea! I just pin it but it never seems to hold as well as I would like.

    Btw, yours is the first IBOT post I read cause I saw the word quilting, and I have sitting on my kitchen table, a whole bunch of beautiful material ready to be sewn but first I must read blogs!

    • CraftyMummy says

      August 1, 2012 at 9:11 PM

      Ah, the responsibilities of a linky party! I hope you got back to your sewing quickly!

  2. tarah says

    July 31, 2012 at 12:45 PM

    oh wow I love this… I’ve been trying to learn how to quilt for sometime so this looks easy!

    • CraftyMummy says

      August 1, 2012 at 9:07 PM

      Glad to help, Tarah! I’d love to see a photo of your quilt…

  3. QuilttemplatesM says

    July 31, 2012 at 3:08 PM

    Great idea! When I did my two quilts that I’ve done, I used straight pins, and they weren’t always easy to put in or to move. Big ugly fingers I guess!

    • CraftyMummy says

      August 1, 2012 at 9:06 PM

      I found I always pricked my fingers with straight pins!!

  4. Yvette @ DTlilsquirts says

    July 31, 2012 at 4:53 PM

    what a fabby idea!!! Definitely will help alot of quilters out there!!!

    • CraftyMummy says

      August 1, 2012 at 9:05 PM

      I hope so, Yvette. I wish I could remember who shared it with me…

  5. Rachel from Redcliffe Style says

    July 31, 2012 at 7:11 PM

    Pegs are great for some many things. This does make it look easy. Rachel x

    • CraftyMummy says

      August 1, 2012 at 9:05 PM

      It does make it easier, Rachel!

  6. Amy says

    August 10, 2012 at 1:42 AM

    Oh you need to switch over to the Wonder Clips … see them at http://www.clover-usa.com/product/0/3155/_/Wonder_Clips_(10_pieces). They come in 10 packs and 50 packs. I love them so much I’ve got about 110 clips at this point. Get them through JoAnn Fabrics and use a 40% coupon. Love them!!

  7. Karen says

    August 15, 2012 at 2:53 AM

    I hadn’t thought of clothes pins for binding – great idea – I use hair clips and as I have a lot of them I will keep using them – I like you use about 3 at a time and just keep moving them along.
    Karen

Hi! I’m the CraftyMummy

Tonya is the voice behind The Crafty Mummy. She dabbles in lots of different crafts – patchwork, quilting, cross-stitch, scrapbooking, knitting, crochet and sewing. This is the record of projects she has done, and the projects she dreams of getting to! Read More…

Search

  • Email
  • Facebook
  • Instagram
  • Pinterest
  • Twitter
  • YouTube
Shop my Affiliate Favourites

Fat Quarter Shop for Fabric and More

Grab the Sew Sampler Box Here

AccuQuilt for Cutting Machines and Dies

QuiltyBox for Monthly Treats in the Mail

CreativeBug for Craft Classes

Pretty Darn Cute for Blog Designs like mine

Creative Market for Fonts, Images, Themes and More

OzGameShop for All the Games

Adrift for Fashion you’ll Love

Kindle Unlimited Membership Plans

Kindle Book List

Click to shop my kindle book list
Shop my Amazon Influencer Shop
Join the CrochetU and learn to crochet
New to TheCraftyMummy.com? Click here to see more
Blog Tools I use for TheCraftyMummy.com

Grammarly

Aweber for email newsletter

CoSchedule to stay organised and share

Milotree for social media

Genesis for blog framework

FoodiePro is my theme

Hosting with WPEngine

Powered by

Recent Articles

Disclosure: There are affiliate links on this site. This means that I may get a commission if you choose to purchase after browsing via these links - at absolutely no extra cost to you, of course. I only recommend products which I use and love, or that I think will be quality products that will be useful to my readers. It is the affiliate links in this site that help me keep my tutorials free of charge. Thank you!

Looking for something? Search here:

Copyright 2015 The Crafty Mummy · Built using Genesis Framework & Foodie Pro Theme