The Crafty Mummy

Crafts. Sewing. Quilting. Crochet. Tutorials.

  • Start Here
  • Welcome
    • Subscribe
    • About Me
      • Copyright
      • Disclosure
      • Privacy Policies
    • Advertise
    • Sharing
      • Recommendations
      • Shopping & Coupons
      • Books
  • Explore
    • Crafts
      • Beading
      • Kids
      • Paint
      • Storage
      • Christmas Crafts
    • Sewing
    • Quilting
    • Stitching
    • Crochet
      • Yarn
    • Life
      • Food
      • Organisation
    • Blogging
      • How To
      • Social Media
      • WordPress Plugins
      • Photography
  • Tutorials
    • Tips
  • Shop on Etsy
  • Shop on Redbubble

Book Week: Dorothy Costume

by Tonya Grant |Filed Under: Sewing Tagged With: Book Week Get a Weekly Update of all Articles

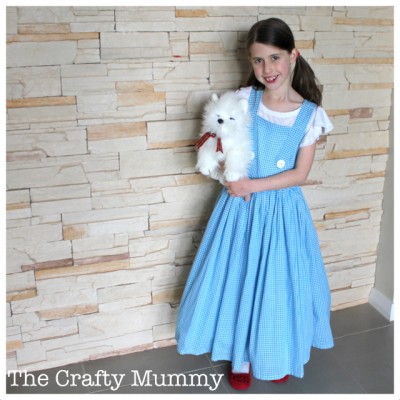
dorothy costume book week

In Queensland schools it is Book Week this week. If you haven’t heard of that before, it is when all the kids are encouraged to explore books and often there is a day when they get to dress up as a book character. Today is that magical day at my kids school.

This year my Little Miss was tossing up between going as Alice in Wonderland and Dorothy from the Wizard of Oz. When a lovely friend offered to lend her a costume, the decision was easily made. Dorothy she would be!

Our friend was a dancer in her youth and has kept every one of her dance costumes for her kids to enjoy. This particular costume includes a gorgeous dress and a petticoat with lots of tulle to make the skirt stand out. Unfortunately it was a little big. So my “Crafty Mummy” skills had to come out!

Adjusting a Dress

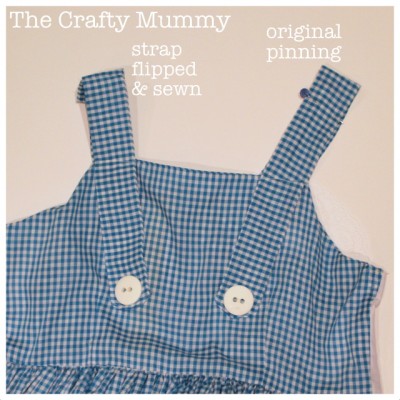
I’m no expert in dressmaking but luckily I understand some of the basics. My first job was to adjust the length of the shoulder straps. This is pretty easy.

adjusting dress straps

  • While wearing the dress, lift the straps until the bodice sits where you want it.
  • Pin the straps close to the top of the shoulder.
  • Try to have the same adjustment in both straps to keep the whole dress even.
  • Take the dress off and turn it inside out.
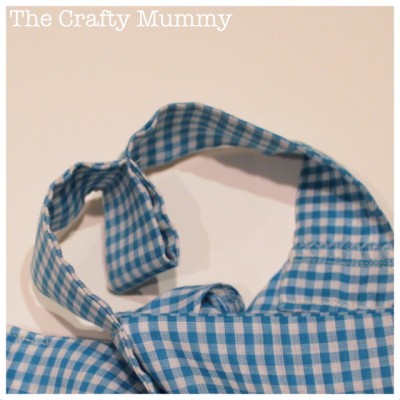
  • Carefully adjust the pinned straps so that the loop of excess fabric is inside out as well.

shortening dress strap


  • Stitch across the strap where the pin was sitting.
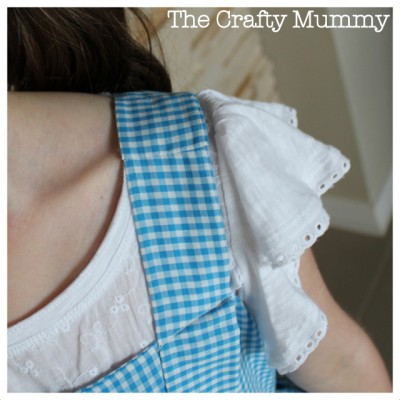
  • If the loop is large, slip stitch it to the underside of the strap to help it lie flat.

dress strap finished


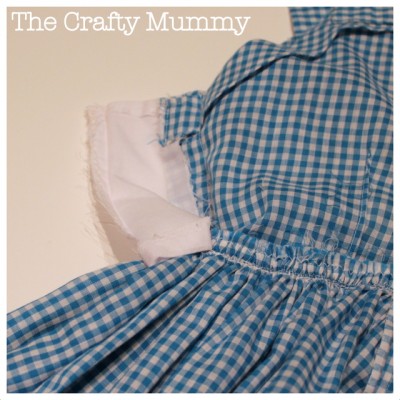
The bodice of the dress was also large on my Little Miss. At some point it had been made larger with two white panels, but I wanted to make it smaller again. Rather than removing the panels altogether, I just took in the side seams to fit.

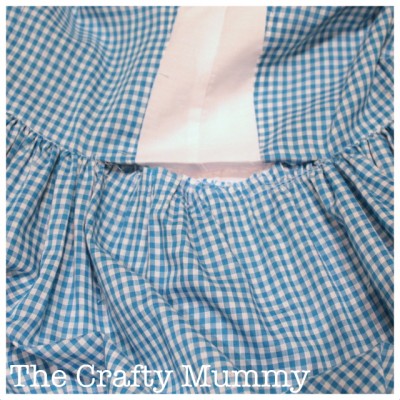
unpick skirt from side seam area

  • While wearing the dress, measure how much to take each side in.
  • Again try to take the same amount on each side to keep the dress even.
  • Carefully unpick the skirt where it meets the bodice where you are going to adjust.

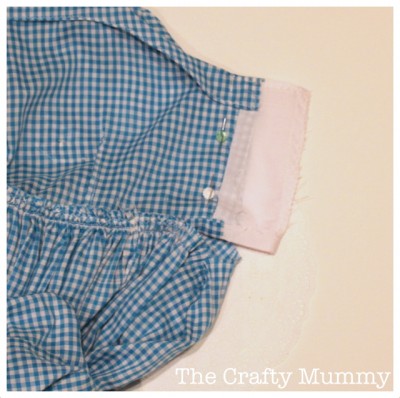
pin side seam

  • Turn the dress inside out and pin the seams where you are going to sew.
  • Sew along the line of pins from the arm hole to the waist.
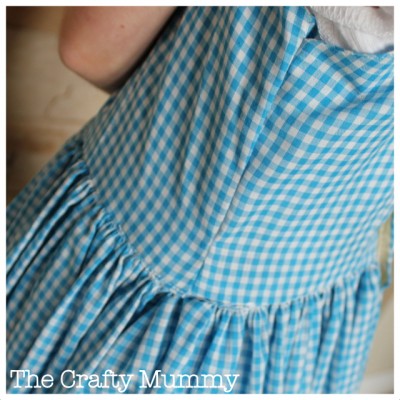
  • Gather the skirt to fit the new waist and stitch it on.
  • Do the same on the other side.

dress seam adjustment

Both of these adjustments can be unpicked again of the dress needs to be bigger again. The arm hole didn’t match up perfectly, but as this is only for dressing up, it really didn’t matter.

dress side seam done

 The underskirt was super easy to adjust. We just pulled the waist elastic out of the casing and tied a knot it in to shorten it. Again this could be easily re-adjusted.
Did your kids take part in Book Week? Who did they dress up as?

Filed Under: Sewing Tagged With: Book Week

« Sew a Reversible Wrap Skirt
Adjust a HTML Table in a Blog Post »
Disclosure: There are affiliate links in this post.  This just means that if you click through and choose to purchase something I may get a small commission - at no extra cost to you, of course.  This helps me keep the content here at The Crafty Mummy free for everyone.

I love to chat so please leave me a comment or ask a question.

Don't stress if your comment doesn't appear immediately - sometimes I have to moderate comments thanks to spam visitors, but the comments from real readers will always get published. Scroll down to add your thoughts or ask a question.

Comments

  1. Lynne says

    August 25, 2012 at 5:30 PM

    Little Miss looks very happy!

    • CraftyMummy says

      August 30, 2012 at 7:30 AM

      She certainly was, Lynne! She loves long swishy dresses

Hi! I’m the CraftyMummy

Tonya is the voice behind The Crafty Mummy. She dabbles in lots of different crafts – patchwork, quilting, cross-stitch, scrapbooking, knitting, crochet and sewing. This is the record of projects she has done, and the projects she dreams of getting to! Read More…

Search

  • Email
  • Facebook
  • Instagram
  • Pinterest
  • Twitter
  • YouTube
Shop my Affiliate Favourites

Fat Quarter Shop for Fabric and More

Grab the Sew Sampler Box Here

AccuQuilt for Cutting Machines and Dies

QuiltyBox for Monthly Treats in the Mail

CreativeBug for Craft Classes

Pretty Darn Cute for Blog Designs like mine

Creative Market for Fonts, Images, Themes and More

OzGameShop for All the Games

Adrift for Fashion you’ll Love

Kindle Unlimited Membership Plans

Kindle Book List

Click to shop my kindle book list
Shop my Amazon Influencer Shop
Join the CrochetU and learn to crochet
New to TheCraftyMummy.com? Click here to see more
Blog Tools I use for TheCraftyMummy.com

Grammarly

Aweber for email newsletter

CoSchedule to stay organised and share

Milotree for social media

Genesis for blog framework

FoodiePro is my theme

Hosting with WPEngine

Powered by

Recent Articles

Disclosure: There are affiliate links on this site. This means that I may get a commission if you choose to purchase after browsing via these links - at absolutely no extra cost to you, of course. I only recommend products which I use and love, or that I think will be quality products that will be useful to my readers. It is the affiliate links in this site that help me keep my tutorials free of charge. Thank you!

Looking for something? Search here:

Copyright 2015 The Crafty Mummy · Built using Genesis Framework & Foodie Pro Theme