A couple of weeks ago I shared this tutorial over at Twelve Crafts Till Christmas but here it is in case you missed it over there!

I have made heaps of these little singlets over the years – for my own kids and as gifts for new babies. Recently I started to make them in threads to match baby quilts and wraps I had also made. I use waste canvas. This is like Aida cloth with a very even weave that creates squares to cross stitch evenly, but when you wet it, the adhesive dissolves and you can remove the threads leaving just the stitching. Mine has a blue thread through it every five rows which makes it easy to count and distinguishes it from the other Aida in my stash. I have also seen a product called “Soluble Canvas” which does the same thing but is more like a sheet of plastic.
A little bit will go a long way – I bought some many years ago and have not had to buy more yet because I use such a small amount on each project. You can use this method to cross stitch onto any fabric really – a shirt pocket, the front of kids’ dress, a bag or a headband – just use your imagination!
You’ll need:
A cross stitch design to stitch

The first thing to do is choose your design so you’ll know how big it will be. I’ve done a very simple row of 3 hearts. There are lots of free patterns available online if you Google “free cross stitch charts”, or grab a piece of graph paper and draw one yourself. Simple is better! I have done things like stars, ducks, dinosaurs, cars, trains and letters. Once you have your design you’ll need a piece of your waste canvas, cut slightly larger than your finished stitching size. This is simply so that you can pin it into place while you stitch.
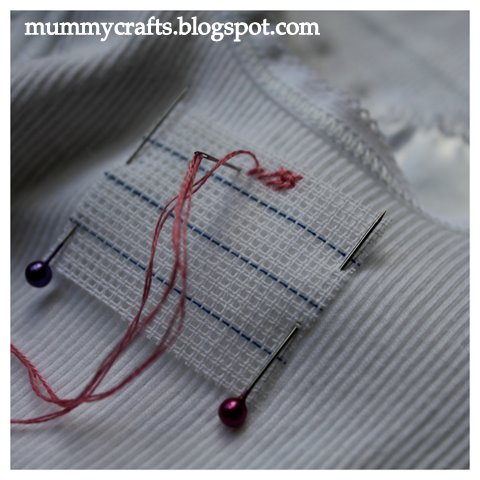
Then you do your cross stitch. You can find a tutorial for that here. I have also shared my tutorial for starting stitching without a knot on my blog.
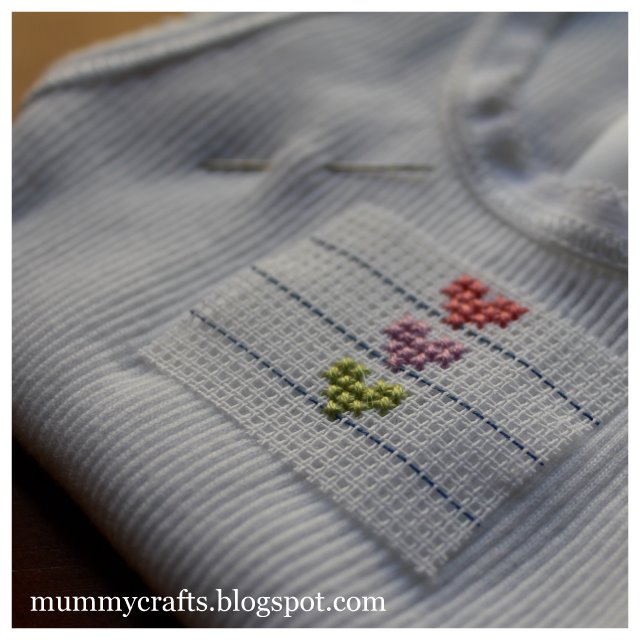
Here are my little hearts all done. They match Miss L’s baby quilt perfectly!
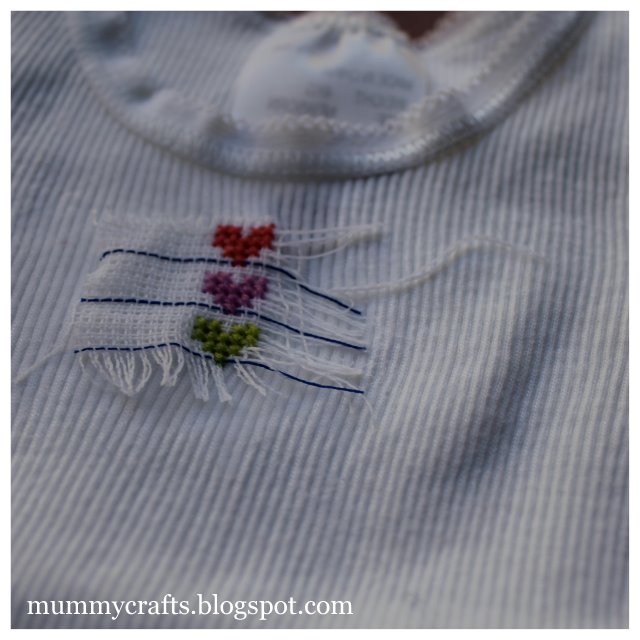
Now remove your pins and needle and pop your stitching under a running tap for a second. You just want the fabric to be damp, not saturated and dripping all over you! Give it a gentle rub and gently tug at the threads. They should start to come away at the edges. Gently draw all the threads out. I sometimes find a pair of tweezers helps to grab the ends. If you have trouble, try a little more water to dissolve the adhesive more.
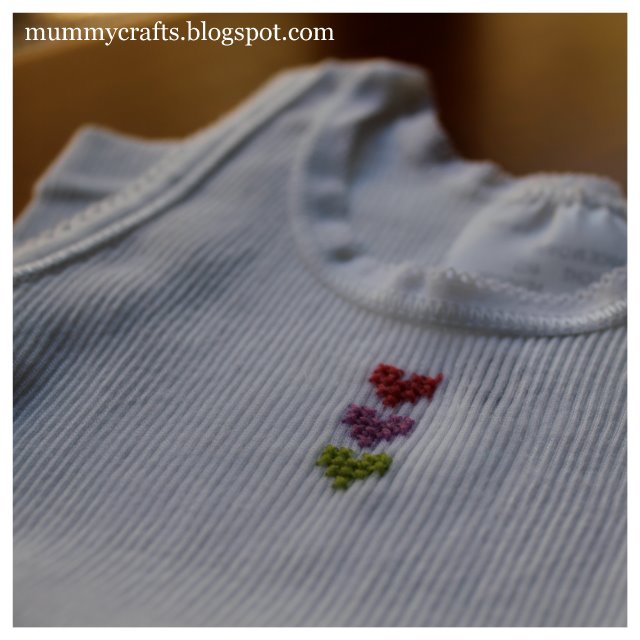
And here’s the end result!


What a lovely idea! A friend of mine just had a baby and this is so sweet! Thanks for sharing.
What an adorable idea for a quick and simple (almost) home-made gift idea. I love it. Thanks for sharing.
I'd never heard about waste canvas before, but as an avid cross-stitcher I can't wait to pick some up! Thanks for the inspiration!
Gracias por mostrar el tutorial, se ve muy original la camiseta con los pequeños corazones.
What a beautiful idea!!
I did an angel on a onesie for my baby's christening outfit–twenty years ago.
I also put a bit of interfacing on the back, used a sharp needle, and cut away the excess interfacing when done.
I miss making them. I've used teddy bears, ducks, and a heart with "I love you"
What a beautiful gift!
BEAUTIFUL! I wish I were crafty to do this! Plus, had a little baby or grandbaby to do this for! 🙂
Best,
Gloria
so sweet! i am thinking about learning to cross stitch (not a far step away from felt food making i think)… also liked the link to starting your stitching with no knots. useful tip 🙂
This is a darling craft. I can think of so many uses for this type of project. Thank you for sharing the tutorial and for linking your project to the Boardwalk Bragfest. It's a great technique!
I love this idea, so cute!! Thank you for sharing the tutorial!
That is the neatest thing ever! Thanks for sharing over at Tuesday Tell All.
That is just so sweet and dainty! I love it, how precious for a little one!
I love this idea. It is so simple and pretty. Versatile too!
Great project! I just wanted to let you know that we featured this project on our Facebook page with almost 12,000 fans. We’d love it if you’d use our Featured Blogger button, available at: http://www.dailycraft.com/thank-you-for-crafting/. Our audience loved the project and we look forward to sharing more from you. Please let us know if you have any questions or projects you’d love us to feature! Thanks!
Thanks, Daily Craft. Feel free to link to my giveaway today http://thecraftymummy.com/2011/06/fat-quarter-shop-giveaway/
I was going to put a link on your Facebook wall but it kind of feels like spamming…
Is there anything special that you do on the back of the singlet so that the thread doesn’t irritate the babies skin? I’ve wanted to try using waste canvas but I’ve never been able to figure out if I need to put something on the back or not so any help is much appreciated!! =o)
Great question, Stitcher. My kids wore similar singlets as babies and they were fine.
But every child is different and some may experience irritation I guess. I’d probably try a layer of soft fabric ironed on the back of the stitching once it is finished to cover the threads. You could iron it on with a double sided fusible webbing like Heat n Bond:
thank you so much for the information and the quick reply! =o) I had never seen anything called Heat n Bond so I’m super excited to try that. Thank you again!!
I found your ideas for decorating a singlet with cross stitch . Thank you
Bit late but hey my first Grandchild is due January 28th 2016. So I’m off to get started.
God bless
Lee
Just found your blog while looking for ideas for embroidered baby singlets. I have some wet canvas. Can’t remember where, when or why I bought it. Didn’t even know what it was called. I tried it the other day on a bubby singlet and it worked a treat. Thank you. So happy I found you.