The easiest way I have found to make a text button is with Skitch. This is a magical little free application for Apple users (sorry to all you non-Apple users, although there is an app for android phones) that allows you to take a “photo” of anything on your screen then add drawing elements to it. But you can also just use it as a drawing tool. Now there are lots of other tools out there that do similar things, but here’s how I use a tool I already have on my desktop.
Start by opening a new document: In the top menu, click “File” > “New”
Then click and drag the corners to adjust the size of the box: Dragging the very outer corners will resize the whole canvas while keeping the dimensions proportional. Dragging the inner corners will resize the rectangle by moving only the corner you have clicked, so you can make the rectangle into a square, for example.
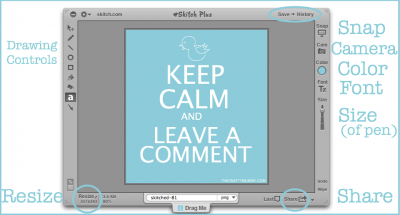
Down in the lower left corner you can see the resize in pixels. If you click on that you can choose pre-set sizes or type in proportions in pixels.
Now comes the fun part! Use the drawing controls on the left side to
- Write words with the letter tool
- Draw a border with the rectangle tool
- Draw dots or circles with the circle tool
- Draw random lines, straight lines or arrows – I’m sure you can see the tools!
- Fill in the background colour with the bucket tool
- Erase mistakes with the eraser tool
Adjust all of the above with the controls on the right side
- Color
- Font
- Size of the “pen”
Once you are happy, you can “share” your picture. Click the Share button in the lower right corner. You can choose options but I usually upload it to the Skitch site as a “Secret” file then download a copy to my computer to use on my blog posts.
Skitch has lots of functions that I know I haven’t explored or used yet. I often use it for grabbing a picture of a screen for tutorials like this. Like many applications, I have worked out a way to do what I need to do and not looked further, so I’m sure it does lots more.
Some Skitch Tips:
- To have words in multiple fonts and sizes, enter them each separately. Then you can edit each one – font, colour, size, and position on the canvas.
- To see things you have Skitched in the past, click History in the top right corner. You can save to the History there as well.
- You can save your files in various formats with the roll down tab at the bottom of the editing box.
- If you click the “Drag Me” button, you can drag and drop the image onto your desktop or into another application.
- Read more about what Skitch can do at The Inquisitr


sweet!! just what I need!! ) Thanks!
You’re welcome!
Oh wow, I could maybe even think about trying that Tonya!! You explain it so well. Thanks. I’m here from #teamibot & it was great to meet you at Blogopolis too. Denyse
Thanks Denyse. It was great to meet you in person. I look forward to meeting you again at some other blogging event!
I hadn’t heard of sketch before, but I’m always on the look out for these kind of apps before, so Thankyou.
Off to visit the app store now….
Glad to help, Jess.
I love new apps, thanks!
This one is great, Bron, I use it every day!
am I missing something? I downloaded this to my iPad, but don’t have any selections down the right hand side, so I’m totally stumped as to how to ue it (there also isn’t a file-new option…) maybe I need to do some searching, and add to your how-to?! it looks like a great little app to play with, though!
I use it on my MacBook, Cate so I suppose it could be a little different on an iPad. I’ll see what I can find out…
Great tutorial. I love Skitch. So do my kids! I hadn’t thought of using it to make a button though. I need a new button, do will give it a try!
Thanks! I have wondered about how people do this, will have to try it out!
You’re welcome!