The Crafty Mummy

Crafts. Sewing. Quilting. Crochet. Tutorials.

  • Start Here
  • Welcome
    • Subscribe
    • About Me
      • Copyright
      • Disclosure
      • Privacy Policies
    • Advertise
    • Sharing
      • Recommendations
      • Shopping & Coupons
      • Books
  • Explore
    • Crafts
      • Beading
      • Kids
      • Paint
      • Storage
      • Christmas Crafts
    • Sewing
    • Quilting
    • Stitching
    • Crochet
      • Yarn
    • Life
      • Food
      • Organisation
    • Blogging
      • How To
      • Social Media
      • WordPress Plugins
      • Photography
  • Tutorials
    • Tips
  • Shop on Etsy
  • Shop on Redbubble

Fabric Scrap Bookmarks

by Tonya Grant |Filed Under: Sewing, Tutorials Tagged With: Mother's Day, Tops of 2015 Get a Weekly Update of all Articles

bookmarks scrap fabric

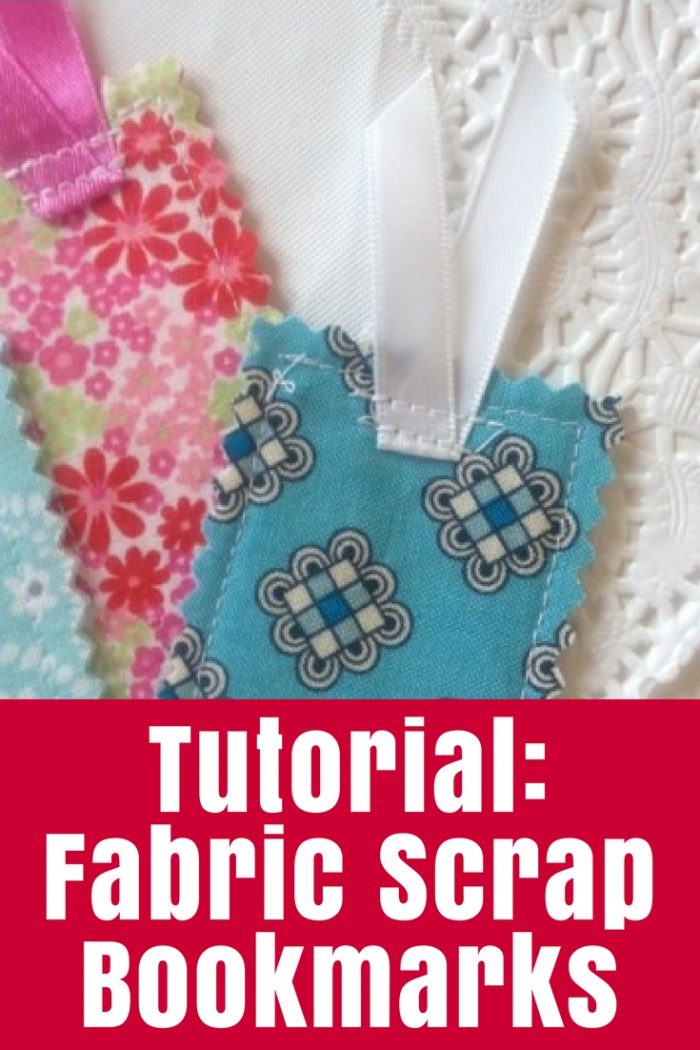
Do you have lots of fabric scraps? Me too! I have scraps from cutting pencil cases and coin purses for my Shop, plus I have scraps of the interfacing I use in the pencil cases. But recently I had an “A-ha” moment: all those scraps could combine to become bookmarks for the crafty stall at Creative Craft Retreat in a couple of weeks. So here’s how I made my Fabric Scrap Bookmarks.

scrap fabric bookmark

I started by cutting all my scraps into strips – two matching strips of each fabric. I didn’t measure them. I just used a rotary cutter and cutting mat to keep them approximately square. They are around 1-2 inches or 3-5cm wide and around 6-9 inches or 15-23cm long.

Shop for rotary cutter & mat here

Next I ironed some interfacing onto the back of one of each pair of fabric then laid the two pieces together with wrong side together.

Shop for iron-on interfacing here

fabric scrap bookmark

Next, sew around the sides about 1/4″ or 5mm in from the edge.

Lastly, trim the edges with pinking shears and add a “V” of ribbon for prettiness!

Shop for pinking shears here

fabric scrap bookmark ribbon

Alternative: You could put right sides together then turn them through if you wanted to. In this case, leave one end open for turning when you stitch, then iron and stitch the opening closed once you have turned through. Don’t use pinking shears on the edges, but you can still add the ribbon.

Do you have lots of fabric scraps? See how I combined a bunch of fabric strips and leftover interfacing to create Fabric Scrap Bookmarks. (click through for tutorial)

bag tag digger sewing  felt bookmarks Father's day

Filed Under: Sewing, Tutorials Tagged With: Mother's Day, Tops of 2015

« Christmas Star Quilt
Would you like to be a Sponsor for November? »
Disclosure: There are affiliate links in this post.  This just means that if you click through and choose to purchase something I may get a small commission - at no extra cost to you, of course.  This helps me keep the content here at The Crafty Mummy free for everyone.

I love to chat so please leave me a comment or ask a question.

Don't stress if your comment doesn't appear immediately - sometimes I have to moderate comments thanks to spam visitors, but the comments from real readers will always get published. Scroll down to add your thoughts or ask a question.

Comments

  1. Crafty Little People says

    November 9, 2012 at 3:20 PM

    These bookmarks look great and so satisfying to find new ways to use scrap fabric. Thanks for sharing.

    • CraftyMummy says

      November 9, 2012 at 5:07 PM

      You’re welcome!

      • Cathy says

        January 1, 2019 at 5:16 PM

        I’m gonna try it out they look nice and handy for markers for my daughter’s school books…ThKU very much 😀

  2. Dani H says

    January 8, 2013 at 4:53 PM

    I’ve thought of doing similar bookmarks but didn’t think of using interfacing! Wonderful! You could even add a couple of ribbons which are long to use as additional bookmarks ie: for use in a cookbook when you want to mark multiple recipes.

    {I found you through “Let’s Get Linky” at ‘BunsInMyOven’}

    • CraftyMummy says

      January 9, 2013 at 9:02 AM

      Great idea, Dani!

  3. Mary Preston says

    February 7, 2014 at 5:08 PM

    I love these. All of my family are great readers, so I will be tucking this idea away for future use.

  4. Kimberly Simpson says

    February 27, 2014 at 12:59 PM

    I love these!
    I am a teacher and would like my students to make these for a unit we’re doing on re-using textiles. Is there a fabric glue that could be used, rather than stitching, so the children could make them without sewing? If so, could you recommend a good one?
    Thanks much!

    • Tonya Grant says

      February 27, 2014 at 1:40 PM

      Hi Kimberley,
      For kids I would just use PVA glue. It would adhere to fabric and dry clear. Even glue stick might work well.
      Hope it goes well,
      Tonya

  5. EmaAn R. Khalil says

    April 7, 2014 at 8:09 PM

    hi I love what u did with those fabric scraps and turned them in to very attractive bookmarks.thanks for sharing

  6. Yusi says

    September 20, 2014 at 8:31 AM

    These are so cute. Do you find the edges unravel after some time of use?

    • Tonya Grant says

      September 20, 2014 at 3:14 PM

      Hi Yusi, I haven’t found the edges have unravelled too much. I suppose if you washed them a lot they would unravel more but bookmarks don’t get very dirty so they don’t need a lot of washing.

  7. Roxie says

    December 3, 2014 at 8:47 PM

    Nice idea for your scraps.

  8. elaine says

    March 12, 2015 at 1:34 PM

    Thanks for this great idea! I don’t throw out my scraps either and this is a great way to use even small pieces! I’ll be adding these to alot of gifts from now on!

  9. Jennifer says

    August 22, 2015 at 1:04 PM

    This is a great idea for my 10 year old daughter to make for her teacher for Christmas. Maybe I can get her to make a few for the other kid’s teachers and I can make a few for her 🙂

  10. Karina says

    November 16, 2015 at 1:51 AM

    Hello!

    I Loved this idea. I used some of my daughters baby clothes to make book marks today. Thanks for the fantastic idea!

  11. mickiie says

    April 15, 2017 at 1:46 AM

    Great idea….think I will make a basket full for my local library check out desk with sign saying……”BOOKMARKS..if you need one, take one” Thanks for the idea.

  12. Penny F says

    January 4, 2018 at 2:32 PM

    This is exactly what I need to try and make!

    I am browsing pinterest for easy sewing projects using smaller scraps.. I came across this! I want to get back into reading more often so this might make me get excited to do that as well! The instructions are simple enough to follow!

    Just have to reteach myself to sew with my sewing machine.. I haven’t used it in a very long time!

  13. Savllen says

    March 12, 2018 at 6:56 AM

    Just made one of these for my son, i used felt in between but he loved it!!

  14. Danielle says

    October 11, 2018 at 11:56 AM

    Hello! Instead of interfacing do you think I could starch, heavily, a piece of fabric for the middle layer?

  15. Deanne Smith says

    May 20, 2019 at 12:45 PM

    OK, I am a total beginner for Hand Sewing and I do not have a machine.
    Is that what they call a Running stitch that you Hand Sew?
    Thank you

  16. Karen says

    August 7, 2019 at 12:49 PM

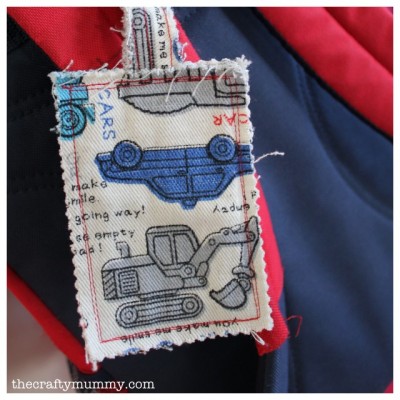
    I found your idea of making book markers out of fabric, so I’m making them for my former coworkers ( I retired in June after working as a Teacher for 35 years). I had extra fabric left and wondered what I’d do for the pieces I cut from the book markers( they were too long), then I saw your idea about bag tags. Do you have a place to put the name on the tag or is it just for visual to know which bag is yours?

    Karen

    • Tonya Grant says

      August 8, 2019 at 9:39 AM

      I didn’t add a name to mine but you easily could add one with a fabric marker or a Sharpie.

  17. Cindy says

    March 17, 2021 at 5:55 AM

    Very cute idea, and Simple! Can’t wait to make a few for my readers in my family and reader friends.

Hi! I’m the CraftyMummy

Tonya is the voice behind The Crafty Mummy. She dabbles in lots of different crafts – patchwork, quilting, cross-stitch, scrapbooking, knitting, crochet and sewing. This is the record of projects she has done, and the projects she dreams of getting to! Read More…

Search

  • Email
  • Facebook
  • Instagram
  • Pinterest
  • Twitter
  • YouTube
Shop my Affiliate Favourites

Fat Quarter Shop for Fabric and More

Grab the Sew Sampler Box Here

AccuQuilt for Cutting Machines and Dies

QuiltyBox for Monthly Treats in the Mail

CreativeBug for Craft Classes

Pretty Darn Cute for Blog Designs like mine

Creative Market for Fonts, Images, Themes and More

OzGameShop for All the Games

Adrift for Fashion you’ll Love

Kindle Unlimited Membership Plans

Kindle Book List

Click to shop my kindle book list
Shop my Amazon Influencer Shop
Join the CrochetU and learn to crochet
New to TheCraftyMummy.com? Click here to see more
Blog Tools I use for TheCraftyMummy.com

Grammarly

Aweber for email newsletter

CoSchedule to stay organised and share

Milotree for social media

Genesis for blog framework

FoodiePro is my theme

Hosting with WPEngine

Powered by

Recent Articles

Disclosure: There are affiliate links on this site. This means that I may get a commission if you choose to purchase after browsing via these links - at absolutely no extra cost to you, of course. I only recommend products which I use and love, or that I think will be quality products that will be useful to my readers. It is the affiliate links in this site that help me keep my tutorials free of charge. Thank you!

Looking for something? Search here:

Copyright 2015 The Crafty Mummy · Built using Genesis Framework & Foodie Pro Theme