The Crafty Mummy

Crafts. Sewing. Quilting. Crochet. Tutorials.

  • Start Here
  • Welcome
    • Subscribe
    • About Me
      • Copyright
      • Disclosure
      • Privacy Policies
    • Advertise
    • Sharing
      • Recommendations
      • Shopping & Coupons
      • Books
  • Explore
    • Crafts
      • Beading
      • Kids
      • Paint
      • Storage
      • Christmas Crafts
    • Sewing
    • Quilting
    • Stitching
    • Crochet
      • Yarn
    • Life
      • Food
      • Organisation
    • Blogging
      • How To
      • Social Media
      • WordPress Plugins
      • Photography
  • Tutorials
    • Tips
  • Shop on Etsy
  • Shop on Redbubble

Chevron iPhone Case Done!

by Tonya Grant |Filed Under: Stitching Tagged With: Case, Cross Stitch, iPhone Get a Weekly Update of all Articles

cross stitch chevron iphone case

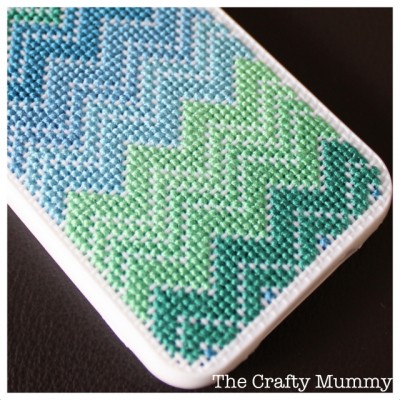
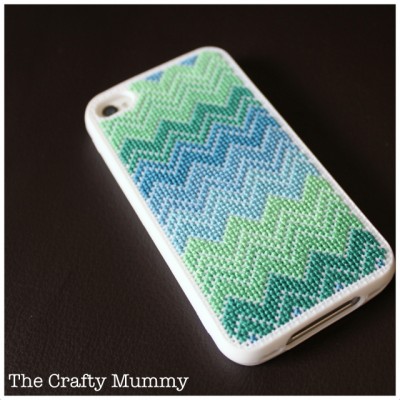
After I started this project at the ProBlogger Event last month, it got lots of lovely comments. But it has been slow going. It has been my “take to swimming and dancing” project so it only had a little bit of time on it each week. But last night when the end was in sight, I sat on the couch and finished it off! So here is my finished chevron iPhone case. I love it!
cross stitch iphone case make it

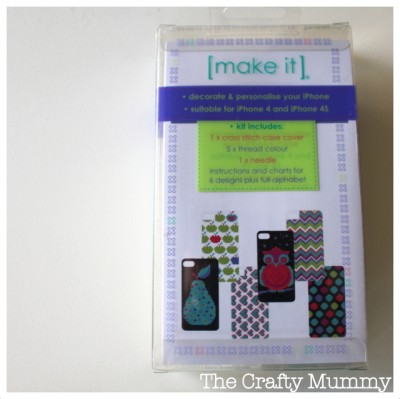
It started out as a kit from the The Haby Goddess. Threads and needle were included as were patterns. But being me, I chose my own threads from my collection and created my pattern as I went along. It is basically a mix of wider and narrower chevrons in ombre colours.

UPDATE: I have recently found cases to stitch in multiple colours on Etsy here.

I used DMC embroidery threads in these colours:

  • darkest green: 991
  • middle green: 912
  • lighter green: 913
  • darkest blue: 3765
  • middle blue: 806
  • lightest blue: 807
cross stitch iphone case chevrons

I used two strands for my cross stitches although the kit recommended one strand. Two strands allowed me to start my stitching without knots which I figured would be flatter on the inside next to the phone. (Hey? How do you start with no knots?! See my tutorial, of course!)

More tips?

  • Try not to make mistakes! I found it was really hard to unpick stitches on this rubbery case and I ruined my thread as I unpicked. I was very careful after that!
  • As with all cross stitch try to make all your stitches look the same by doing the first the first part of the cross the same way each time.
  • The rubbery case is quite bendable, so if you’re having trouble finishing off at the back, try flipping the edges inside out.
  • Consider using a thimble to protect your fingers – it can be a little harder to push through the holes than it is through fabric. (Another thing I learnt the hard way! Ow!)
  • You could do any kind of stitch on these case so if you want to draw a picture, try using back stitches instead.

You can find my previous post about making this iPhone case here: iPhone Case Cross Stitch, and I have shared a few progress shots over on Instagram too.

Disclosure: The ProBlogger Event link above is an affiliate link – Virtual Tickets are still available and I am still listening to the sessions myself so I would highly recommend them. On another note, I bought my iPhone case kit myself, had no obligation or incentive to write this post, and just wanted to share the love by linking back to The Haby Goddess store so you can find one if you want one.

Filed Under: Stitching Tagged With: Case, Cross Stitch, iPhone

« Out and About
Sew an Apron Panel »
Disclosure: There are affiliate links in this post.  This just means that if you click through and choose to purchase something I may get a small commission - at no extra cost to you, of course.  This helps me keep the content here at The Crafty Mummy free for everyone.

I love to chat so please leave me a comment or ask a question.

Don't stress if your comment doesn't appear immediately - sometimes I have to moderate comments thanks to spam visitors, but the comments from real readers will always get published. Scroll down to add your thoughts or ask a question.

Comments

  1. Me N my Monkeys says

    November 15, 2012 at 12:58 PM

    Wow! What an awesome idea. I love how it turned out.

  2. Stefani says

    November 15, 2012 at 1:03 PM

    This looks great! I love the colors you chose.

    • CraftyMummy says

      November 15, 2012 at 2:23 PM

      Thanks Stefani. I seem to be leaning towards these colours in clothes at the moment too!

  3. Leanne V says

    November 17, 2012 at 11:10 AM

    Love the iPhone cover – I just completed one also. I didnt use the designs that came with the kit but with the pattern in the last better homes and gardens mag. Its pinks and purples with hearts and stars.

    • CraftyMummy says

      November 17, 2012 at 4:47 PM

      Sounds gorgeous, Leanne! I’d love to see a picture

  4. Dusti says

    January 4, 2016 at 3:00 AM

    I just finished one of these kits, but my design sorta bubbles out. 🙁 Any suggestions on how to fix that?

    • Tonya Grant says

      January 4, 2016 at 7:30 AM

      Have you just stitched on part of the design area, Dusti? Is it that it bubbles out where your stitching is? If so, why not stitch the background of your design in a solid colour so that the whole surface is stitched and then it would all be the same thickness. The stitching is always going to be thicker than the case but I didn’t find it a problem with mine when I used it.

      Another thought: did you use all 6 strands of the embroidery thread to stitch with? You could use just 2 or 3 strands of thread and that would make your design less bulky too.

Hi! I’m the CraftyMummy

Tonya is the voice behind The Crafty Mummy. She dabbles in lots of different crafts – patchwork, quilting, cross-stitch, scrapbooking, knitting, crochet and sewing. This is the record of projects she has done, and the projects she dreams of getting to! Read More…

Search

  • Email
  • Facebook
  • Instagram
  • Pinterest
  • Twitter
  • YouTube
Shop my Affiliate Favourites

Fat Quarter Shop for Fabric and More

Grab the Sew Sampler Box Here

AccuQuilt for Cutting Machines and Dies

QuiltyBox for Monthly Treats in the Mail

CreativeBug for Craft Classes

Pretty Darn Cute for Blog Designs like mine

Creative Market for Fonts, Images, Themes and More

OzGameShop for All the Games

Adrift for Fashion you’ll Love

Kindle Unlimited Membership Plans

Kindle Book List

Click to shop my kindle book list
Shop my Amazon Influencer Shop
Join the CrochetU and learn to crochet
New to TheCraftyMummy.com? Click here to see more
Blog Tools I use for TheCraftyMummy.com

Grammarly

Aweber for email newsletter

CoSchedule to stay organised and share

Milotree for social media

Genesis for blog framework

FoodiePro is my theme

Hosting with WPEngine

Powered by

Recent Articles

Disclosure: There are affiliate links on this site. This means that I may get a commission if you choose to purchase after browsing via these links - at absolutely no extra cost to you, of course. I only recommend products which I use and love, or that I think will be quality products that will be useful to my readers. It is the affiliate links in this site that help me keep my tutorials free of charge. Thank you!

Looking for something? Search here:

Copyright 2015 The Crafty Mummy · Built using Genesis Framework & Foodie Pro Theme