The Crafty Mummy

Crafts. Sewing. Quilting. Crochet. Tutorials.

  • Start Here
  • Welcome
    • Subscribe
    • About Me
      • Copyright
      • Disclosure
      • Privacy Policies
    • Advertise
    • Sharing
      • Recommendations
      • Shopping & Coupons
      • Books
  • Explore
    • Crafts
      • Beading
      • Kids
      • Paint
      • Storage
      • Christmas Crafts
    • Sewing
    • Quilting
    • Stitching
    • Crochet
      • Yarn
    • Life
      • Food
      • Organisation
    • Blogging
      • How To
      • Social Media
      • WordPress Plugins
      • Photography
  • Tutorials
    • Tips
  • Shop on Etsy
  • Shop on Redbubble

How to Make a Maid Marion head-dress

by Tonya Grant |Filed Under: Sewing, Tutorials Tagged With: Book Week, Costumes, Halloween Get a Weekly Update of all Articles

Learn how to make a Maid Marion head-dress that would be perfect for any medieval lady.

Learn how to make a Maid Marion head-dress that would be perfect for any medieval lady.

Maid Marion needed a head-dress for her costume – according to my Little Miss! No, Mum, not a hat or a headband or just cute hair, but a head-dress. So head-dress it was! This one could double for any medieval lady and be more decorated with a little more time.

What You Need

  • Strip of blue fabric approximately 1m x 25cm (mine was just s a scrap from the dress – it doesn’t need to be exact)
  • Strip of tulle, chiffon or similar for the veil approximately 50cm wide and as long as you want it to hang down the back (mine was a scrap from a fairy costume skirt that we “upcycled”, about 1.4m long )
  • Scissors, thread, needle, pins

Learn how to make a Maid Marion head-dress that would be perfect for any medieval lady.

What To Do

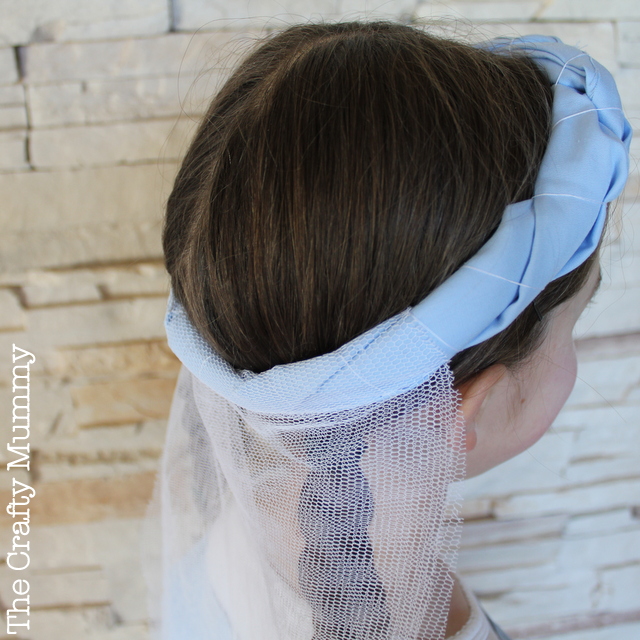
1. Take the blue fabric and twist it like a rope, tucking the unfinished ends inside the twist.

2. Wrap the twisted fabric around the head of your Maid Marion for size and twist the ends into the rope to form a circle. Pin to hold.

3. To hold the rope in shape and stop it untwisting, I planned to stitch the ends in. But I decided a more effective way was to do some small stitches but to also wrap the thread around the twist as I moved around the circle. So start with some small stitches securing one end of the fabric then wrap the thread around the whole rope, working our way around the whole circle. Look at the picture to see what I mean. In hindsight, I could have used a decorative thread for this and made it a feature.

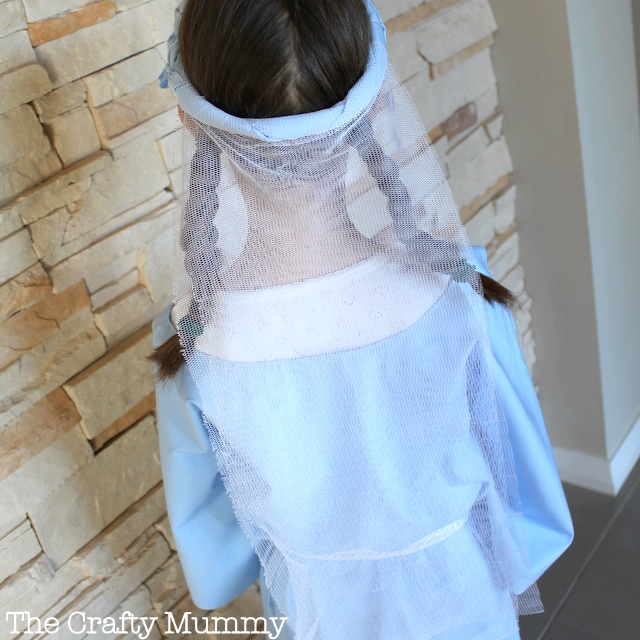
4. Take the tulle strip and thread it through the circle then fold it over itself the create the veil at the back. Once you are happy with the placement and the length of your veil, stitch it into place near the fabric circle.

Find the tutorial to make the rest of Maid Marion’s costume here.

Summary
Maid Marion Headdress
Article Title
Maid Marion Headdress
Description
Learn how to make a Maid Marion head-dress that would be perfect for any medieval lady.
Author
Tonya Grant
Published on
TheCraftyMummy.com

Filed Under: Sewing, Tutorials Tagged With: Book Week, Costumes, Halloween

« Theme of the Week: Father’s Day
ModernQAL: Escalator Block »
Disclosure: There are affiliate links in this post.  This just means that if you click through and choose to purchase something I may get a small commission - at no extra cost to you, of course.  This helps me keep the content here at The Crafty Mummy free for everyone.

I love to chat so please leave me a comment or ask a question.

Don't stress if your comment doesn't appear immediately - sometimes I have to moderate comments thanks to spam visitors, but the comments from real readers will always get published. Scroll down to add your thoughts or ask a question.

Comments

  1. Lucy @ Bake Play Smile says

    October 9, 2013 at 2:07 PM

    What a gorgeous idea! I bet this will get a lot of use in the dress up box over the next few years!

Hi! I’m the CraftyMummy

Tonya is the voice behind The Crafty Mummy. She dabbles in lots of different crafts – patchwork, quilting, cross-stitch, scrapbooking, knitting, crochet and sewing. This is the record of projects she has done, and the projects she dreams of getting to! Read More…

Search

  • Email
  • Facebook
  • Instagram
  • Pinterest
  • Twitter
  • YouTube
Shop my Affiliate Favourites

Fat Quarter Shop for Fabric and More

Grab the Sew Sampler Box Here

AccuQuilt for Cutting Machines and Dies

QuiltyBox for Monthly Treats in the Mail

CreativeBug for Craft Classes

Pretty Darn Cute for Blog Designs like mine

Creative Market for Fonts, Images, Themes and More

OzGameShop for All the Games

Adrift for Fashion you’ll Love

Kindle Unlimited Membership Plans

Kindle Book List

Click to shop my kindle book list
Shop my Amazon Influencer Shop
Join the CrochetU and learn to crochet
New to TheCraftyMummy.com? Click here to see more
Blog Tools I use for TheCraftyMummy.com

Grammarly

Aweber for email newsletter

CoSchedule to stay organised and share

Milotree for social media

Genesis for blog framework

FoodiePro is my theme

Hosting with WPEngine

Powered by

Recent Articles

Disclosure: There are affiliate links on this site. This means that I may get a commission if you choose to purchase after browsing via these links - at absolutely no extra cost to you, of course. I only recommend products which I use and love, or that I think will be quality products that will be useful to my readers. It is the affiliate links in this site that help me keep my tutorials free of charge. Thank you!

Looking for something? Search here:

Copyright 2015 The Crafty Mummy · Built using Genesis Framework & Foodie Pro Theme