One of the trickiest things about setting up an online shop is working out your postage charges. Just the thought of this aspect put me off for a long time. When I set up my store on Ecwid, it looked like it would be easy, and it would have been if I was using one of the shipping providers that were supported by the platform. Unfortunately Australia Post wasn’t on the list, so I had to work out how to create some postage options. My items are mostly flat so they fit in a large envelope, but the weight can effect the charge. After much reading, I worked out how to set up custom tables that would take the weight of my items and calculate the correct postage for them in a large envelope. I created 3 large envelope options for my items, and a parcel option for items going overseas. Let me save you some time (and angst!) and explain what I did. (To learn more about setting up a store on Ecwid, check out this post.)
How to Set up a Custom Shipping Method
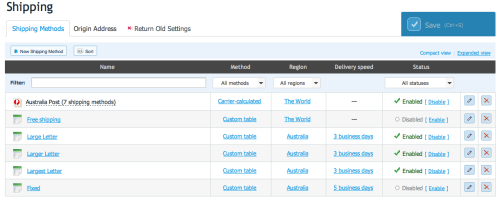
- In your Ecwid Dashboard, choose the ‘System Settings’ tab on the right hand side near the top.
- Then choose ‘Shipping’, and look under Shipping Methods. The screen should look similar to the screenshot above.
- Click “New Shipping Method” to create a new option.
- 1. Choose where your method will apply to – The World or a region from the list.
- 2. Choose Custom Table, then click the button at the bottom to go to ‘Shipping rates & delivery speed’
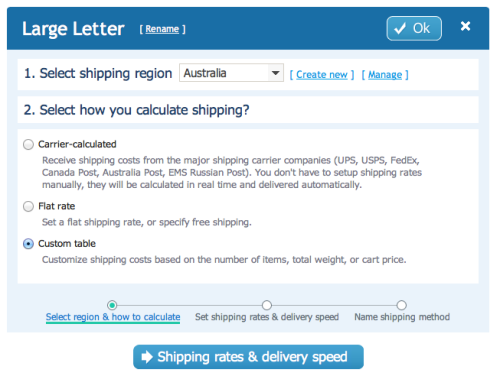
- 3. Choose some settings for your table – you can see my choices in the image below: a table based on ‘Weight’ and a rate based on ‘Range, subtotal, weight’.
- With those options selected you will get some boxes to fill in for Step 4. I used information from Australia Post to set the weight range, then set a postage fee for that weight range. It costs $1.20 to post a large letter within that weight range so I have added some extra to cover the cost of the envelope and handling.
- 5. Then set how many days you suggest it will take for the envelope to get to your customer.
- Once you are happy with your numbers, click the button to go to ‘Name shipping method’
- The last screen simply has a box to give your shipping method a name. Your customer will see this so keep that in mind.
- Finally click ‘Save & Finish’.

Follow the same steps to create each of the custom shipping options you need. You might use large envelopes like I do, or even smaller envelopes. Make sure the options you want are marked ‘Enabled’ on the right of the master list, and disable or delete any options that were already set up.
Finally once your shipping options are all set up, make sure you go into any products already in your catalogue and select from your new options under the shipping tab where you edit each item.
Do you have an Ecwid store? Share your URL in the comments so I can visit you! (Only ‘family friendly’ stores please – This is a family friendly blog)


Hi Tonya!
Thanks for this great article. I am just getting my Ecwid store set up, and while I don’t think I have to worry about any special set up, the whole shipping thing is intimidating to me, so posts like yours do help me understand the whole system a bit more. Thanks again!
Happy to help, Jan! Hope your store goes well.
Hi Tonya
I am just setting up a site and found your shipping advice really helpful – thanks.
As you are in Aus I wonder if you would have any idea how to set up different shipping rates for different states?
Also as my products are dropshipped after purchase on my site do you know how to set up emails following payment? I am using the trial version – which plan are you using for your site?
Many thanks
Your article was helpful, but I’m still struggling to have some automation in exclusions. Some of the stuff I ship will be bulky and go via Fastway courier, who have different rates for different zones of Australia that don’t follow state boundaries.
At the moment, I’ve kinda left it up to the buyer, but need to streamline it significantly.
Any tips?
I am just getting started with an ecwid shop as I am tired of all of the Etsy fees. It certainly looks like shipping will be less complicated than on Etsy. Thanks for your blog.
You’re welcome – I hope it helps you get set up
I have a questions..Been chatting with ecwid tech this morning..Really dont think she understood my problem..
First” I sell only to USA..This has got to be simple….What I do
set up new item page, add the weight, save, click on shipping, set up the Region(USA), select carrier, set up carrier calculating, add the package/box measurements, then give it a “Special Name and save all this.. …. Now..when I go to my website via domain and add that particular item to the cart…..I look at the shipping and it will not just have the shipping I set up for that said item…But, additional methods that have not affiliation with the item…Do you follow me? I sell different items-different size mailing boxes-different weights….One size does not fit all.. Hope you can help better than the edwid tech…Thank You
Hi Deborah,
Unfortunately, I wrote this tutorial back in 2013 and I no longer have my online store. I hope you can work it out though – what do you sell?
Tonya