The Crafty Mummy

Crafts. Sewing. Quilting. Crochet. Tutorials.

  • Start Here
  • Welcome
    • Subscribe
    • About Me
      • Copyright
      • Disclosure
      • Privacy Policies
    • Advertise
    • Sharing
      • Recommendations
      • Shopping & Coupons
      • Books
  • Explore
    • Crafts
      • Beading
      • Kids
      • Paint
      • Storage
      • Christmas Crafts
    • Sewing
    • Quilting
    • Stitching
    • Crochet
      • Yarn
    • Life
      • Food
      • Organisation
    • Blogging
      • How To
      • Social Media
      • WordPress Plugins
      • Photography
  • Tutorials
    • Tips
  • Shop on Etsy
  • Shop on Redbubble

How to Paint a Mandala Canvas with a Stencil

by Tonya Grant |Filed Under: Crafts, Paint, Tips, Tutorials Get a Weekly Update of all Articles

Have you painted with stencils? They are making a huge comeback in interior design and decorating at the moment. I keep seeing them on furniture and walls, and used to create wall art – even on floors! I’ve been wanting to paint some large canvas wall art for a while. In fact, I bought the canvasses ages ago and they have been moved from pillar to post around the house as I try to find time to play with paint in peace. So when the chance came to play with a mandala stencil, I knew this was the perfect chance to create something for the main bathroom. Wouldn’t you love to know how to paint a mandala canvas? I’m all over it!
Paradise Mandala Stencil from Stencil Revolution
This beautiful mandala came from Stencil Revolution, an online retailer with a huge range of designs. They are a small family-run business in Florida who cut each stencil to order.  They have the cutest family pictures on their website – you can see it really is a family thing, not some big company.

Check them out here: Stencil Revolution

      
They have stencils for everything – Halloween, Christmas, Walls, Tiles, Animals, Religious, Military, Sports, States, Letters & Numbers and more. If you are about to start Halloween decorating, this haunted house might be just the thing for the front door. Most stencils come in a bunch of sizes and I love the idea of stencilling a Christmas tree on a wall! But maybe my favourite find as I clicked around their site was the tile stencil section. How cool to paint your own floor tiles!!

How to Paint a Mandala Canvas with One Huge Stencil

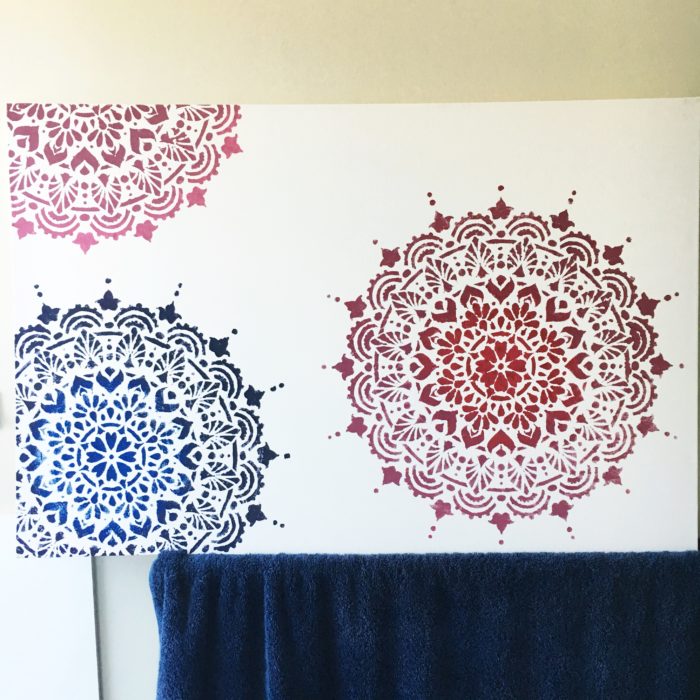
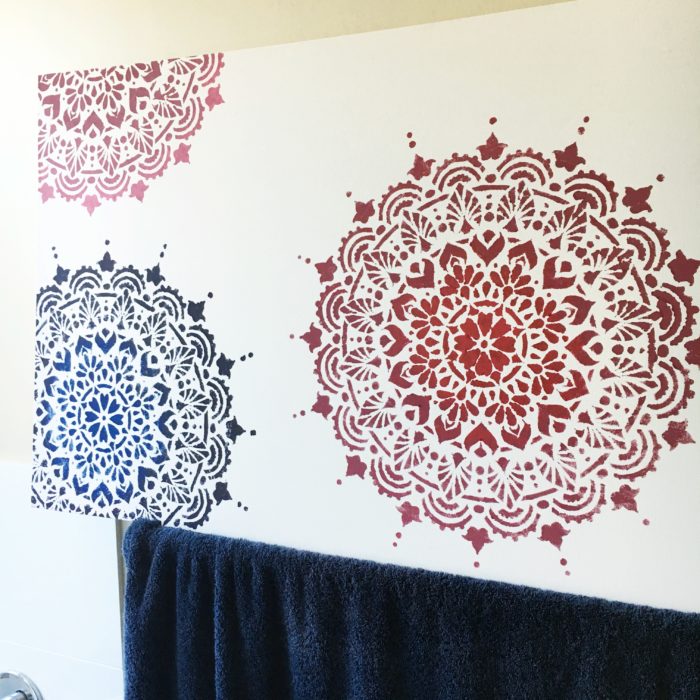
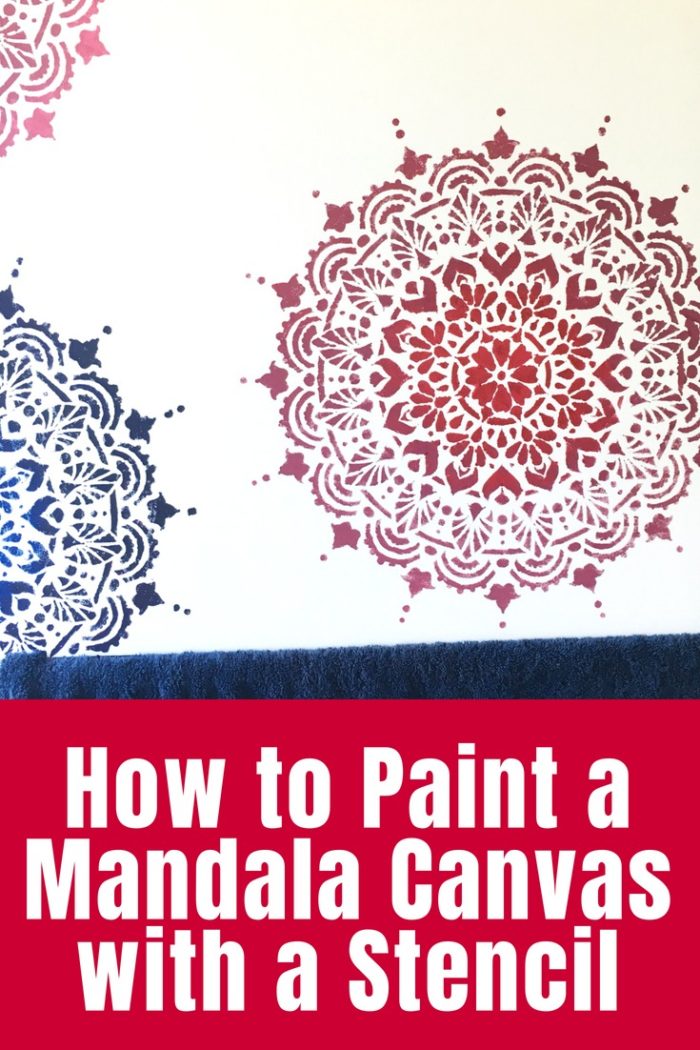
Let me tell you all about my canvas so you can create one too. I only used one large stencil in three different ways to create an interesting piece of wall art for our bathroom.

What You Need

  • Large art canvas – mine is 24″ x 36″ (61cm x 91cm) – shop here
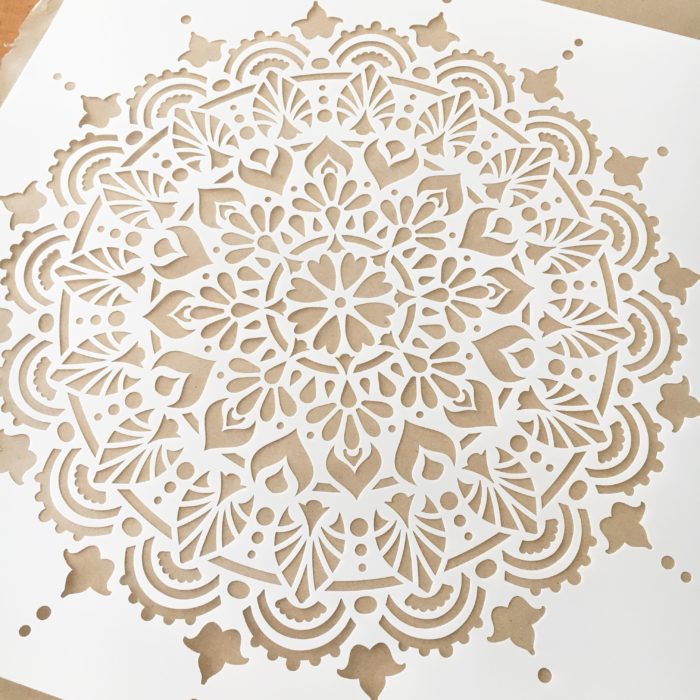
  • Large mandala stencil – mine is the Paradise Mandala in size 20″ – shop here
  • Paint – I used Jo Sonja’s acrylics – in shades of navy and plum pink – shop here
  • Sponge – shop here
  • Paint palette – mine is just a kids’ plastic paint tray like this one
  • Painters Masking Tape – shop here

What To Do

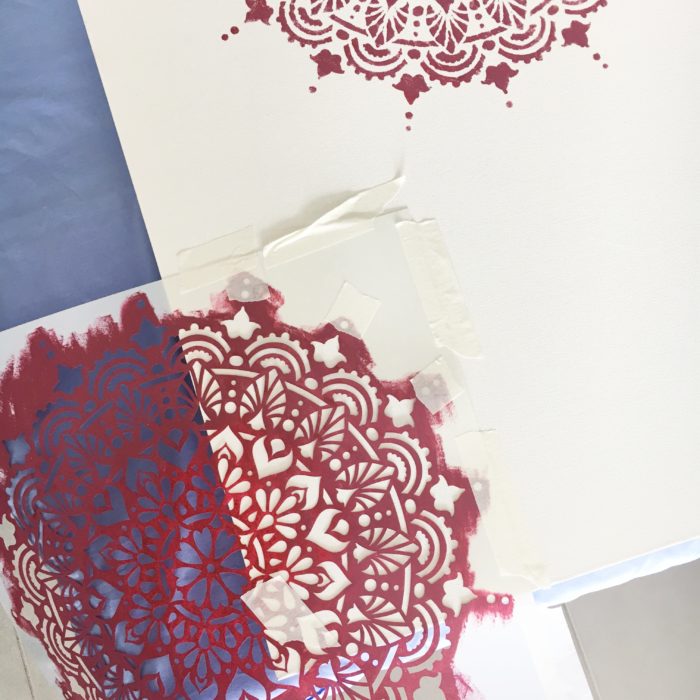
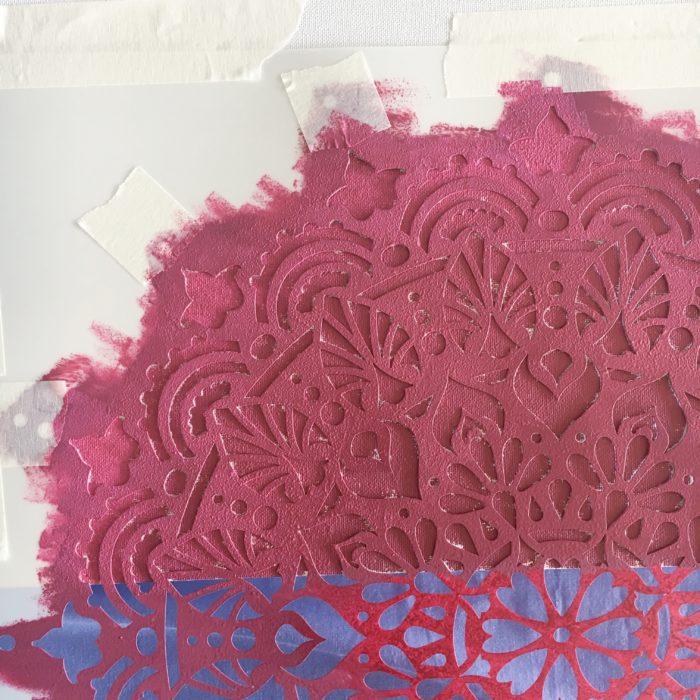
Set yourself up on a large table with a drop cloth to protect the surface. You will need all of your paints, a paint tray and sponge along with your canvas. Think about where you want to paint your stencil. Do you want the entire stencil or just a section of it? The stencils from Stencil Revolution are reusable and can be cleaned although I didn’t clean mine between sessions. My canvas was painted over a couple of days in three sessions to let each one dry between painting. I started with the full-size mandala in two shades of plum pink. Position your stencil where you want it, then tape the edges with painters tape. This will come off easily later without lifting the surface or the paint, but will hold your stencil in place while you work.
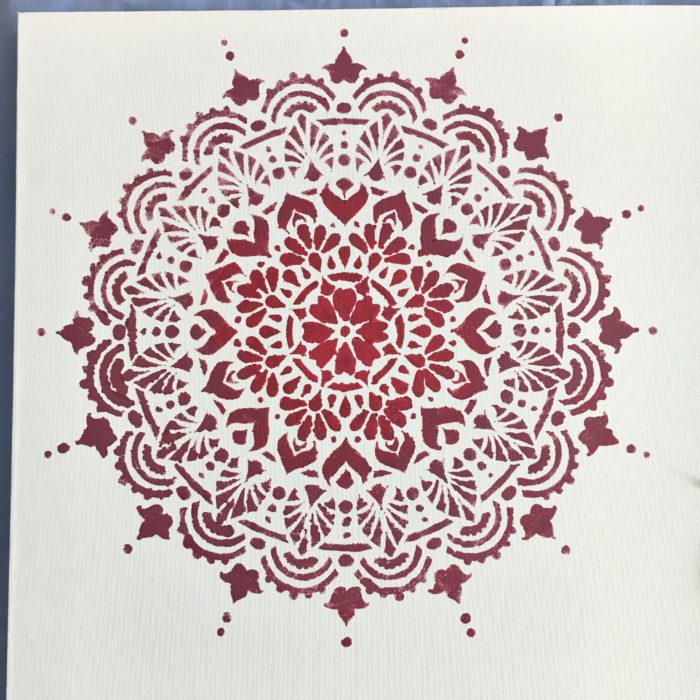
I started with my darker shade of pink in the centre area of the mandala. Dip your sponge in the paint then dab it into another section of your paint tray to take most of the paint back off. Excess paint will bleed under the edges of the stencil so you want less paint rather than more. You can go over an area more than once to build up the colour but you can’t easily remove paint that has seeped under the edge. Dab gently over your stencil to lay down the paint working from the centre in circles around your mandala design. As I got about a third of the way from the centre, I added some of the lighter pink to my sponge to create a mixture of the two colours. As I got to the outer edge, I switched to just the lighter colour. This created a gradual change in the colour throughout the mandala. Once you’ve filled your stencil and you’re happy with the amount of paint, let it dry for half an hour or so before you gently remove the stencil. Allow the canvas to dry completely – overnight if possible – before you reposition your stencil and paint the next section.
I painted a smaller corner section in lighter pink. This time I positioned my stencil hanging off the edge of the canvas and taped it into place securely. I also used painters tape to cover some of the outer dots for the second mandala. Depending on your stencil, you could easily tape sections off and create a different looking mandala by having those areas unpainted. The painters’ tape is great for this because it is easy to tear or cut into the size you need.
Again paint by dabbing the colours and be careful not to load the sponge with too much paint. I again worked from a darker colour in the middle to lighter at the edge of this corner. Later I painted a blue/ purple mandala as well. These colours match the towels in our main bathroom. I positioned this one hanging off another corner to create balance. None of my three images overlap, but you could certainly overlap them. Just make sure the first image is completely dry before you try to paint the second image on top so that the stencil doesn’t smudge the first one.

My Top Tips

  • Tape stencil securely to avoid movement while painting.
  • Work with less paint rather than more to avoid bleeding under the edges of the stencil.
  • Let the paint dry a little before removing the stencil to avoid smudging.
  • Allow paint to dry completely before reusing the stencil on another area of the canvas.
  • Use painters tape to mask sections of the stencil that you don’t want to paint. This can make the same stencil look a little different.
Disclosure: I received my mandala stencil from Stencil Revolution as a gift. This post is purely my opinions and tutorial sharing something I loved working with.
Learn how to paint a mandala canvas using a large stencil and get all my tips for using one stencil more than once to create more interesting wall art.
  • Share on Pinterest Share on Pinterest

More Canvas Art Projects

Filed Under: Crafts, Paint, Tips, Tutorials

« Crochet Cable Blanket Finished
Christmas Crochet Patterns »
Disclosure: There are affiliate links in this post.  This just means that if you click through and choose to purchase something I may get a small commission - at no extra cost to you, of course.  This helps me keep the content here at The Crafty Mummy free for everyone.

I love to chat so please leave me a comment or ask a question.

Don't stress if your comment doesn't appear immediately - sometimes I have to moderate comments thanks to spam visitors, but the comments from real readers will always get published. Scroll down to add your thoughts or ask a question.

Comments

  1. Kristina L Madrigal says

    August 28, 2019 at 10:47 AM

    Hi..i will be trying to stencil a canvas with chalk paint but was told to put something like a piece if wood underneath the canvaa so that the stencil holds tightly in place and will have no bleeding. I do t have anything karge enough to out under a 24×36 canvas. What do you recommend? Thank you.

    • Tonya Grant says

      August 29, 2019 at 9:42 AM

      How about a layer of textbooks with a sheet over them to protect them? That should give you a solid surface under the canvas.

Hi! I’m the CraftyMummy

Tonya is the voice behind The Crafty Mummy. She dabbles in lots of different crafts – patchwork, quilting, cross-stitch, scrapbooking, knitting, crochet and sewing. This is the record of projects she has done, and the projects she dreams of getting to! Read More…

Search

  • Email
  • Facebook
  • Instagram
  • Pinterest
  • Twitter
  • YouTube
Shop my Affiliate Favourites

Fat Quarter Shop for Fabric and More

Grab the Sew Sampler Box Here

AccuQuilt for Cutting Machines and Dies

QuiltyBox for Monthly Treats in the Mail

CreativeBug for Craft Classes

Pretty Darn Cute for Blog Designs like mine

Creative Market for Fonts, Images, Themes and More

OzGameShop for All the Games

Adrift for Fashion you’ll Love

Kindle Unlimited Membership Plans

Kindle Book List

Click to shop my kindle book list
Shop my Amazon Influencer Shop
Join the CrochetU and learn to crochet
New to TheCraftyMummy.com? Click here to see more
Blog Tools I use for TheCraftyMummy.com

Grammarly

Aweber for email newsletter

CoSchedule to stay organised and share

Milotree for social media

Genesis for blog framework

FoodiePro is my theme

Hosting with WPEngine

Powered by

Recent Articles

Disclosure: There are affiliate links on this site. This means that I may get a commission if you choose to purchase after browsing via these links - at absolutely no extra cost to you, of course. I only recommend products which I use and love, or that I think will be quality products that will be useful to my readers. It is the affiliate links in this site that help me keep my tutorials free of charge. Thank you!

Looking for something? Search here:

Copyright 2015 The Crafty Mummy · Built using Genesis Framework & Foodie Pro Theme