The Crafty Mummy

Crafts. Sewing. Quilting. Crochet. Tutorials.

  • Start Here
  • Welcome
    • Subscribe
    • About Me
      • Copyright
      • Disclosure
      • Privacy Policies
    • Advertise
    • Sharing
      • Recommendations
      • Shopping & Coupons
      • Books
  • Explore
    • Crafts
      • Beading
      • Kids
      • Paint
      • Storage
      • Christmas Crafts
    • Sewing
    • Quilting
    • Stitching
    • Crochet
      • Yarn
    • Life
      • Food
      • Organisation
    • Blogging
      • How To
      • Social Media
      • WordPress Plugins
      • Photography
  • Tutorials
    • Tips
  • Shop on Etsy
  • Shop on Redbubble

Bookmarks & Keyrings Tutorial

by Tonya Grant |Filed Under: Sewing, Tutorials Tagged With: Books, Father's Day, Gifts, Kids Get a Weekly Update of all Articles

It’s Father’s Day next weekend and there’s a stall at Little Miss’ school this week where the kids can buy something for Dad.
(You might remember when I made things for the Mother’s Day stall earlier in the year.)
So this time I’ve done a few bookmarks and keyrings – 8 of each because that’s all the split rings I had!

Here’s how:

I started with:

  • 4 sheets of felt (approx A4 size)
  • (2 sheets of felt will make 4 bookmarks & 4 keyrings)
  • iron-on interfacing
  • 8 split rings
  • ribbon (you’ll need about 2.5″ per keyring)
  • fabric paint (to decorate)
  • pinking shears to zigzag the edges
  • sewing machine and thread

Step 1

I decided to have red and yellow felt for one set, and blue and green felt for the other set.
Iron your interfacing onto one of your pair of felt sheets. I ironed onto the blue and the yellow.

Step 2

Cutting
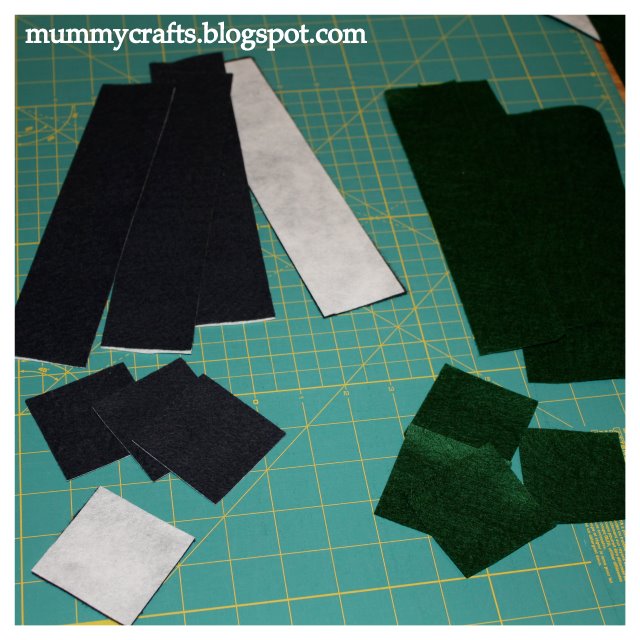
I used my rotary cutter and mat but you can easily use scissors.
I cut 4 strips across the felt sheet, each about 2″ wide. These will be your bookmarks – 2″ x 8.5″ approx.
Then the last bit I cut into 4 squares about 2.5″ square.
Do that for both your sheets of felt.
You’ll end up with all the bits in the photo above – blue bits with interfacing, green without.

Step3

Keyring:
Match up a green and blue square with the interfacing in the middle and pin.
Slip a piece of ribbon through a split ring then tuck the ends into one edge of your sandwiched squares.
I placed my ribbon near but not on a corner.
Make sure that its tucked far enough in that the ends will get caught when you sew.
Bookmark:
Match a blue and a green rectangle with the interfacing in the middle and pin to hold.

Step 4

Sew the squares together about 5/8″ in from the edge.
I started just before the ribbon then finished just past it so it got stitched in twice to reinforce it a bit better.
Then trim the edges with pinking shears.
Be careful when trimming near the ribbon – do each fabric individually on that side of the square so you don’t cut through the ribbon!

Step 5

Repeat Step 4 on the rectangles to make your bookmarks.
Then I added “DAD” with fabric paint but you could decorate with a pattern or buttons or anything!
You could also add ribbon to the top of your bookmark if you like.

I’m thinking next year I’ll do “girly” ones with buttons or flat flowers for Mother’ Day.
They’d also be good to add to a book gift for a child’s birthday or Christmas.

Filed Under: Sewing, Tutorials Tagged With: Books, Father's Day, Gifts, Kids

« Book Week Costume
Starting your stitching with no knots »
Disclosure: There are affiliate links in this post.  This just means that if you click through and choose to purchase something I may get a small commission - at no extra cost to you, of course.  This helps me keep the content here at The Crafty Mummy free for everyone.

I love to chat so please leave me a comment or ask a question.

Don't stress if your comment doesn't appear immediately - sometimes I have to moderate comments thanks to spam visitors, but the comments from real readers will always get published. Scroll down to add your thoughts or ask a question.

Comments

  1. Jami says

    August 30, 2010 at 11:57 AM

    Those are really cute and crafty! Would be great teacher gifts, too!
    smiles!

  2. Judy says

    August 30, 2010 at 10:26 PM

    These are nice! Have a wonderful week.

  3. Kimberlee says

    August 31, 2010 at 12:08 AM

    I love how you made those up! Great for kiddos to add a personal touch. I have to say that I am spoiled by me embroidery machine and ITH (In-The-Hoop) designs, LOL!
    ~Kimberlee

  4. Catch A Falling Star says

    August 31, 2010 at 1:18 AM

    Cute! I have tons of felt I need to use up. book marks and key rings would be a great idea.
    Thanks for sharing.

  5. Kaysi says

    August 31, 2010 at 5:00 AM

    What a great idea, I love these!

  6. Lori@Paisley Passions says

    September 3, 2010 at 1:49 PM

    Darling idea!!! Thanks for joining in on the first Thrilling Thursday linky party @ Paisley Passions. I hope you will join in again next week 🙂

    ~Lori

  7. Joy says

    September 4, 2010 at 2:05 AM

    Very cute idea! Thanks for linking up with Making It Fantabulous Friday on mommaskindcrafty!
    Joy

  8. Laura says

    September 5, 2010 at 1:39 PM

    What a fun idea!

  9. Holly says

    September 9, 2010 at 3:52 PM

    What a great idea – useful and cute and a great gift.

  10. Holly says

    September 9, 2010 at 3:54 PM

    Sorry if this is a duplicate – the computer is acting up!

    What a great idea. Anything that is useful and cute is tops in my book.

  11. Sandy Ang says

    September 18, 2010 at 12:51 PM

    What fun bookmarks

  12. Sheila D. says

    April 30, 2015 at 9:47 AM

    These are so cute! I think they would be great to add to gifts for Christmas.

Hi! I’m the CraftyMummy

Tonya is the voice behind The Crafty Mummy. She dabbles in lots of different crafts – patchwork, quilting, cross-stitch, scrapbooking, knitting, crochet and sewing. This is the record of projects she has done, and the projects she dreams of getting to! Read More…

Search

  • Email
  • Facebook
  • Instagram
  • Pinterest
  • Twitter
  • YouTube
Shop my Affiliate Favourites

Fat Quarter Shop for Fabric and More

Grab the Sew Sampler Box Here

AccuQuilt for Cutting Machines and Dies

QuiltyBox for Monthly Treats in the Mail

CreativeBug for Craft Classes

Pretty Darn Cute for Blog Designs like mine

Creative Market for Fonts, Images, Themes and More

OzGameShop for All the Games

Adrift for Fashion you’ll Love

Kindle Unlimited Membership Plans

Kindle Book List

Click to shop my kindle book list
Shop my Amazon Influencer Shop
Join the CrochetU and learn to crochet
New to TheCraftyMummy.com? Click here to see more
Blog Tools I use for TheCraftyMummy.com

Grammarly

Aweber for email newsletter

CoSchedule to stay organised and share

Milotree for social media

Genesis for blog framework

FoodiePro is my theme

Hosting with WPEngine

Powered by

Recent Articles

Disclosure: There are affiliate links on this site. This means that I may get a commission if you choose to purchase after browsing via these links - at absolutely no extra cost to you, of course. I only recommend products which I use and love, or that I think will be quality products that will be useful to my readers. It is the affiliate links in this site that help me keep my tutorials free of charge. Thank you!

Looking for something? Search here:

Copyright 2015 The Crafty Mummy · Built using Genesis Framework & Foodie Pro Theme