The Crafty Mummy

Crafts. Sewing. Quilting. Crochet. Tutorials.

  • Start Here
  • Welcome
    • Subscribe
    • About Me
      • Copyright
      • Disclosure
      • Privacy Policies
    • Advertise
    • Sharing
      • Recommendations
      • Shopping & Coupons
      • Books
  • Explore
    • Crafts
      • Beading
      • Kids
      • Paint
      • Storage
      • Christmas Crafts
    • Sewing
    • Quilting
    • Stitching
    • Crochet
      • Yarn
    • Life
      • Food
      • Organisation
    • Blogging
      • How To
      • Social Media
      • WordPress Plugins
      • Photography
  • Tutorials
    • Tips
  • Shop on Etsy
  • Shop on Redbubble

Christmas Beaded Stars

by Tonya Grant |Filed Under: Beading, Tutorials Tagged With: Christmas, Christmas Crafts, Kids, Ornament, Stars, Tops of 2015 Get a Weekly Update of all Articles

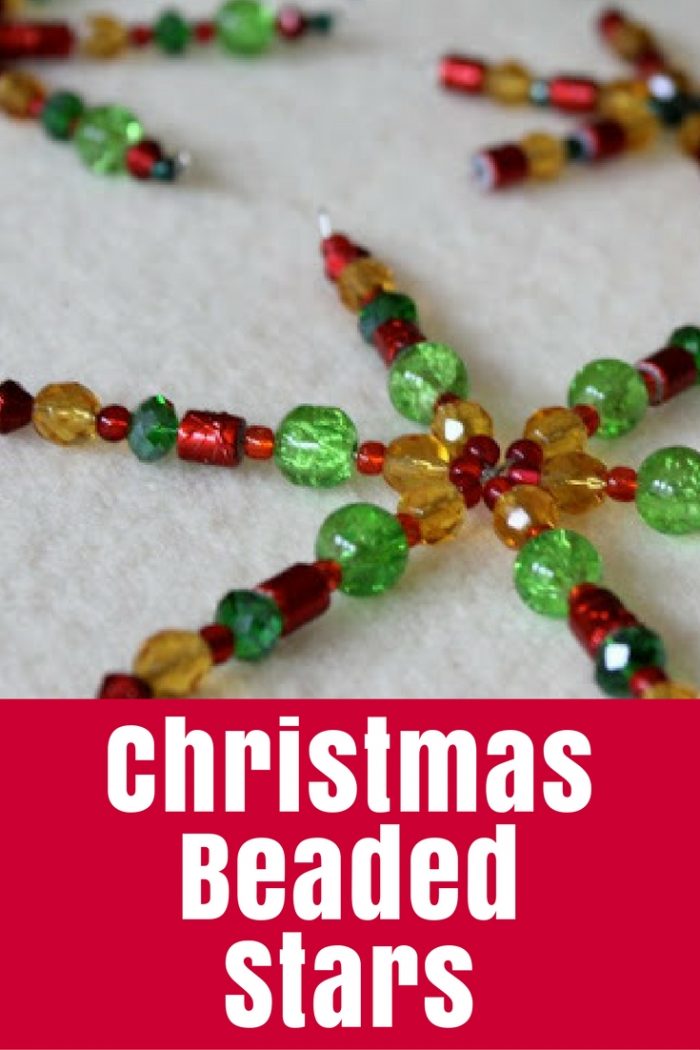
While I was on Craft Retreat I saw a very clever lady making beaded stars.
I just had to have a go!

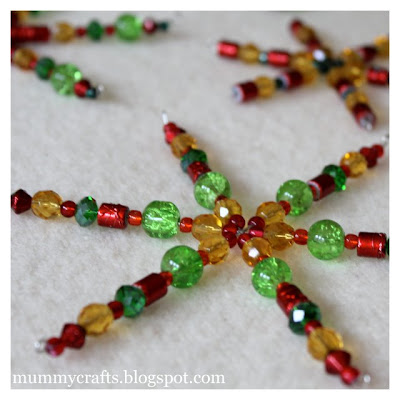
You start off with pre-made wire stars. The packaging calls them snow flakes but since we don’t get snow here I’m calling them stars for Christmas. They come in 3 different sizes in our local beading shop.

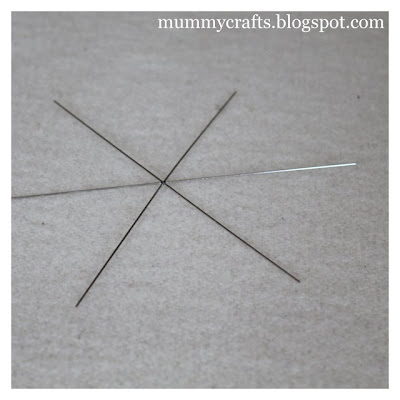
The kids and I had fun threading all the beads. I just bought a variety of shapes and sizes. It was good to have some smaller ones to start in the middle.

At the end of each “spike” we just curved the wire over to stop the beads coming off. (I’m sure there’s a technical beading term for this…?)
We discovered that you needed to complete each “spike” and finish the end before doing the next one or you risked tipping all the beads back off again!

I intend to thread ribbon and hang our stars near our front door for Christmas. This was a fun craft to do with the kids and fits nicely with my idea of starting a new tradition – making a new ornament with the kids each year.

Note: These photos are watermarked for my old blog, MummyCrafts, before I moved over to TheCraftyMummy.com They are still photos taken by me.


Make these Christmas Beaded Stars to decorate your house, tree or table this year using simple crystal beads and special wire forms. Or you could make them as snowflakes for your Winter decorating

double beaded star tutorial

Filed Under: Beading, Tutorials Tagged With: Christmas, Christmas Crafts, Kids, Ornament, Stars, Tops of 2015

« Craft Retreat…
More beaded stars »
Disclosure: There are affiliate links in this post.  This just means that if you click through and choose to purchase something I may get a small commission - at no extra cost to you, of course.  This helps me keep the content here at The Crafty Mummy free for everyone.

I love to chat so please leave me a comment or ask a question.

Don't stress if your comment doesn't appear immediately - sometimes I have to moderate comments thanks to spam visitors, but the comments from real readers will always get published. Scroll down to add your thoughts or ask a question.

Comments

  1. Tammy@ Not Just Paper and Glue says

    November 17, 2010 at 1:52 PM

    These are just lovely!

  2. Modista Modesta says

    November 18, 2010 at 3:20 AM

    How cool. We pick a color for our tree each year. This would be a good way to fill in the wholes in any color.

  3. CK says

    November 18, 2010 at 7:28 AM

    Beautiful! What a great handmade ornament!!!

  4. CK says

    November 18, 2010 at 7:28 AM

    Awesome! What a great handmade ornament!!!
    -CK

  5. elizabeth @ twelvecrafts says

    November 18, 2010 at 2:15 PM

    Thanks for linking this up to the twelve days of traditions! Great idea to include them in the ornament making!

  6. Craftiness NOW says

    November 18, 2010 at 3:07 PM

    very nice! i want to make some too 🙂

  7. Amanda @ Sew Retro, So You says

    November 20, 2010 at 2:59 AM

    I've made mine in white, clear and green but I love the multicoloured ones and think I'm going to have to make more now;-D

    Thank you for sharing your lovely pictures and story.

  8. Anna says

    November 20, 2010 at 1:25 PM

    These are lovely! We change up our tree every year, too and this would be an inexpensive way to do so with pony beads or wooden beads for the kids.

    (Stopped by from BlogFrog.)

  9. Red Couch Recipes says

    November 20, 2010 at 2:39 PM

    I hope I can find the wire snowflakes at my craft store — these are really cute! Joni

  10. Melissa says

    November 22, 2010 at 12:37 PM

    That is so cute! Thanks for sharing over at Tuesday Tell All!

  11. Jan @ bobbypins boardwalk says

    November 24, 2010 at 8:50 AM

    Well — they're beautiful. Truly a beautiful little star and they look like they would be great fun to make — I would love to experiment with the colors and bead combinations, and imagine that some could get quite elaborate. Thank you so much for sharing, Crafty Mummy, this wonderful project on the Boardwalk Bragfest. I wish that you and yours have a blessed Thanksgiving!

  12. Linda@Coastal Charm says

    November 26, 2010 at 1:32 PM

    These are sooooo pretty…my daughter made one a few years ago!

    Blessings,
    Linda

    I’m having a CHRISTMAS OPEN HOUSE linky party on 12/9…would love for you to join in on the FUN!!!

  13. Rose :: Fine Craft Guild.com says

    December 1, 2010 at 6:00 PM

    Really colorful. Love them. Thank you for sharing them (and their tutorial) with us in our DIY Craft linky party!

    Today a new party opens and you're invited to come add a few new ideas/projects/tutorials, particularly if they are as nice as these.

  14. Rose :: Fine Craft Guild.com says

    December 1, 2010 at 6:00 PM

    Really colorful. Love them. Thank you for sharing them (and their tutorial) with us in our DIY Craft linky party!

    Today a new party opens and you're invited to come add a few new ideas/projects/tutorials, particularly if they are as nice as these.

  15. Katie's Nesting Spot says

    December 2, 2010 at 12:06 PM

    Thanks for linking:) I featured these in tomorrow's post.

  16. Darlene Bender says

    January 10, 2013 at 6:51 AM

    Hi, I use the tall earring backs for my star ornaments. Can be bought by the bag at craft locations. It is a good finish for the project, and you can put your string, wire, whatever on then put earring back on to hold in place. I have also alternated them narrow end and wide endaround so three of them are narrow end up & three down.
    Dar

    • CraftyMummy says

      January 10, 2013 at 7:14 AM

      Great idea, Darlene!

Hi! I’m the CraftyMummy

Tonya is the voice behind The Crafty Mummy. She dabbles in lots of different crafts – patchwork, quilting, cross-stitch, scrapbooking, knitting, crochet and sewing. This is the record of projects she has done, and the projects she dreams of getting to! Read More…

Search

  • Email
  • Facebook
  • Instagram
  • Pinterest
  • Twitter
  • YouTube
Shop my Affiliate Favourites

Fat Quarter Shop for Fabric and More

Grab the Sew Sampler Box Here

AccuQuilt for Cutting Machines and Dies

QuiltyBox for Monthly Treats in the Mail

CreativeBug for Craft Classes

Pretty Darn Cute for Blog Designs like mine

Creative Market for Fonts, Images, Themes and More

OzGameShop for All the Games

Adrift for Fashion you’ll Love

Kindle Unlimited Membership Plans

Kindle Book List

Click to shop my kindle book list
Shop my Amazon Influencer Shop
Join the CrochetU and learn to crochet
New to TheCraftyMummy.com? Click here to see more
Blog Tools I use for TheCraftyMummy.com

Grammarly

Aweber for email newsletter

CoSchedule to stay organised and share

Milotree for social media

Genesis for blog framework

FoodiePro is my theme

Hosting with WPEngine

Powered by

Recent Articles

Disclosure: There are affiliate links on this site. This means that I may get a commission if you choose to purchase after browsing via these links - at absolutely no extra cost to you, of course. I only recommend products which I use and love, or that I think will be quality products that will be useful to my readers. It is the affiliate links in this site that help me keep my tutorials free of charge. Thank you!

Looking for something? Search here:

Copyright 2015 The Crafty Mummy · Built using Genesis Framework & Foodie Pro Theme