The Crafty Mummy

Crafts. Sewing. Quilting. Crochet. Tutorials.

  • Start Here
  • Welcome
    • Subscribe
    • About Me
      • Copyright
      • Disclosure
      • Privacy Policies
    • Advertise
    • Sharing
      • Recommendations
      • Shopping & Coupons
      • Books
  • Explore
    • Crafts
      • Beading
      • Kids
      • Paint
      • Storage
      • Christmas Crafts
    • Sewing
    • Quilting
    • Stitching
    • Crochet
      • Yarn
    • Life
      • Food
      • Organisation
    • Blogging
      • How To
      • Social Media
      • WordPress Plugins
      • Photography
  • Tutorials
    • Tips
  • Shop on Etsy
  • Shop on Redbubble

Timeline for Pages: Tabs

by Tonya Grant |Filed Under: How To, Social Media Tagged With: Blogging, Facebook Get a Weekly Update of all Articles

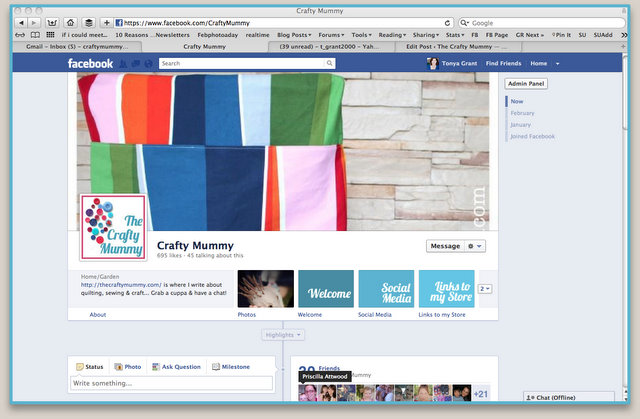
 Facebook page timeline

This morning I opened my Facebook page to find that I could use the new Timeline layout. Fun!

One thing that has changed is that your Tabs (which used to be down the side of your page) are now along the top and have larger pictures. Mine are mostly made with Shortstack and I described how to make them recently in this post: Facebook Page Tabs Tutorial.

But now you need to create a picture for them to look pretty.

I created some simple graphics using Skitch, similar to the new buttons in my blog sidebar. The tab pictures are 110 x 75 pixels. I created my graphics double that size – 220 x 150 – and Facebook resized them to fit, but the dimensions stayed the way I wanted them.

More about making text buttons with Skitch in this post.

facebook tabs timeline pics

Loading Pictures for your Facebook Tabs

Once you have your graphics or pictures ready, here’s the steps to load them onto your FB page:

1. Go to your Admin Panel (look for a button, top right)

2. Click “Manage”, then “Edit Page”. This will take you to a familiar looking “Edit Profile” page.

3. Choose “Apps” on the left, then click “Edit Settings” under the tab you want to add a picture to.

4. In the pop-up, you can change the name of the Tab (for example, “Welcome”), then click on “Change” next to “Custom Tab Image”.

5. A new page will open showing the current image. Click “Change” and upload your new image from your computer. There is no save button but you should see the new image appear on the page.

6. Go back to your Edit Tab pop-up and save there by clicking “Okay”.

When you go back to your page you should see your new image. You can do that for each of the Tabs.

Change the Order of the Tabs

The other thing you may want to do is to change the order of the Tabs. The Photos Tab must stay there but the others can be rearranged.

1. Hover over the Tab picture you want to move.

2. Click on the pencil that appears int he top right corner

3. You can “Swap” it with any of your other Tabs by clicking on the name of the other Tab in the list.


Do you have the new Timeline on your Facebook pages yet? Do you like it? What do you want to do but haven’t worked out yet?


More Blogging Tools I Use


Start Your Free Trial Today!

Social Media Editorial Calendar For WordPress
Ecwid

Filed Under: How To, Social Media Tagged With: Blogging, Facebook

« Notice Board Makeover
The Year so Far »
Disclosure: There are affiliate links in this post.  This just means that if you click through and choose to purchase something I may get a small commission - at no extra cost to you, of course.  This helps me keep the content here at The Crafty Mummy free for everyone.

I love to chat so please leave me a comment or ask a question.

Don't stress if your comment doesn't appear immediately - sometimes I have to moderate comments thanks to spam visitors, but the comments from real readers will always get published. Scroll down to add your thoughts or ask a question.

Comments

  1. Little Gumnut says

    March 1, 2012 at 12:33 PM

    great tute Tonya! Thanks for highlighting this, I missed it!!

    • CraftyMummy says

      March 1, 2012 at 1:50 PM

      You’re welcome. I love learning new stuff – keeps my brain ticking!

  2. Linda says

    March 1, 2012 at 8:19 PM

    I’ve been on the timeline for months now since I stupidly agreed to try it out. I literally hate it! It’s been months and I still cannot get used to its layout and I find the whole thing so annoying.
    Give me the old one any day!
    Glad to hear some of you enjoy it though. Seeing as we’re stuck with it I guess it’s going to help to actually like it. lol.

    • CraftyMummy says

      March 1, 2012 at 10:20 PM

      Interesting! There were things I didn’t understand but I figured it’s only the first day I’m using it so I’d give it time.

  3. Mommyof2Girlz/StephD says

    March 4, 2012 at 8:20 AM

    Fabulous tutorial!!! I will be working on this tomorrow 🙂

    • CraftyMummy says

      March 4, 2012 at 12:07 PM

      Happy to help, Steph!

  4. kirri says

    June 30, 2012 at 6:17 AM

    What great detailed info. Thank you so so much. (Now I just have to make the time to make the changes!).

    • CraftyMummy says

      June 30, 2012 at 8:57 PM

      You’re very welcome, Kirri. It does take a little time but it is worth it for the feeling of achievement!

Hi! I’m the CraftyMummy

Tonya is the voice behind The Crafty Mummy. She dabbles in lots of different crafts – patchwork, quilting, cross-stitch, scrapbooking, knitting, crochet and sewing. This is the record of projects she has done, and the projects she dreams of getting to! Read More…

Search

  • Email
  • Facebook
  • Instagram
  • Pinterest
  • Twitter
  • YouTube
Shop my Affiliate Favourites

Fat Quarter Shop for Fabric and More

Grab the Sew Sampler Box Here

AccuQuilt for Cutting Machines and Dies

QuiltyBox for Monthly Treats in the Mail

CreativeBug for Craft Classes

Pretty Darn Cute for Blog Designs like mine

Creative Market for Fonts, Images, Themes and More

OzGameShop for All the Games

Adrift for Fashion you’ll Love

Kindle Unlimited Membership Plans

Kindle Book List

Click to shop my kindle book list
Shop my Amazon Influencer Shop
Join the CrochetU and learn to crochet
New to TheCraftyMummy.com? Click here to see more
Blog Tools I use for TheCraftyMummy.com

Grammarly

Aweber for email newsletter

CoSchedule to stay organised and share

Milotree for social media

Genesis for blog framework

FoodiePro is my theme

Hosting with WPEngine

Powered by

Recent Articles

Disclosure: There are affiliate links on this site. This means that I may get a commission if you choose to purchase after browsing via these links - at absolutely no extra cost to you, of course. I only recommend products which I use and love, or that I think will be quality products that will be useful to my readers. It is the affiliate links in this site that help me keep my tutorials free of charge. Thank you!

Looking for something? Search here:

Copyright 2015 The Crafty Mummy · Built using Genesis Framework & Foodie Pro Theme