The Crafty Mummy

Crafts. Sewing. Quilting. Crochet. Tutorials.

  • Start Here
  • Welcome
    • Subscribe
    • About Me
      • Copyright
      • Disclosure
      • Privacy Policies
    • Advertise
    • Sharing
      • Recommendations
      • Shopping & Coupons
      • Books
  • Explore
    • Crafts
      • Beading
      • Kids
      • Paint
      • Storage
      • Christmas Crafts
    • Sewing
    • Quilting
    • Stitching
    • Crochet
      • Yarn
    • Life
      • Food
      • Organisation
    • Blogging
      • How To
      • Social Media
      • WordPress Plugins
      • Photography
  • Tutorials
    • Tips
  • Shop on Etsy
  • Shop on Redbubble

Make a Text Button with Skitch: Tutorial

by Tonya Grant |Filed Under: Blogging, How To Tagged With: Skitch, Tools I Use Get a Weekly Update of all Articles

The easiest way I have found to make a text button is with Skitch. This is a magical little free application for Apple users (sorry to all you non-Apple users, although there is an app for android phones) that allows you to take a “photo” of anything on your screen then add drawing elements to it. But you can also just use it as a drawing tool. Now there are lots of other tools out there that do similar things, but here’s how I use a tool I already have on my desktop.

Start by opening a new document: In the top menu, click “File” > “New”

Then click and drag the corners to adjust the size of the box: Dragging the very outer corners will resize the whole canvas while keeping the dimensions proportional. Dragging the inner corners will resize the rectangle by moving only the corner you have clicked, so you can make the rectangle into a square, for example.

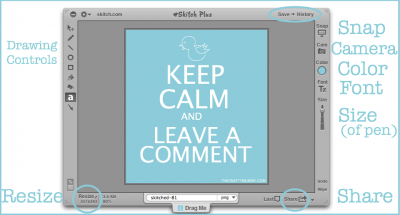
Down in the lower left corner you can see the resize in pixels. If you click on that you can choose pre-set sizes or type in proportions in pixels.

Now comes the fun part! Use the drawing controls on the left side to

  • Write words with the letter tool
  • Draw a border with the rectangle tool
  • Draw dots or circles with the circle tool
  • Draw random lines, straight lines or arrows – I’m sure you can see the tools!
  • Fill in the background colour with the bucket tool
  • Erase mistakes with the eraser tool

Adjust all of the above with the controls on the right side

  • Color
  • Font
  • Size of the “pen”

Once you are happy, you can “share” your picture. Click the Share button in the lower right corner. You can choose options but I usually upload it to the Skitch site as a “Secret” file then download a copy to my computer to use on my blog posts.

make text button with skitch

Skitch has lots of functions that I know I haven’t explored or used yet. I often use it for grabbing a picture of a screen for tutorials like this. Like many applications, I have worked out a way to do what I need to do and not looked further, so I’m sure it does lots more.

Some Skitch Tips:

  • To have words in multiple fonts and sizes, enter them each separately. Then you can edit each one – font, colour, size, and position on the canvas.
  • To see things you have Skitched in the past, click History in the top right corner. You can save to the History there as well.
  • You can save your files in various formats with the roll down tab at the bottom of the editing box.
  • If you click the “Drag Me” button, you can drag and drop the image onto your desktop or into another application.
  • Read more about what Skitch can do at The Inquisitr
Have you used Skitch? Any more tips to share? Leave a comment!

Filed Under: Blogging, How To Tagged With: Skitch, Tools I Use

« Back to School: Lunchbox Notes
Kids Craft: Clothes Peg Planes »
Disclosure: There are affiliate links in this post.  This just means that if you click through and choose to purchase something I may get a small commission - at no extra cost to you, of course.  This helps me keep the content here at The Crafty Mummy free for everyone.

I love to chat so please leave me a comment or ask a question.

Don't stress if your comment doesn't appear immediately - sometimes I have to moderate comments thanks to spam visitors, but the comments from real readers will always get published. Scroll down to add your thoughts or ask a question.

Comments

  1. Yvette @ DTlilsquirts says

    July 17, 2012 at 10:39 AM

    sweet!! just what I need!! ) Thanks!

    • CraftyMummy says

      July 17, 2012 at 2:15 PM

      You’re welcome!

  2. Denyse Whelan. education specialist says

    July 17, 2012 at 9:08 PM

    Oh wow, I could maybe even think about trying that Tonya!! You explain it so well. Thanks. I’m here from #teamibot & it was great to meet you at Blogopolis too. Denyse

    • CraftyMummy says

      July 21, 2012 at 4:35 PM

      Thanks Denyse. It was great to meet you in person. I look forward to meeting you again at some other blogging event!

  3. Jess says

    July 17, 2012 at 10:20 PM

    I hadn’t heard of sketch before, but I’m always on the look out for these kind of apps before, so Thankyou.

    Off to visit the app store now….

    • CraftyMummy says

      July 18, 2012 at 9:59 AM

      Glad to help, Jess.

  4. Dr Bron says

    July 17, 2012 at 11:17 PM

    I love new apps, thanks!

    • CraftyMummy says

      July 18, 2012 at 10:01 AM

      This one is great, Bron, I use it every day!

  5. cate says

    July 22, 2012 at 4:19 PM

    am I missing something? I downloaded this to my iPad, but don’t have any selections down the right hand side, so I’m totally stumped as to how to ue it (there also isn’t a file-new option…) maybe I need to do some searching, and add to your how-to?! it looks like a great little app to play with, though!

    • CraftyMummy says

      July 22, 2012 at 6:12 PM

      I use it on my MacBook, Cate so I suppose it could be a little different on an iPad. I’ll see what I can find out…

  6. Laney @ Crash Test Mummy says

    July 23, 2012 at 12:45 PM

    Great tutorial. I love Skitch. So do my kids! I hadn’t thought of using it to make a button though. I need a new button, do will give it a try!

  7. Rachael @ the ambitious quilter says

    September 15, 2013 at 8:22 PM

    Thanks! I have wondered about how people do this, will have to try it out!

    • CraftyMummy says

      September 15, 2013 at 10:28 PM

      You’re welcome!

Hi! I’m the CraftyMummy

Tonya is the voice behind The Crafty Mummy. She dabbles in lots of different crafts – patchwork, quilting, cross-stitch, scrapbooking, knitting, crochet and sewing. This is the record of projects she has done, and the projects she dreams of getting to! Read More…

Search

  • Email
  • Facebook
  • Instagram
  • Pinterest
  • Twitter
  • YouTube
Shop my Affiliate Favourites

Fat Quarter Shop for Fabric and More

Grab the Sew Sampler Box Here

AccuQuilt for Cutting Machines and Dies

QuiltyBox for Monthly Treats in the Mail

CreativeBug for Craft Classes

Pretty Darn Cute for Blog Designs like mine

Creative Market for Fonts, Images, Themes and More

OzGameShop for All the Games

Adrift for Fashion you’ll Love

Kindle Unlimited Membership Plans

Kindle Book List

Click to shop my kindle book list
Shop my Amazon Influencer Shop
Join the CrochetU and learn to crochet
New to TheCraftyMummy.com? Click here to see more
Blog Tools I use for TheCraftyMummy.com

Grammarly

Aweber for email newsletter

CoSchedule to stay organised and share

Milotree for social media

Genesis for blog framework

FoodiePro is my theme

Hosting with WPEngine

Powered by

Recent Articles

Disclosure: There are affiliate links on this site. This means that I may get a commission if you choose to purchase after browsing via these links - at absolutely no extra cost to you, of course. I only recommend products which I use and love, or that I think will be quality products that will be useful to my readers. It is the affiliate links in this site that help me keep my tutorials free of charge. Thank you!

Looking for something? Search here:

Copyright 2015 The Crafty Mummy · Built using Genesis Framework & Foodie Pro Theme