The Crafty Mummy

Crafts. Sewing. Quilting. Crochet. Tutorials.

  • Start Here
  • Welcome
    • Subscribe
    • About Me
      • Copyright
      • Disclosure
      • Privacy Policies
    • Advertise
    • Sharing
      • Recommendations
      • Shopping & Coupons
      • Books
  • Explore
    • Crafts
      • Beading
      • Kids
      • Paint
      • Storage
      • Christmas Crafts
    • Sewing
    • Quilting
    • Stitching
    • Crochet
      • Yarn
    • Life
      • Food
      • Organisation
    • Blogging
      • How To
      • Social Media
      • WordPress Plugins
      • Photography
  • Tutorials
    • Tips
  • Shop on Etsy
  • Shop on Redbubble

Tutorial: Chocolate Lip Gloss

by Tonya Grant |Filed Under: Crafts, Tutorials Tagged With: Kids, Pamper, Party, Tutorial Get a Weekly Update of all Articles

chocolate lip gloss tutorial cocoa

When we had our Pretty Pamper Party, one of things the girls made was Chocolate Lip Gloss. It was inspired by Jill at Meet the Dubiens.

Here’s how you can make some too.
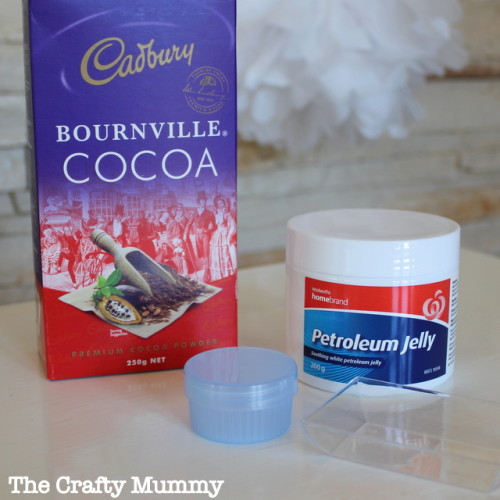
chocolate lip gloss kit

What You Need

  • Cocoa Powder
  • Petroleum Jelly
  • small lidded container to store it in – I found mine at a pharmacy
  • something to mix it in – we tried to use these little clear plastic dishes but you need something bigger!
  • microwave safe jug or bowl
  • mixing utensil – spoon or stick
  • microwave oven

What To Do

We made a huge mess and this was not the most successful of our activities, so I’m going to tell you what we did, then what I’d try next time based on our experience.

  • Scoop the petroleum jelly into the microwave safe bowl or jug and microwave it in 30 second bursts until it is liquid.
  • Let that cool a little so you don’t burn yourself
  • Put some cocoa powder into your mixing bowl – we used about a tablespoon of cocoa for a tablespoon of jelly
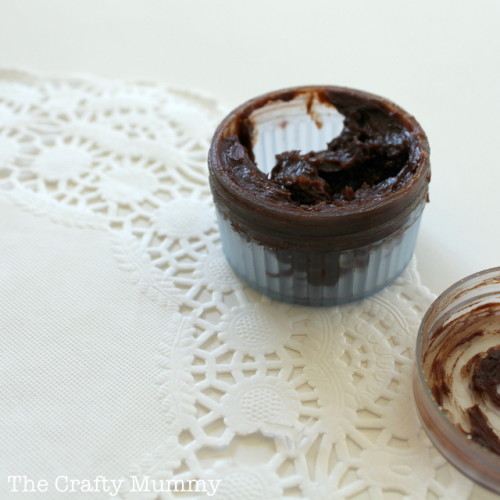
  • Spoon some jelly on top and mix – this is the messy bit! It is pretty sticky but keep going until the powder is mixed through.
  • Transfer the gloss to your storage container (again kinda messy!)

My Tips for Next Time

  • Make sure the petroleum jelly is quite liquid. I was in a hurry with 8 eager girls and I didn’t melt it enough so it was still quite sticky and very hard to mix.
  • Use larger mixing containers – ours were way to small so everything quickly tipped out over the edge as we tried to mix and made a huge mess!
  • Have damp cloths on hand for cleaning up finger as you go – this will leave a mark on cream fabric chair covers (yes, that’s experience talking… sigh…)

I’m planning to have another go at this activity over the school holidays so I’ll update this post then.

Filed Under: Crafts, Tutorials Tagged With: Kids, Pamper, Party, Tutorial

« Crafty Christmas Toy Stash + 5 x $100 Giveaway
Tutorial: Bath Salts »
Disclosure: There are affiliate links in this post.  This just means that if you click through and choose to purchase something I may get a small commission - at no extra cost to you, of course.  This helps me keep the content here at The Crafty Mummy free for everyone.

I love to chat so please leave me a comment or ask a question.

Don't stress if your comment doesn't appear immediately - sometimes I have to moderate comments thanks to spam visitors, but the comments from real readers will always get published. Scroll down to add your thoughts or ask a question.

Comments

  1. Nicole @Feisty Mom says

    July 8, 2013 at 11:37 AM

    I’ve tried the lip gloss where you add the kool-aid. I didn’t have a tremendous amount of success. It was difficult to do. I definitely think having the petroleum liquid would have helped me too. – Feisty Mom

Hi! I’m the CraftyMummy

Tonya is the voice behind The Crafty Mummy. She dabbles in lots of different crafts – patchwork, quilting, cross-stitch, scrapbooking, knitting, crochet and sewing. This is the record of projects she has done, and the projects she dreams of getting to! Read More…

Search

  • Email
  • Facebook
  • Instagram
  • Pinterest
  • Twitter
  • YouTube
Shop my Affiliate Favourites

Fat Quarter Shop for Fabric and More

Grab the Sew Sampler Box Here

AccuQuilt for Cutting Machines and Dies

QuiltyBox for Monthly Treats in the Mail

CreativeBug for Craft Classes

Pretty Darn Cute for Blog Designs like mine

Creative Market for Fonts, Images, Themes and More

OzGameShop for All the Games

Adrift for Fashion you’ll Love

Kindle Unlimited Membership Plans

Kindle Book List

Click to shop my kindle book list
Shop my Amazon Influencer Shop
Join the CrochetU and learn to crochet
New to TheCraftyMummy.com? Click here to see more
Blog Tools I use for TheCraftyMummy.com

Grammarly

Aweber for email newsletter

CoSchedule to stay organised and share

Milotree for social media

Genesis for blog framework

FoodiePro is my theme

Hosting with WPEngine

Powered by

Recent Articles

Disclosure: There are affiliate links on this site. This means that I may get a commission if you choose to purchase after browsing via these links - at absolutely no extra cost to you, of course. I only recommend products which I use and love, or that I think will be quality products that will be useful to my readers. It is the affiliate links in this site that help me keep my tutorials free of charge. Thank you!

Looking for something? Search here:

Copyright 2015 The Crafty Mummy · Built using Genesis Framework & Foodie Pro Theme