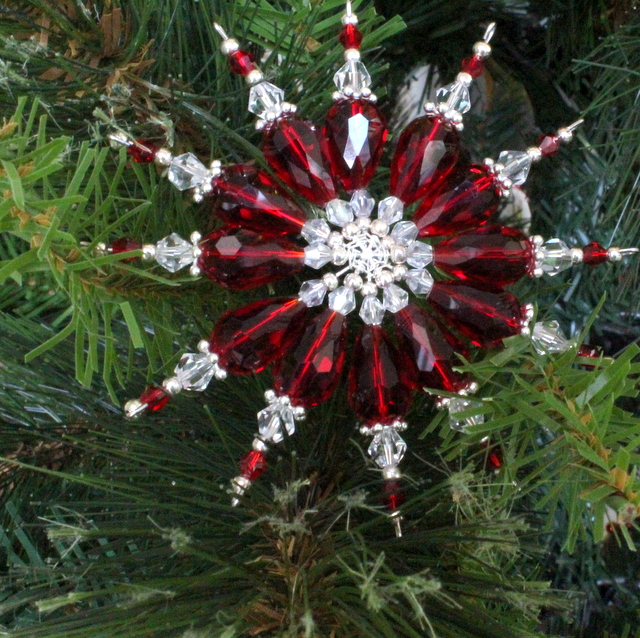
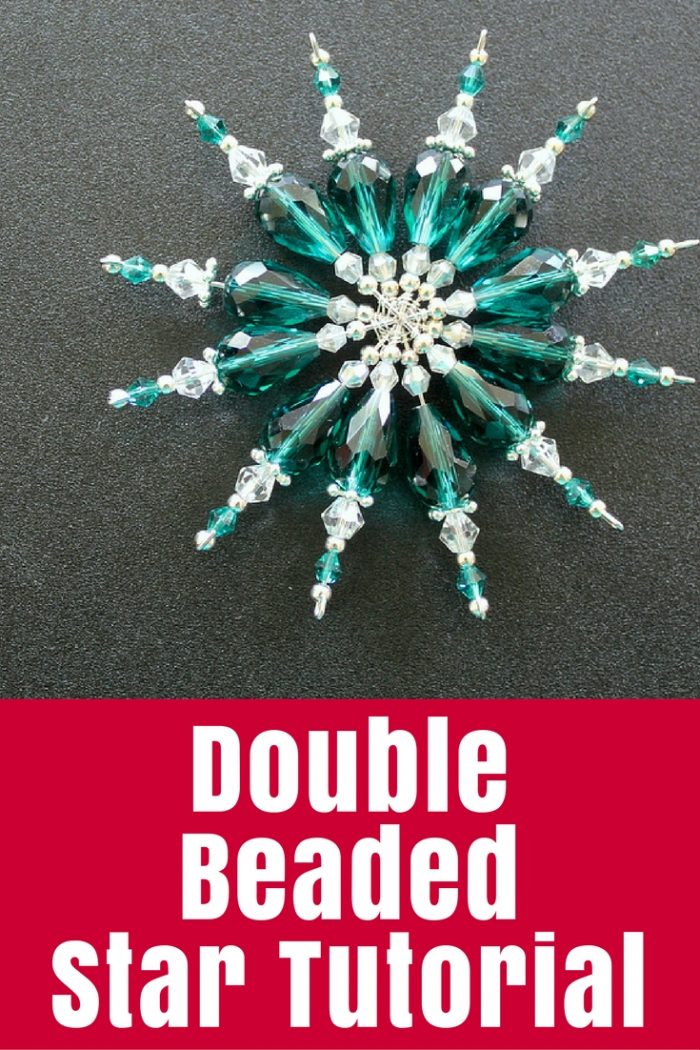
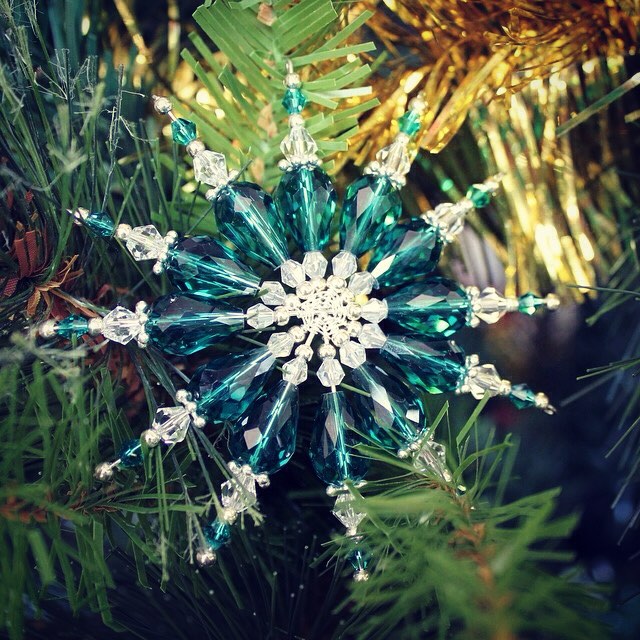
A tutorial to make a double beaded star or snowflake. Mine are for Christmas but they would be a lovely Winter decoration too.
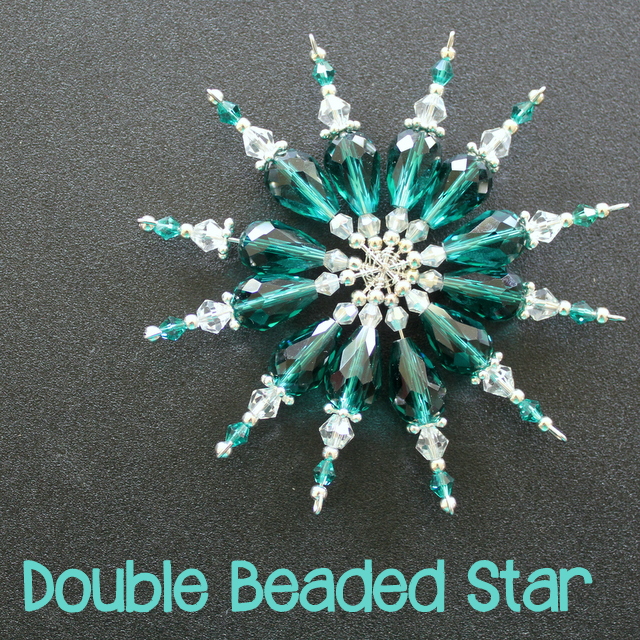
I love stars at Christmas! They are perhaps my favourite symbol of the season so we have a bunch of pretty ornaments on our tree that are stars. A couple of years back I made beaded stars and shared them here on the blog. That is one of THE MOST popular Christmas posts I have ever written! It used wire shapes that could be stars or snowflakes and you just needed to add the beads. So easy but so effective.
Recently I bought a couple of kits from my favourite beading shop to make some more as gifts only to realise that they were a double beaded star. Wow! Love the extra sparkle in these!
 What You Need
- 2 x star or snowflake wire shapes
- silver wire – about 25cm
- beads – there are 12 points to fill so you could use 12 sets of beads for matching points
- wire cutters and pliers to turn the ends
What To Do
- Lay the two wire stars flat on top of each other with the points evenly spread.
- Wrap the wire around each “spoke” of the wheel close to the centre to hold the two layers together – I went around 3 times then trimmed the wire off
- Thread the beads, one point at a time. When you get about 6mm from the end of the point, fold the wire over with your pliers to create a little loop and stop the beads falling off.


Tips and Ideas
- I used two stars the same size but you could use a larger and a smaller together for a pretty star.
- For snowflakes you could use all clear or white crystals, or even pearls.
- These can be hung by threading a ribbon or more wire through one of the loops.
Buy a kit to make similar snowflakes on Amazon here.
Disclosure: This post contains affiliate links.


Love these stars Tonya! So beautiful!
These are just so beautiful.
beautiful
I absolutely love these stars. I made these stars when I was in Girl Scouts and I still have a few of them.
Thank you for the directions. Now I will make these for Christmas this year.
Happy Holidays in July….
Christine
You’re welcome, Christine. My kids loved making some more last year.
Where did u buy the wire stars I would love to make them for my tree I love christmax thank u
Hi Vianey,
I bought mine at a local beading shop, but you can get them online at Amazon (affiliate link)
Hi Tonya,
What a lovely, lovely tutorial I was inspired. I use pipe cleaners, usually tinsel covered, for my basic
pattern. Much easier to use then single wire lengths. We are not Christians so we have a Tree all year round and I decorate in different colours and patterns for any particular occasion (birthdays, anniversaries etc) but the snowflakes and spangly stars are the main decorations. I have even used wiremen’s led bulbs as the colours are strong and pure and glow in the sunshine. I call them “electric sparkeys”!!!
Anyway I wish you all the very best for 2016 and look forward to many more designs from you.
Regards
Sheila (from rainy Rothwell, Northants, England)
can you tell me what beads you used to make these? Thanks so much.
These ornaments are beautiful. Could I get more information about how many beads you used for each ornament and the shapes and sizes? I need a lot more detail for my instructions. Sorry. Please help!
Hi Jayda,
I’m afraid I didn’t write down exact details, but part of the fun is creating something unique to you! You could look closely at my pictures and count the beads to get an idea, but when you’re shopping for beads you won’t be able to buy exactly the number you need so I’d suggest you buy a packet of mixed faceted beads, or a 5 or 6 small bags of matching beads then play with them. The crystal type beads are good because they will catch the light and sparkle.
I have added a new section to the bottom of this post with some suggested beads from Amazon so I hope that helps.
Tonya
Thank you for the help. Jayda
These are very pretty. Hope to make some.
I’m having trouble finding the beads that were used in the star. Could you give me some bead stores to contact in order to get the beads?
I’d order from Amazon, Jayda.
I LOVE the ornament and would like to make them but I’m in a small town and have no clue as to where to get the snowflake wire forms or the beads you show (size of beads and what kind they are, maybe where to look for them, where to get the wire forms). Any help would be greatly appreciated. I have some special friends and family I would like to make these for but the local stores I’ve checked have nada. Thank You for any assistance you are able to provide, so pretty!
Hi June, Thanks for taking the time to leave a comment. You can find kits to make similar stars on Amazon and they should ship to you even in a small town: http://amzn.to/1CMjyyE
Your beaded ornamrnts are georgeous. I love them.I have got some beads at home must try to make one. Like yours.
Thanks a lot for the tutorial. God bless u. Hoping to see more tutorial s from you.
WOW —-I am so excited about next years snowflakes —–this snowflake you have shown us is so awesome-my families are going to love next years batch of ornaments—I also make icicles 🙂 thank you so so much for sharing you are wonderful !!!!!!!!!!!!!!!!!!
Great design. I’ve made hundreds of beaded ornament’s and am always looking foe new patterns.
You say these are double beaded, what do u mean by that exactly? Do u have more pictures to illustrate?
Hi Teresa, The original stars I made had 6 points. These use two 6 point frames together to create 12 points so they are ‘double’ the points.