The Crafty Mummy

Crafts. Sewing. Quilting. Crochet. Tutorials.

  • Start Here
  • Welcome
    • Subscribe
    • About Me
      • Copyright
      • Disclosure
      • Privacy Policies
    • Advertise
    • Sharing
      • Recommendations
      • Shopping & Coupons
      • Books
  • Explore
    • Crafts
      • Beading
      • Kids
      • Paint
      • Storage
      • Christmas Crafts
    • Sewing
    • Quilting
    • Stitching
    • Crochet
      • Yarn
    • Life
      • Food
      • Organisation
    • Blogging
      • How To
      • Social Media
      • WordPress Plugins
      • Photography
  • Tutorials
    • Tips
  • Shop on Etsy
  • Shop on Redbubble

Button Pumpkin Tutorial

by Tonya Grant |Filed Under: Crafts, Tutorials Tagged With: 31 Days of Crafty Tutorials, Buttons, Halloween Get a Weekly Update of all Articles

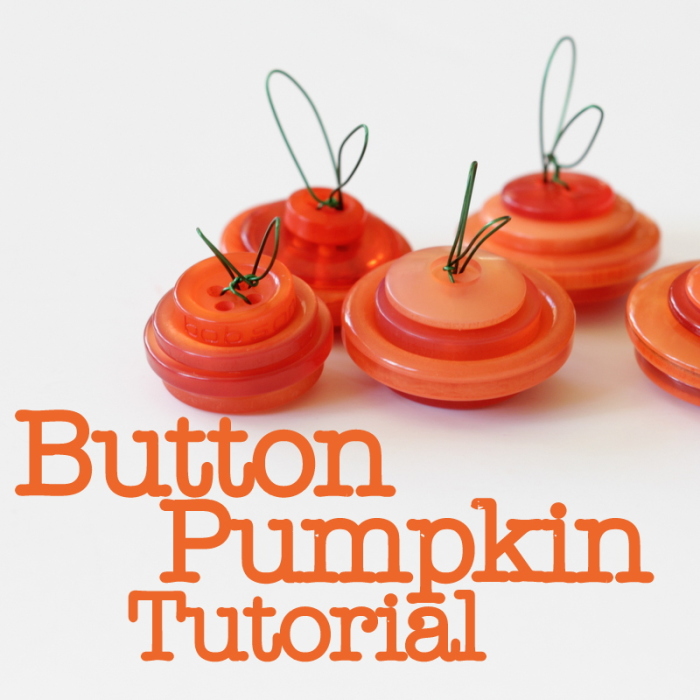
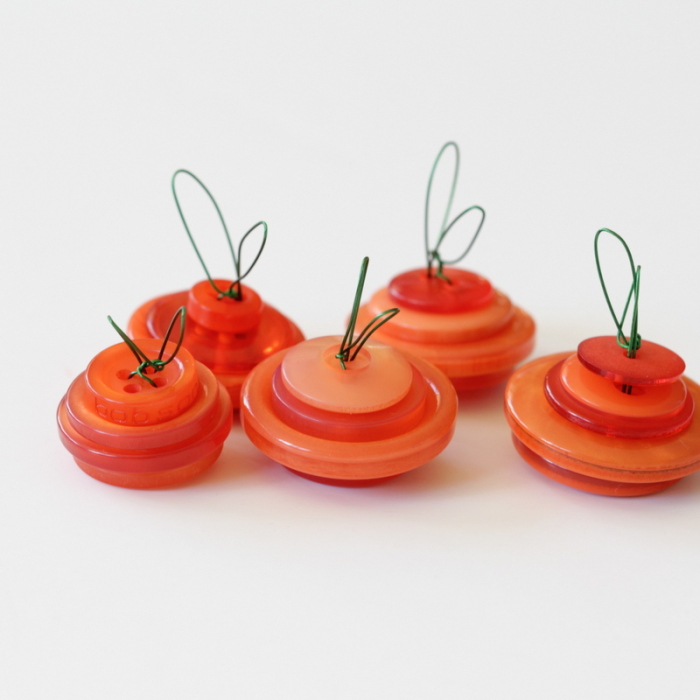
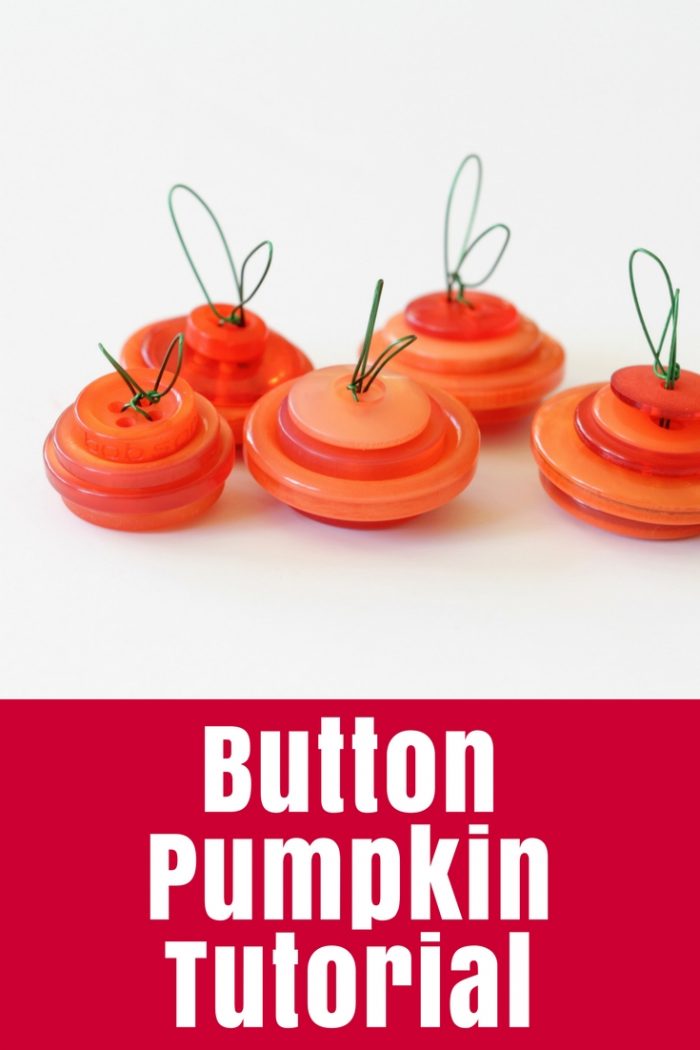
Make the cutest mini Button Pumpkin for your Halloween decorating. They’d be perfect for table decorations or party favors.

Make the cutest mini Button Pumpkin for your Halloween decorating. They'd be perfect for table decorations or party favors.

Halloween.

We don’t really celebrate Halloween here at Crafty HQ, but my social media channels have been overwhelmingly filled with crafts related to Halloween for a couple of weeks now.

So today I got inspired.

And I LOVE the results!!

This is one of those little projects that turned out so CUTE!

How to Make Pumpkins with Buttons

button pumpkin 1

What You Need

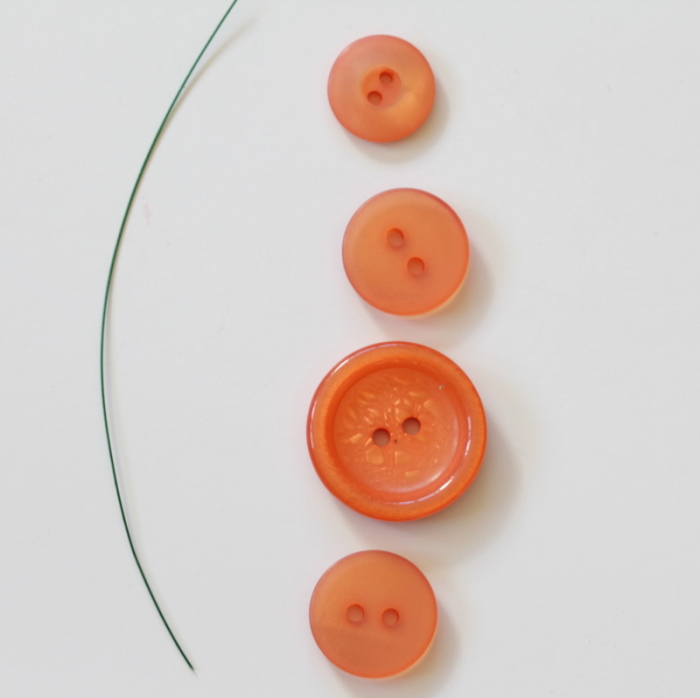
  • Orange buttons – I used three or four per pumpkin
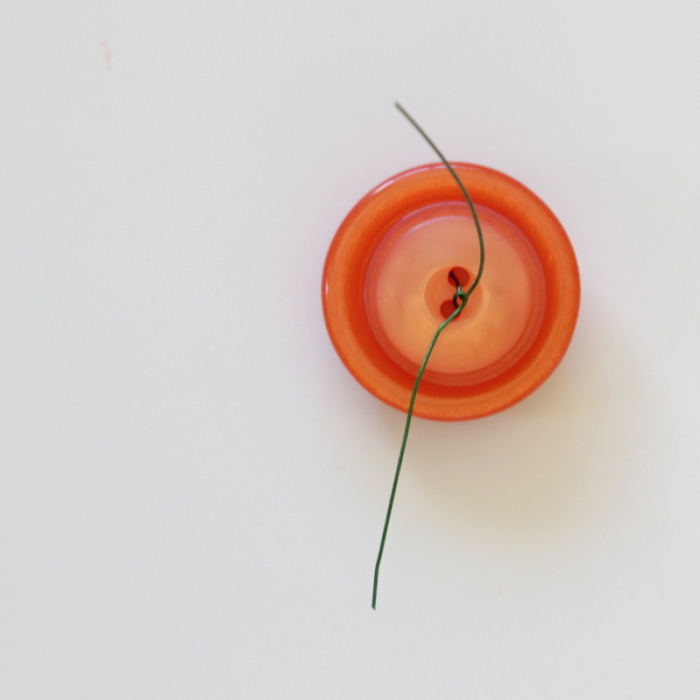
  • Thin beading wire – mine is green, about 10cm per pumpkin

What To Do

button pumpkin 2

1. Choose your buttons. I started with the largest one I could find in my collection then matched it with a smaller one for the base and two gradually smaller ones for the top of the pumpkin. I found a bag of mixed sizes but all orange at my local Spotlight.

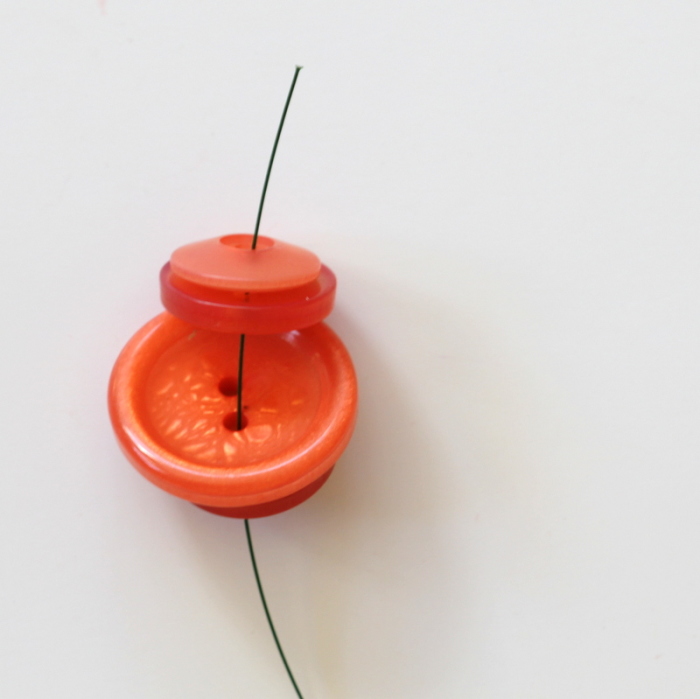
2. Cut a piece of wire about 10cm long and thread the buttons onto it starting with the top button.

button pumpkin 3

3. Fold the wire and thread it up from the bottom of the buttons through another hole. If your buttons have four holes, choose two holes diagonally opposite each other.

button pumpkin 4

4. Pull the wire tight and wrap it around itself a couple of times to secure it on top of the pumpkin.

button pumpkin 5

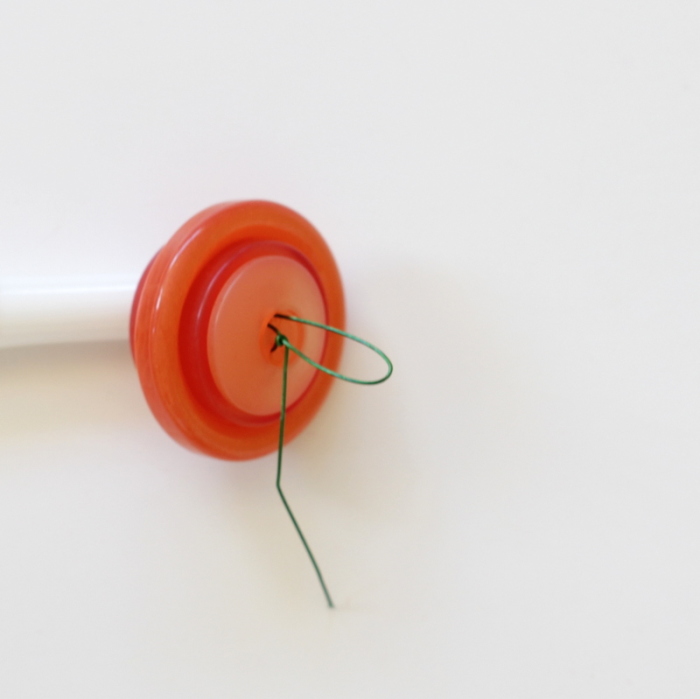
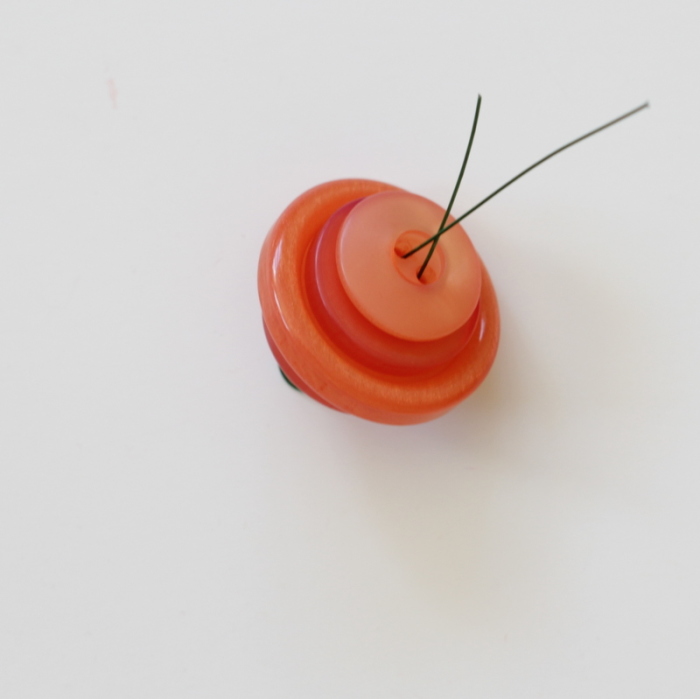
5. Loop the ends back down into the holes and pinch to bend and hold in place. (I know pumpkins don’t really have “leaves” on top and these kind of look like leaves, but let’s just go with it!) You could twist the loops together to create a more solid stem for your pumpkin if you’d like.

pumpkins made from buttons

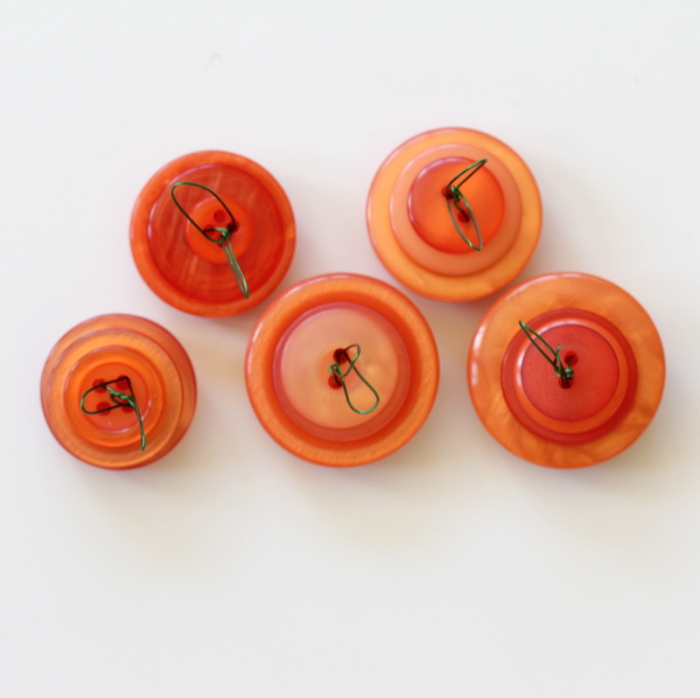
Done! I made a few pumpkins – each a little different but all cute.

These would make cute table decorations or they could adorn a mini mantel piece. Perhaps your kids need to add some pumpkins on the porch of the Barbie house!

button pumpkins

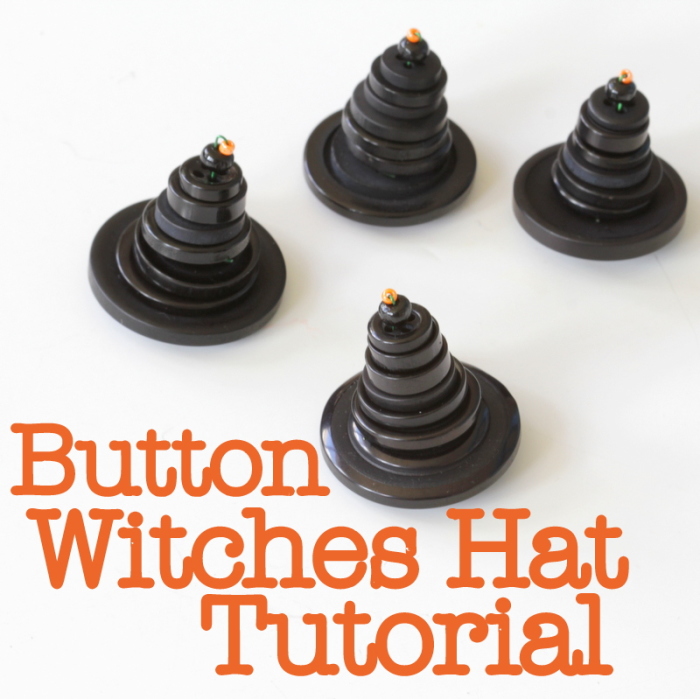
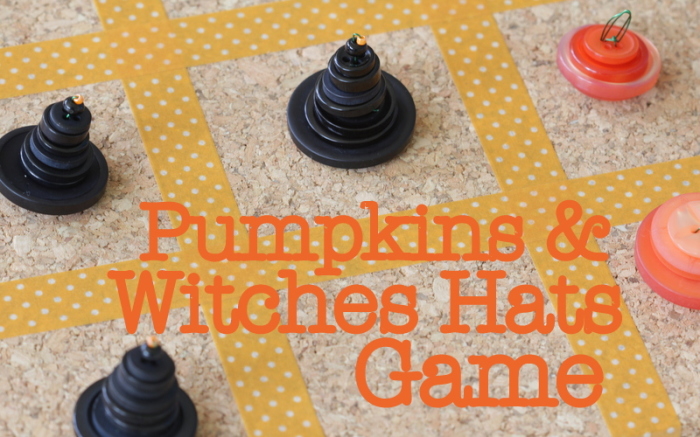
I’ll be matching them with another mini button Halloween icon tomorrow to create a coffee table board game so stay tuned.

Button Witches Hat Tutorial

31 days of crafty tutorials

Pumpkins and Witches Hats GameMake the cutest mini Button Pumpkin for your Halloween decorating. They'd be perfect for table decorations or party favors.

Pumpkin Spice Coffee Mug
Summary
Button Pumpkin Tutorial
Article Title
Button Pumpkin Tutorial
Description
Make the cutest mini Button Pumpkin for your Halloween decorating. They'd be perfect for table decorations or party favors.
Author
Tonya Grant
Published on
TheCraftyMummy.com

Filed Under: Crafts, Tutorials Tagged With: 31 Days of Crafty Tutorials, Buttons, Halloween

« How to Organise a Cupboard
Button Witches Hat Tutorial »
Disclosure: There are affiliate links in this post.  This just means that if you click through and choose to purchase something I may get a small commission - at no extra cost to you, of course.  This helps me keep the content here at The Crafty Mummy free for everyone.

I love to chat so please leave me a comment or ask a question.

Don't stress if your comment doesn't appear immediately - sometimes I have to moderate comments thanks to spam visitors, but the comments from real readers will always get published. Scroll down to add your thoughts or ask a question.

Comments

  1. Stormy Kinnear says

    June 4, 2018 at 5:19 AM

    I have been absent for a while, but now I remember why I used to love this web site. Thanks , I will try and check back more often. How frequently you update your site?

  2. Dolly Bradley says

    October 22, 2018 at 11:36 AM

    I hope ill enjoy to get email later n some crafts n decorates! Thank you for taking your time and I have been sewing something n others! I am deaf n i love to make things !
    Dolly Bradley

Hi! I’m the CraftyMummy

Tonya is the voice behind The Crafty Mummy. She dabbles in lots of different crafts – patchwork, quilting, cross-stitch, scrapbooking, knitting, crochet and sewing. This is the record of projects she has done, and the projects she dreams of getting to! Read More…

Search

  • Email
  • Facebook
  • Instagram
  • Pinterest
  • Twitter
  • YouTube
Shop my Affiliate Favourites

Fat Quarter Shop for Fabric and More

Grab the Sew Sampler Box Here

AccuQuilt for Cutting Machines and Dies

QuiltyBox for Monthly Treats in the Mail

CreativeBug for Craft Classes

Pretty Darn Cute for Blog Designs like mine

Creative Market for Fonts, Images, Themes and More

OzGameShop for All the Games

Adrift for Fashion you’ll Love

Kindle Unlimited Membership Plans

Kindle Book List

Click to shop my kindle book list
Shop my Amazon Influencer Shop
Join the CrochetU and learn to crochet
New to TheCraftyMummy.com? Click here to see more
Blog Tools I use for TheCraftyMummy.com

Grammarly

Aweber for email newsletter

CoSchedule to stay organised and share

Milotree for social media

Genesis for blog framework

FoodiePro is my theme

Hosting with WPEngine

Powered by

Recent Articles

Disclosure: There are affiliate links on this site. This means that I may get a commission if you choose to purchase after browsing via these links - at absolutely no extra cost to you, of course. I only recommend products which I use and love, or that I think will be quality products that will be useful to my readers. It is the affiliate links in this site that help me keep my tutorials free of charge. Thank you!

Looking for something? Search here:

Copyright 2015 The Crafty Mummy · Built using Genesis Framework & Foodie Pro Theme