Last week I wrote about how I did my Blog Makeover with some tips for changing different elements. One of the items I changed was my sidebar headline images, footer image and post dividers. Here’s how I did that in my Hostgator dashboard.
Stop!
Before you start changing things in your blog, you should back it up. That way if you make a mistake you can reload the current version.
The Images
Decide which images you want to change.
Look at the originals that came with your theme. I use the Pretty Young Thing theme with a Genesis Framework. So I looked at the image files that I downloaded when I moved to my WordPress blog back in May 2011. The sidebar images were files called “headline-sidebar.jpg” and they were 260 x 40 pixels.
Note: Pretty Young Thing theme is no longer available but I’d look at Modern Blogger or Fabric Child Theme as an alternative.
I used Skitch to create new images that are the same width but slightly taller. The width is important so that they fit in your current sidebar.
Save the images using exactly the same name as the original images – that way you can change them over and not have to re-write any code in your blog.
Not sure of the name of the file? Work your way through the next few steps to find the image files for your blog and you should be able to work out which is the file name you need.
Changing the Images on your Blog
I use Hostgator for my blog hosting so I will be showing pictures from the Hostgator Dashboard for this tutorial. If you use another host provider, don’t despair. From what I hear, most hosts have a similar dashboard system so you may find very similar steps work just fine.
Log in to your Dashboard and look for the File Manager.
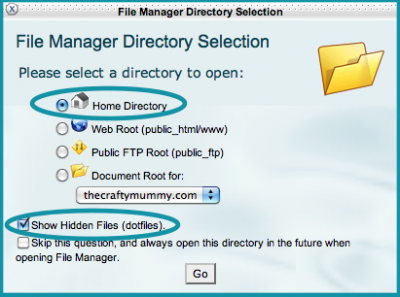
When you click on it, this screen should pop up. Choose the Home Directory and tick “Show Hidden Files”, then click “Go”.
You should see all the files from your blog with some buttons along the top of the page. We want to find the image files for your current blog theme.
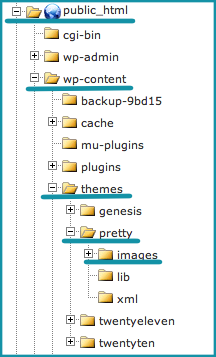
Look for the “public html” folder and click the + to open it. Then look for the “wp-content” folder and open it. In that one look for the “themes” folder and open it. My theme is called “pretty” so I opened that folder next, but look for your theme and open that folder. Then open the “images” folder. Pretty has three colour schemes so in that folder there are three different colours. I opened next the folder for the colour set I use on my blog right now – “yellow”.
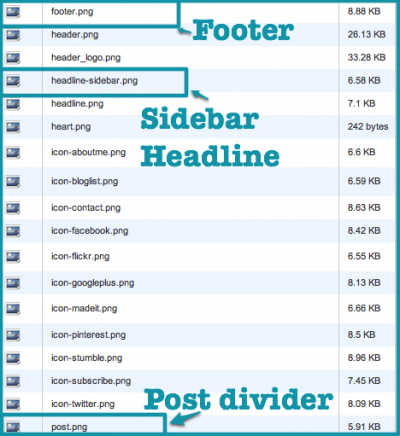
Work your way through until you can see image files like these in the right hand part of your screen. These are the images that are on your blog right now. I changed three of these files one by one, but for this tutorial we’re looking at the headline-sidebar file.
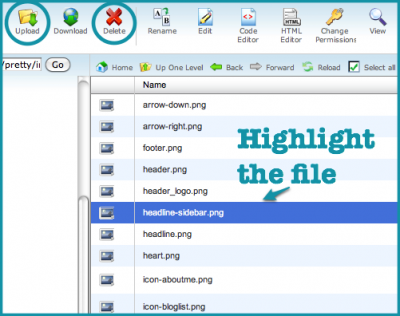
Click on the headline-sidebar file so it is highlighted like this.
Optional step: If you don’t have a copy of this file on your computer, click “download” first to copy this to your computer. Then if you mess up later, at least you know where this one is! If you know you have a copy there on your computer, you don’t need to download this one.
So you have the file highlighted, right? Now click the “delete” button at the top of that page. Yes, we’re deleting it from your blog so you can load the new one in the next step.
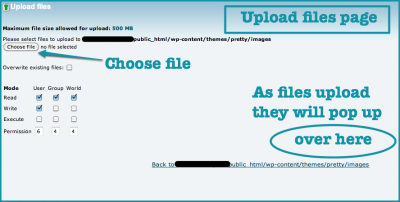
Next, click “upload” to load the new image you made. A screen like this will pop up. Click choose file and select your lovely new png file. As it uploads, you will see it at the bottom left of the screen.
Once it loads you’re done! When you load your blog, you should see the new headline image behind your sidebar headline.
Note: If you have a cache plugin running, like WP Super Cache, you will see the old image which is saved in the cache. Go to the cache settings in your blog dashboard and turn off the cache. Then load your blog and you should see the new image. (Mine took a couple of refreshes of the screen to load so be patient.)
To change the footer and the post dividers I went through the same steps and changed the “footer.png” file and the “post.png” file. Your files might have different names. If you’re not sure which one is the one you want to change, download it and look at it!
Some of the links in this post are affiliate links which just helps pay for the cup of coffee I’m drinking as I write this post. More info on my Disclosure page.
Disclaimer: I’m no expert. I have taught myself this stuff. I take no responsibility if something goes wrong when you try to change your blog files. That said, if I can do it, you can too, so take your time and have a go. You can always change it back if you don’t like it!





What a wonderful post. You sure make it all sound so easy that’s for sure. I am thinking of a bit of a makeover soon so this was all rather timely for me.
Fairy wishes and butterfly kisses #teamIBOT
Hope it helps you, Rhianna!
Another great makeover post 🙂 I’m on Blogger but I’ve often heard WP is so much more flexible and user-oriented with the diff plugins. Great reference for when I make a switch over in the future
Part of the reason that WordPress is thought to be more flexible is because you can access the files like this. But there is a lot you can do on Blogger now too.
This is very informative post Tonya. I already know ho to do it but this post will be great for newbies. Took me ages to get this information in google!
Thanks Penny. I hope I have made it easier for a newbie – like you, I have had to search for info to learn.
What a great tutorial. thanks for sharing. I like to just stick to the plain one colour of my blog and just use what ever blogger has. I try not to put to much on my page. But I will keep this in mind for the next time I’m changing my blog.
Hi Salz. I have stuck with a plain white background for ages. But I’m liking the colour at the moment. I love the pinky purple that you have!
YAY!! I haven’t got round to finishing off my blog yet and this will help me so much!!
Have a sneaky peak – new picture/logo/colours
Love it! The colours are great with your header pictures.
Oh, and I hear the rant too. There were a couple there I really could rant about too! I’ll be your friend who “gets” blogging, if you like… and my family told me to put my phone away at dinner the other night when I tried to snap a picture of the cake! Oops!
I always get a bit nervy fiddling with the stuff “behind the scenes” of my blog because after one upgrade… I nearly lost the lot! Your idea to back up beforehand is a good one! Your blog looks very clean and professional. I need to jazz mine up a bit so might give this a go!
Thanks Misha. I’m always a little nervous too. I try to do it when the kids aren’t around so I can really concentrate on what I’m doing.
Thanks for this post, I have been considering a switch to wordpress and I think you have pushed me a little closer!
Yep, this is where it starts getting all over my head, and I call Michelle from LHH to do it instead!
Amybe one day I’ll be brace enough to play myself….
I leave my playing around to the experts – hats off to anyone who does it themselves!
THANK YOU!!!!! I’ve been trying to figure this out for months! Your directions were concise and clear. Worked the first time. Just took me 30 seconds!
Just signed up for your newsletter too 🙂
Laura Lynn
Hi Laura, So happy it was helpful for you! Your bears are gorgeous and your site has so much info for a beginner – love it!
Just a little tip: be careful were you place your Google Ads within your pages. On your Start Here page, the ad is in the middle of your content making it really distracting as a reader.
Tonya thank you for your kind words about my bears, and also very much for your input on where my adwords ads were placed. I’ve taken care of that now!