The Crafty Mummy

Crafts. Sewing. Quilting. Crochet. Tutorials.

  • Start Here
  • Welcome
    • Subscribe
    • About Me
      • Copyright
      • Disclosure
      • Privacy Policies
    • Advertise
    • Sharing
      • Recommendations
      • Shopping & Coupons
      • Books
  • Explore
    • Crafts
      • Beading
      • Kids
      • Paint
      • Storage
      • Christmas Crafts
    • Sewing
    • Quilting
    • Stitching
    • Crochet
      • Yarn
    • Life
      • Food
      • Organisation
    • Blogging
      • How To
      • Social Media
      • WordPress Plugins
      • Photography
  • Tutorials
    • Tips
  • Shop on Etsy
  • Shop on Redbubble

How to Add a Pen Loop to a Notebook

by Tonya Grant |Filed Under: Crafts, Tutorials Tagged With: Notebook, Washi tape Get a Weekly Update of all Articles

Learn how to add a pen loop to a notebook – and make it your own style with some washi tape decoration.

Learn how to add a pen loop to a notebook - and make it your own style with some washi tape decoration.

My kids are really into notebooks lately. They love them!

I suspect they may have inherited this from me. I always seem to have a notebook on hand. In fact, I’ve just counted 5 currently on my desk and another 5 in the trolley under my standing desk.

One day I’ll show you the gorgeous planner that Little Miss got recently from KikkiK but today I’m showing off the notebook of Mr Happy. He’s 9 (shh, I may have had to double-check that he’s 9, not still 8!) and he loves to draw. The other day he came to me and asked for a journal notebook to write in – something new but good in my book.

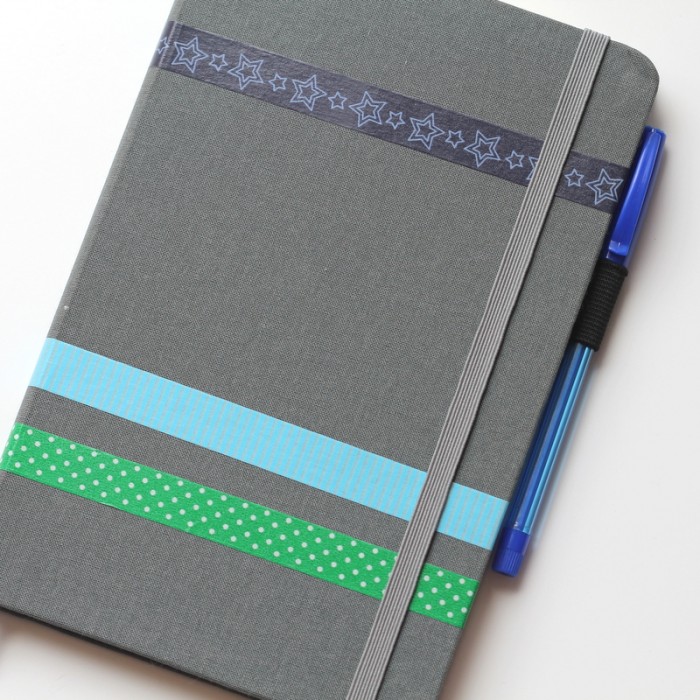
We searched a little and found a “spare” stashed on my desk that was not too girly – A5 size notebook covered in plain grey linen with an elastic to keep it closed. Perfect!

However, he wanted a loop for the pen. That way he could keep his favourite pen right there ready to write when he felt the urge. He has been writing down 3 good things each day plus a few notes on stuff that has happened, and I totally want to encourage that habit.

pen loop notebook

HOW TO:

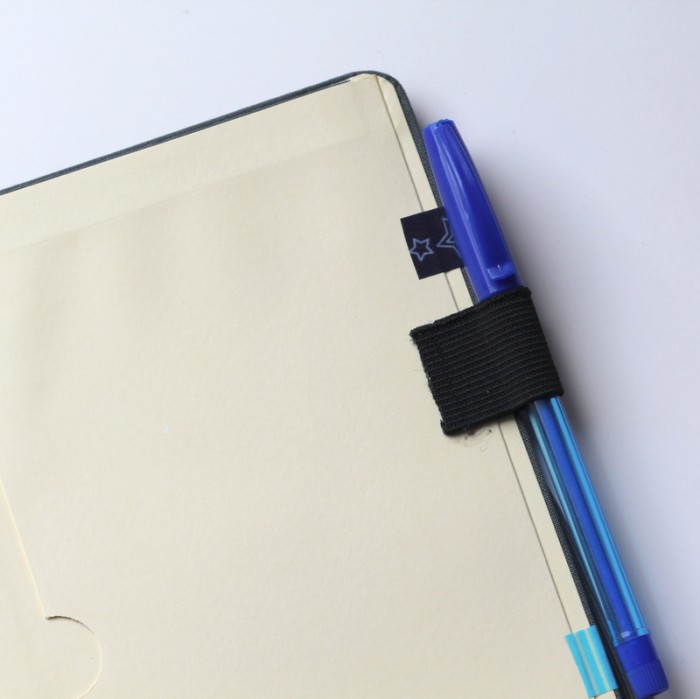
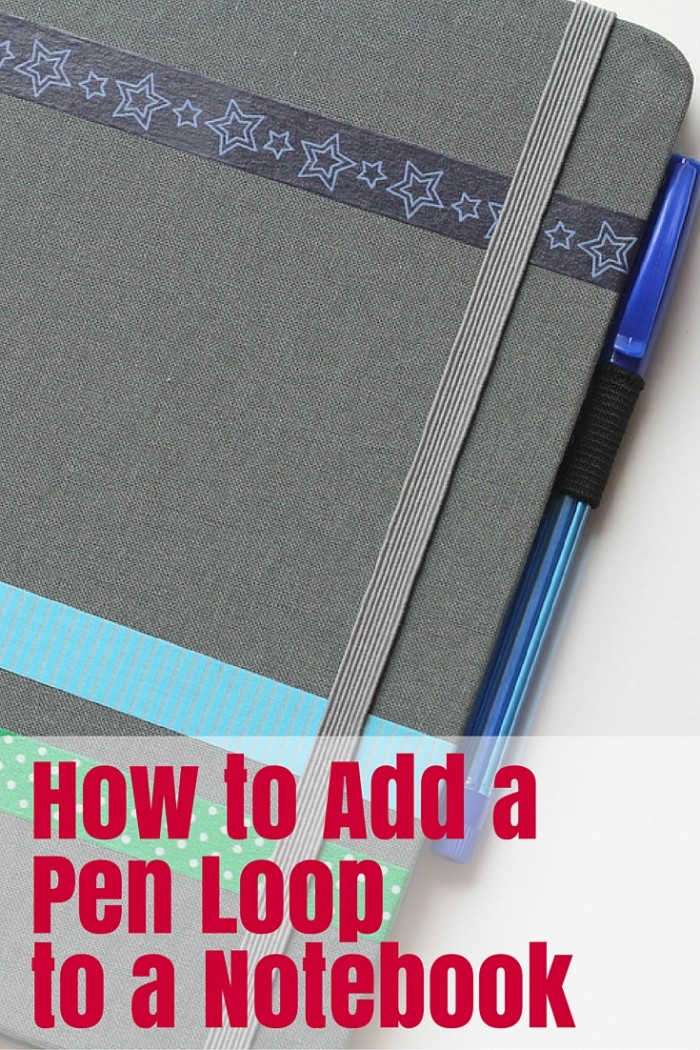
The pen loop is simply a small piece of black elastic. It is 2.5cm (1″) wide (just because that’s what I had in my sewing stash) and about 5cm long.

Fold the elastic in half to make a loop and stitch the ends together with a few running stitches. If you’re not a stitcher, you could glue or staple the elastic instead. Then use strong craft glue to attach it to the inside back cover of the book. I used Helmar 450 Quick Dry Adhesive from Spotlight or Amazon which dries clear and quickly.

Mr Happy raided my washi tape stash for some tape he liked too and added a couple of strips.

TIP: Tuck the edges of the washi tape inside the cover so stop them lifting.

Now he is all set to write a few notes each day in his special notebook.

Learn how to add a pen loop to a notebook - and make it your own style with some washi tape decoration.

More Notebooks

matchbook notebook tutorial  notebooks with washi tape

Summary
How to Add a Pen Loop to a Notebook
Article Title
How to Add a Pen Loop to a Notebook
Description
Learn how to add a pen loop to a notebook - and make it your own style with some washi tape decoration.
Author
Tonya Grant
Published on
TheCraftyMummy.com

Filed Under: Crafts, Tutorials Tagged With: Notebook, Washi tape

« Rainbow Susannah Block
How to Cut Triangles with a Square Ruler »
Disclosure: There are affiliate links in this post.  This just means that if you click through and choose to purchase something I may get a small commission - at no extra cost to you, of course.  This helps me keep the content here at The Crafty Mummy free for everyone.

I love to chat so please leave me a comment or ask a question.

Don't stress if your comment doesn't appear immediately - sometimes I have to moderate comments thanks to spam visitors, but the comments from real readers will always get published. Scroll down to add your thoughts or ask a question.

Hi! I’m the CraftyMummy

Tonya is the voice behind The Crafty Mummy. She dabbles in lots of different crafts – patchwork, quilting, cross-stitch, scrapbooking, knitting, crochet and sewing. This is the record of projects she has done, and the projects she dreams of getting to! Read More…

Search

  • Email
  • Facebook
  • Instagram
  • Pinterest
  • Twitter
  • YouTube
Shop my Affiliate Favourites

Fat Quarter Shop for Fabric and More

Grab the Sew Sampler Box Here

AccuQuilt for Cutting Machines and Dies

QuiltyBox for Monthly Treats in the Mail

CreativeBug for Craft Classes

Pretty Darn Cute for Blog Designs like mine

Creative Market for Fonts, Images, Themes and More

OzGameShop for All the Games

Adrift for Fashion you’ll Love

Kindle Unlimited Membership Plans

Kindle Book List

Click to shop my kindle book list
Shop my Amazon Influencer Shop
Join the CrochetU and learn to crochet
New to TheCraftyMummy.com? Click here to see more
Blog Tools I use for TheCraftyMummy.com

Grammarly

Aweber for email newsletter

CoSchedule to stay organised and share

Milotree for social media

Genesis for blog framework

FoodiePro is my theme

Hosting with WPEngine

Powered by

Recent Articles

Disclosure: There are affiliate links on this site. This means that I may get a commission if you choose to purchase after browsing via these links - at absolutely no extra cost to you, of course. I only recommend products which I use and love, or that I think will be quality products that will be useful to my readers. It is the affiliate links in this site that help me keep my tutorials free of charge. Thank you!

Looking for something? Search here:

Copyright 2015 The Crafty Mummy · Built using Genesis Framework & Foodie Pro Theme